Programme d’exemple 16: MM_S16_Viz_GetDirection
Présentation du programme
Description |
Après que le robot a obtenu la trajectoire planifiée et terminé la prise, le robot adopte différentes stratégies de dépose en fonction de l’orientation du groupe d’objets. |
Chemin du fichier |
Vous pouvez accéder au répertoire d’installation de Mech-Vision et Mech-Viz et trouver le fichier via le chemin |
Projet |
Projet Mech-Vision et projet Mech-Viz (l’outil est un préhenseur à vide pour la dépalettisation) |
Prérequis |
|
| Ce programme d’exemple est fourni uniquement à titre de référence. Avant d’utiliser le programme, veuillez le modifier en fonction du scénario réel. |
Description du programme
Cette partie décrit le programme d’exemple MM_S16_Viz_GetDirection.
| Comparé au programme d’exemple MM_S15_Viz_GetDoList, ce programme d’exemple ne contient que la modification suivante (le code de cette modification est en gras). Par conséquent, seule la modification est décrite dans la section suivante. Pour des informations sur les parties de MM_S16_Viz_GetDirection qui sont cohérentes avec celles de MM_S15_Viz_GetDoList, voir Programme d’exemple 15: MM_S15_Viz_GetDoList. |
DEF MM_S16_Viz_GetDirection ( )
;---------------------------------------------------
; FUNCTION: trigger Mech-Viz project, then get
; planned path and get box direction using command
; 210
; Mech-Mind, 2023-12-25
;---------------------------------------------------
;set current tool no. to 1
BAS(#TOOL,1)
;set current base no. to 0
BAS(#BASE,0)
;move to robot home position
PTP HOME Vel=100 % DEFAULT
;initialize communication parameters (initialization is required only once)
MM_Init_Socket("XML_Kuka_MMIND",873,871,60)
;move to image-capturing position
LIN camera_capture Vel=1 m/s CPDAT1 Tool[1] Base[0]
;trigger Mech-Viz project
MM_Start_Viz(2,init_jps)
;get planned path
MM_Get_PlanData(0,3,pos_num,vis_pos_num,status)
;check whether planned path has been got from Mech-Viz successfully
IF status<> 2100 THEN
;add error handling logic here according to different error codes
;e.g.: status=2038 means no point cloud in ROI
halt
ENDIF
;get gripper control signal list
MM_Get_Dolist(0,0)
;save waypoints of the planned path to local variables one by one
FOR count=1 TO pos_num
MM_Get_PlanJps(count,3,pick_point[count],move_type[count],tool_num[count],speed[count])
ENDFOR
Xpick_point1=pick_point[1]
Xpick_point2=pick_point[2]
Xpick_point3=pick_point[3]
;follow the planned path to pick
;move to approach waypoint of picking
PTP pick_point1 Vel=50 % PDAT1 Tool[1] Base[0]
;move to picking waypoint
PTP pick_point2 Vel=10 % PDAT2 Tool[1] Base[0]
;add object grasping logic here
halt
;set gripper control signal
MM_Set_Dolist(0)
;move to departure waypoint of picking
PTP pick_point3 Vel=50 % PDAT3 Tool[1] Base[0]
;get box direction status from planned results
box_direction=MM_Plan_Results[17]
IF box_direction==0 THEN
;move to intermediate waypoint of placing
PTP drop_waypoint_1 CONT Vel=100 % PDAT4 Tool[1] Base[0]
;move to approach waypoint of placing
LIN drop_app_1 Vel=1 m/s CPDAT2 Tool[1] Base[0]
;move to placing waypoint
LIN drop_1 Vel=0.3 m/s CPDAT3 Tool[1] Base[0]
;add object releasing logic here, such as "$OUT[1]=FALSE"
halt
;move to departure waypoint of placing
LIN drop_app_1 Vel=1 m/s CPDAT2 Tool[1] Base[0]
ELSE
;move to intermediate waypoint of placing
PTP drop_waypoint_2 CONT Vel=100 % PDAT5 Tool[1] Base[0]
;move to approach waypoint of placing
LIN drop_app_2 Vel=1 m/s CPDAT4 Tool[1] Base[0]
;move to placing waypoint
LIN drop_2 Vel=0.3 m/s CPDAT5 Tool[1] Base[0]
;add object releasing logic here, such as "$OUT[1]=FALSE"
halt
;move to departure waypoint of placing
LIN drop_app_2 Vel=1 m/s CPDAT4 Tool[1] Base[0]
ENDIF
;move back to robot home position
PTP HOME Vel=100 % DEFAULT
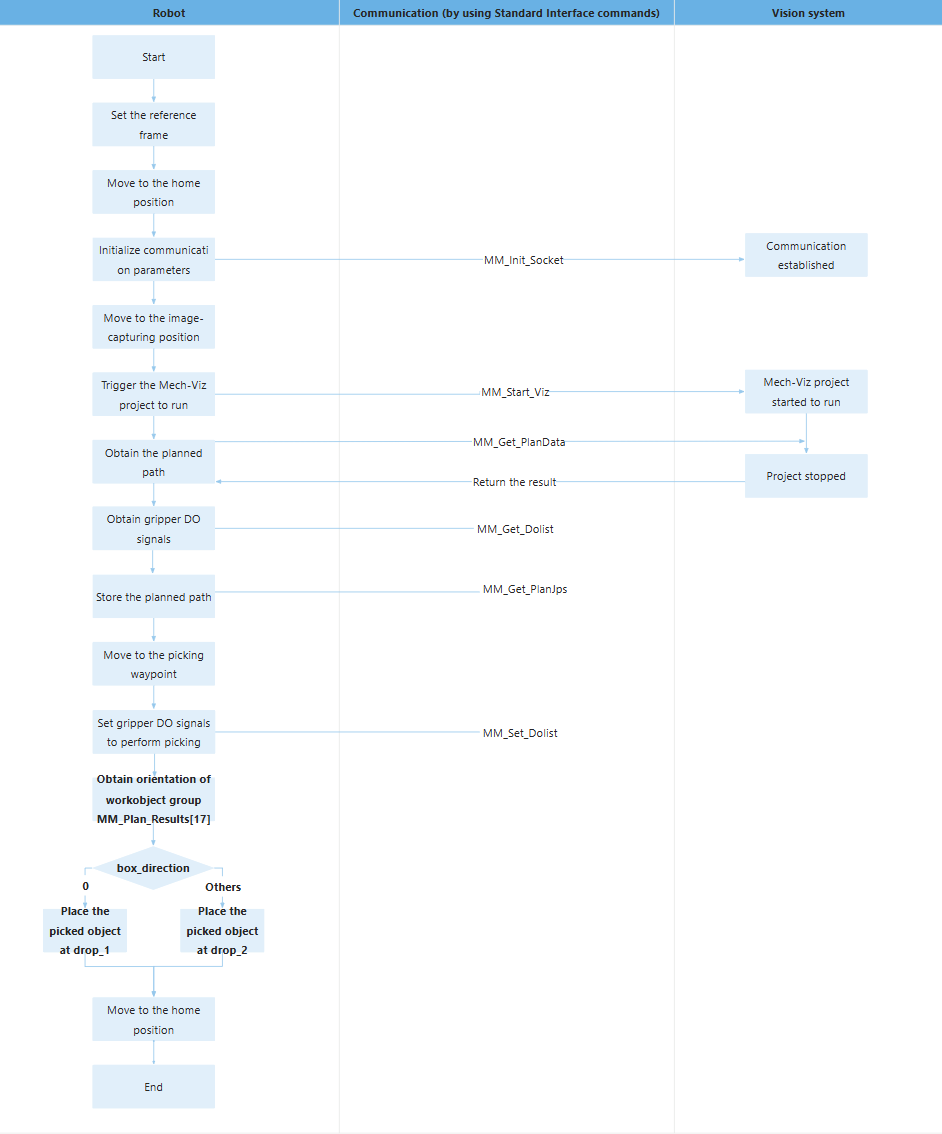
ENDLe flux de travail correspondant au code du programme d’exemple ci-dessus est illustré dans la figure ci-dessous.
Le tableau ci-dessous décrit le code en gras. Vous pouvez cliquer sur l’hyperlien du nom de la commande pour en afficher la description détaillée.
| Fonctionnalité | Code et description | ||
|---|---|---|---|
Obtenir l’orientation du groupe d’objets |
Le robot obtient les données Vision Move des points de passage en exécutant la commande MM_Get_PlanData, puis enregistre dans le tableau global MM_Plan_Results les données Vision Move des points de passage qui sont stockées dans la mémoire du robot en exécutant la commande MM_Get_PlanJps. Dans le tableau global MM_Plan_Results, MM_Plan_Results[17] spécifie la relation d’orientation entre le groupe d’objets et le côté long du préhenseur à vide. 0 indique parallèle, tandis que 1 indique perpendiculaire. Le code ci-dessus indique que si MM_Plan_Results[17] est affecté à la variable box_direction, la variable box_direction indiquera l’orientation du groupe d’objets. |
||
Adopter une stratégie de dépose basée sur l’orientation du groupe d’objets |
Le code ci-dessus indique que si le groupe d’objets est parallèle au côté long du préhenseur à vide (c’est-à-dire si box_direction est réglé sur 0), le groupe d’objets sera déposé à drop_1 ; sinon, le groupe d’objets sera déposé à drop_2. |