Configure OPC UA Server Communication
This section describes how to configure the OPC UA Server communication. Before the operation, please confirm that you have already selected the robot and entered the communication configuration interface.
-
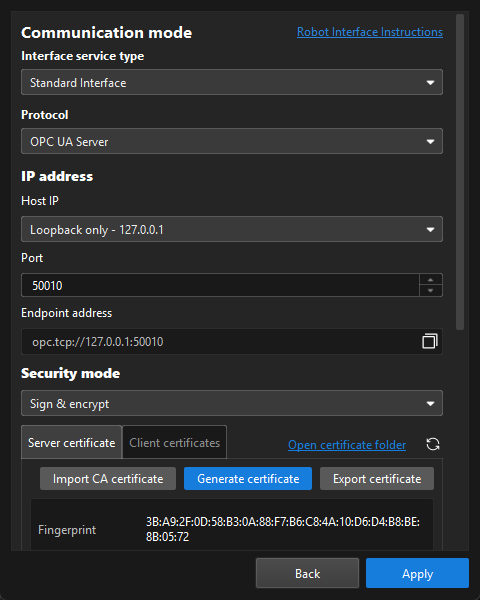
In the Communication mode section, set the "Interface service type" parameter to Standard Interface, and set the "Protocol" parameter to OPC UA Server.
-
In the IP address section, perform the following settings.
-
Host IP: Select the host IP address from the dropdown list.
-
The default option, Loopback only - 127.0.0.1, only supports local connections. To allow connections from external devices such as robots and PLCs, select the actual IP address of the network adapter, or select Listen on all adapters - 0.0.0.0.
-
After the host IP address changes, previously generated certificates become invalid, and the interface displays a certificate error. In this case, you need to regenerate the certificate or manually import a CA certificate.
-
-
Port: The default port number is 50010.
-
Endpoint address: The system automatically generates the endpoint address based on the host IP address and port, in the format of opc.tcp://<IP>:<port>. Click the copy button on the right of the endpoint address to copy the endpoint address to the clipboard.
-
-
In the Security mode section, select a security mode, and configure certificates as needed.
-
Three security modes are supported: None (data transmission in plaintext), Sign, and Sign & encrypt. When Sign or Sign & encrypt is selected, certificates must be configured.
-
Click the Server certificate tab to configure the server certificate:
-
Click Import CA certificate to import an existing CA certificate and key files (the .der and .pem formats are supported).
-
Click Generate certificate to automatically generate a self-signed certificate.
-
Click Export certificate to export the current server certificate.
The certificate information area displays the Fingerprint, Expires on, and Issuer of the certificate. The certificate status is marked next to the expiry date: Valid, Expiring soon, or Expired. After the certificate expires, please regenerate or import a certificate.
-
-
Click the Client certificates tab to manage client certificates:
-
After the Automatically receive client certificates option is enabled, certificates sent by clients will enter the pending certificate list. Pending certificates support the Trust, Details, Delete, and Reject operations.
-
Only after Trust is clicked can the client establish a connection. Trusted certificates support the Details and Distrust operations.
-
-
-
In the User authentication section, select the authentication method:
-
Anonymous: The client can connect without entering a username and password.
-
Username and password: Set the Username and Password. The client must enter the matching username and password when connecting.
-
-
(Optional) In the Advanced Settings section, configure parameters as needed.
-
Max num of poses to send per time: When you use the run Mech-Vision project command, you can set the maximum number of poses that can be sent by the vision system each time. The maximum number is 30.
-
Timeout for getting Mech-Viz data (s): If you use the run Mech-Viz project command and Mech-Viz does not return the result during the specified timeout period, a timeout error code will be returned.
-
Timeout for getting Mech-Vision data (s): If you use the run Mech-Vision project command and Mech-Vision does not return the result during the specified timeout period, a timeout error code will be returned.
-
Return "1102:Successfully triggered" after the capture: In eye in hand scenarios, if you select this option, the vision system will return "1102:Successfully triggered" after the camera finishes image-capturing. This way, the robot can move immediately without waiting for the Mech-Vision project to finish running, shortening the cycle time. If you do not select this option, the robot have to wait for the Mech-Vision project to stop running before moving.
After you select this option, Timeout waiting for capture completion (s) will be displayed. If the camera needs a relatively long period of time to capture the image, specify a larger timeout period. -
Property Configuration: This button does not take effect on the selected protocol. Please ignore this button.
-
Reset: Reset the preceding configuration items (except Property Configuration) to default values.
-
-
(Optional) Select Auto enable interface service when opening the solution. When the solution is opened, you do not need to start the interface service manually.
-
Click the Apply button.
After the configuration is completed, configure the OPC UA client on the robot side. When connecting, the client must use the Endpoint address, and select the same Security mode and User authentication as the server; if the security mode is Sign or Sign & encrypt, the client certificate must also be trusted.
For the description of OPC UA nodes and commands, see OPC UA.