Check DI
| From version 1.8.0, the “Check DI List” Step is merged with the “Check DI” Step to form the new “Check DI” Step. |
| This Step can only be used in the Master-Control communication mode. |
Function
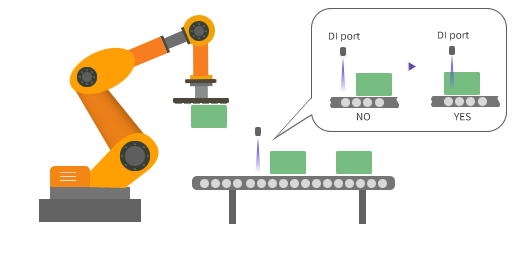
In robotics industry, DI usually stands for digital input. DIs are usually used to check and monitor the status of external devices or sensors.
This Step can be used to read the DI of a specified port and execute different branches (subworkflows) based on the DI.
Application Scenario
-
Detect whether the box is dropped during depalletizing.
-
Detect whether the vacuum gripper is attached to the box firmly during depalletizing.
-
Detect specific DIs.
Parameter Description
Behavior during Simulation
This parameter is used to select the Step behavior during the project simulation.
-
Check external input
When the simulation project executes to this Step, the Step checks the external input and selects the corresponding exit port based on the DI.
-
Execute along specific exit port
Designate a specific exit port, and the simulation project will execute the branch after that exit port.
-
Select exit port manually
When the simulation project executes to this Step, a window will pop up for you to choose an exit port manually. Once selected, the project execution will continue.
An example is showed in the following figure.
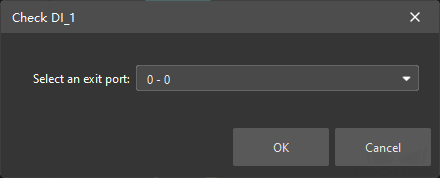
Select an exit port in the dropdown menu of “Select exit port manually,” and then click OK. The project will continue to run the Steps.
Click Cancel or X to stop the simulation.
Exit Port for Pre-Planning
| The Planning refers to the process when the software attempts to find a collision-free path that the robot can follow to reach the target position. |
For Steps that may interrupt the planning, the software cannot predict the actual exit port of these Steps during planning. In this case, an exit port can be specified for pre-planning so that the software can skip this Step and plan in a holistic approach.
The “Check DI” Step requires a real DI to be detected first until the branch can be executed, which will interrupt the planning. To run the whole workflow continuously and make the robot moves more smoothly, you can specify the exit port for pre-planning and therefore the branch connected with the port can be executed.
-
When this parameter is set to −1 (default), this Step will be executed to check the current DI and interrupt the overall planning.
-
When it is set to 0 or any integer larger than 0, the workflow will take the corresponding exit port to continue execution, and an overall planning can be achieved together with the Steps before and after the current Step. As a result, the overall motion of the robot will be much smoother.
Besides, if the actual exit port does not match the Pre Plan Out Port, the planning will be performed again based on the actual exit port.
Operation Mode
Source
The source of the DI can be set to either “Vision Move” or “Custom”.
-
Vision Move
This option applies to box depalletizing scenarios only. According to the area covered by boxes on the bottom surface of the vacuum gripper, the software will automatically compute the DI port numbers that should be checked.
-
Custom
Set the DI ports and values to be checked manually. Please follow these steps to configure.
-
Click + to add ports based on the number of ports to be checked.
-
Set the port numbers and values to be checked, and you can comment on the function of the current port.

-
The port numbers cannot be duplicated. The configuration cannot be completed with duplicated port numbers.
-
To clarify the function of each port, it is recommended to add a comment for each port.
-
Select the line of a specific port and click - to delete the port configuration.
-
-
Logical Condition
-
Any one satisfied: Successful if any one signal satisfied the condition, and the project will proceed along the corresponding exit port.
-
All satisfied: Successful if all signals satisfied the condition, while failed if any one signal did not satisfy the condition.
Check Mode
-
Check once
Check once immediately when the Step is triggered.
-
Check continuously
Check continuously before a timeout occurs. If the signals satisfy the “Logical Condition,” the project will proceed along the corresponding exit port.
You can set a “Timeout.” If the specified signal is not detected within the timeout, the branch connected with the “Timeout” exit port will be executed. If the “Set Timeout” parameter is not selected, the check will continue until the signal(s) satisfies the logical condition.
Examples
-
When the Source is set to “Vision Move,” please go to Tools in the resource tree, click “Configure depalletizing vacuum gripper” in the Tool Configuration window to configure the DI port and values.
Parameter Settings
Description
Any one satisfied + Check once
If any one signal satisfies the condition, the workflow will continue through the “Any one satisfied” exit port. If none of the signals satisfy the condition, the workflow will continue through the “None satisfied” exit port.
Any one satisfied + Check continuously
Check continuously before a timeout occurs. If any one signal satisfies the condition, the workflow will continue through the “Any one satisfied” exit port. If a timeout occurs, the workflow will continue through the “Timeout” exit port.
All satisfied + Check once
Only when all signals satisfy the condition, the workflow will continue through the “All satisfied” exit port, or else the workflow will continue through the “One or more not satisfied” exit port.
All satisfied + Check continuously
Check continuously before a timeout occurs. Only when all signals satisfy the condition, the workflow will continue through the “All satisfied” exit port. If a timeout occurs, the workflow will continue through the “Timeout” exit port.
-
When the source is set to “Custom,” an example of adding three ports: DI1, DI2, and DI3 is used for the illustration.
Parameter Settings
Description
Any one satisfied + Check once
If any one signal satisfies the condition, the workflow will continue through the corresponding exit port. If none of the signals satisfy the condition, the workflow will continue through the “None satisfied” exit port.
Any one satisfied + Check continuously
Check continuously before a timeout occurs. If any one signal satisfies the condition, the workflow will continue through the corresponding exit port. If a timeout occurs, the workflow will continue through the “Timeout” exit port.
All satisfied + Check once
Only when all signals satisfy the condition, the workflow will continue through the “All satisfied” exit port, or else the workflow will continue through the “One or more not satisfied” exit port.
All satisfied + Check continuously
Check continuously before a timeout occurs. Only when all signals satisfy the condition, the workflow will continue through the “All satisfied” exit port. If a timeout occurs, the workflow will continue through the “Timeout” exit port.