Classify
Function Description
Auto-classify before the Vision Move Step or select a branch based on the information of the held target object during the execution of the Step.
Usage Scenario
This Step is used for path planning based on target object information.
|
The “target object information” includes the target object name, pick point name, and pick point label. |
Parameter Description
This Step provides two usage modes: Auto-classify before “Vision Move” and Select branch by held target object.
Click to view the detailed description of other parameters when Auto-classify before “Vision Move” is selected
When the “Classify” Step is before the Vision Move Step, please select the option. When this option is selected, Steps that will interrupt the path planning are not allowed between the “Classify” Step and the Vision Move Step.
Select Step Name
Select the Vision Move Step used in conjunction.
Select Branch By
When Names of target object and pick point is selected, the Step will classify based on the names of target objects and pick points set in the target object editor.
When Pick point label is selected, the Step will classify based on the deep learning label or numeric label set in the target object editor.
| Classify by “Names of target object and pick point” | Classify by “Pick point label” |
|---|---|
|
|
Data Sorting
This parameter is only available when the Auto-classify before “Vision Move” Step is selected. It defines the order of the classified result used for path planning.
Pick point order |
The “Classify” Step will, based on the pick point order presented in the vision results, sequentially apply them for subsequent planning. If the pick point order in the vision result is 1-C, 2-A, and 3-B, then the planning order is 1-C, 2-A, and 3-B. |
Exit port order |
The “Classify” Step will use pick points according to the exit port order of the current Step (left to right). If the pick point order in the vision result is 1-C, 2-C, 3-A, 4-B, 5-A, and 6-B, and the pick point names corresponding to the exit ports of the current Step, from left to right, are A, B, and C, then the planning order is 3-A, 5-A, 4-B, 6-B, 1-C, and 2-C. |
| In the above example, letters represent the names of target object and pick point or pick point label, and numbers represent their order in the vision results. |
Labels
-
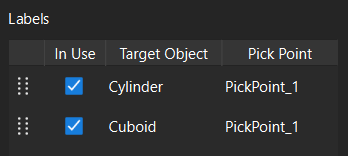
When Select Branch By is set to Names of target object and pick point, the target objects and their pick points will be automatically displayed in this area. If you unselect In Usefor some pick point and its corresponding target object, the exit ports of the “Classify” Step will decrease accordingly.
-
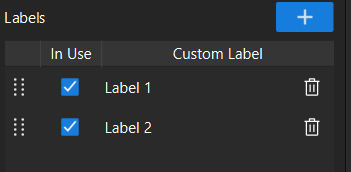
When Select Branch By is set to Pick point label, you can add custom labels. The labels added here should match the deep learning label or numeric label set in the target object editor. If you unselect In Use for some pick point label, the exit ports of the “Classify” Step will decrease accordingly.
Add labels Click the
 button to add labels.
Customize label names Double-click the label name under Pick point label to modify it.
Delete labels Click
 on the right side of the entry to delete the selected label.
Adjust label order Drag
 on the left side of each entry to adjust the order, and the exit port order will also change accordingly.
| If pick points are planned in Exit port order, adjusting the label order will also change the planning order. |
Click to view the detailed description of other parameters when Select branch by held target object is selected
When this option is selected, the software will select the branch to proceed based on the information of the held target object while the “Classify” Step is executing.
Select Branch By
When Names of target object and pick point is selected, the Step will classify based on the names of target objects and pick points set in the target object editor.
When Pick point label is selected, the Step will classify based on the deep learning label or numeric label set in the target object editor.
| Classify by “Names of target object and pick point” | Classify by “Pick point label” |
|---|---|
|
|
Labels
-
When Select Branch By is set to Names of target object and pick point, the target objects and their pick points will be automatically displayed in this area. If you unselect In Usefor some pick point and its corresponding target object, the exit ports of the “Classify” Step will decrease accordingly.
-
When Select Branch By is set to Pick point label, you can add custom labels. The labels added here should match the deep learning label or numeric label set in the target object editor. If you unselect In Use for some pick point label, the exit ports of the “Classify” Step will decrease accordingly.
Add labels Click the
button to add labels.Customize label names Double-click the label name under Pick point label to modify it.
Delete labels Click
on the right side of the entry to delete the selected label.Adjust label order Drag
on the left side of each entry to adjust the order, and the exit port order will also change accordingly.
Application Example
Change the gripper to pick different target objects
The “Classify” Step is used before the Vision Move Step to change the gripper to pick different target objects.
The general logic of the workflow is: recognize target object > select different branches for operation based on the target object information > pick specified target object, as shown in the figure below.

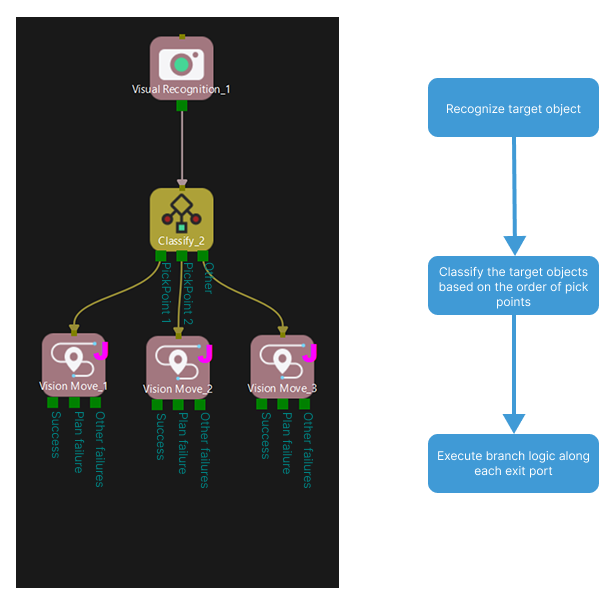
Plan the path in the order of the pick points
The “Classify” Step is used before the Vision Move Step to classify the target objects and plan the path sequentially in the order of the pick points in the vision result.
The general logic of the workflow is: recognize target object > classify the target objects based on the order of pick points > execute branch logic along each exit port.
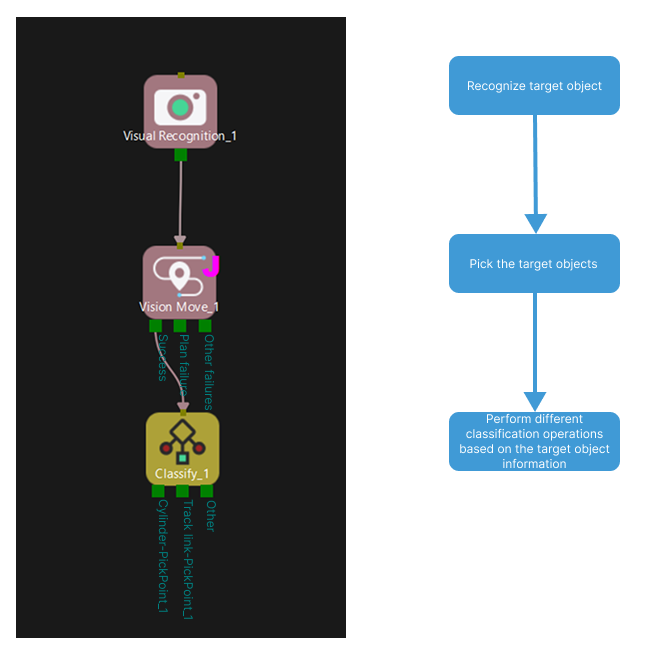
Classify the target object and place them into different bins
The “Classify” Step is used after the Vision Move Step to classify the target object and place them into different bins using the same gripper.
The general logic of the workflow is: recognize target object > pick the target objects > perform different classification operations based on the target object information, as shown in the figure below.