Interface of Workflow
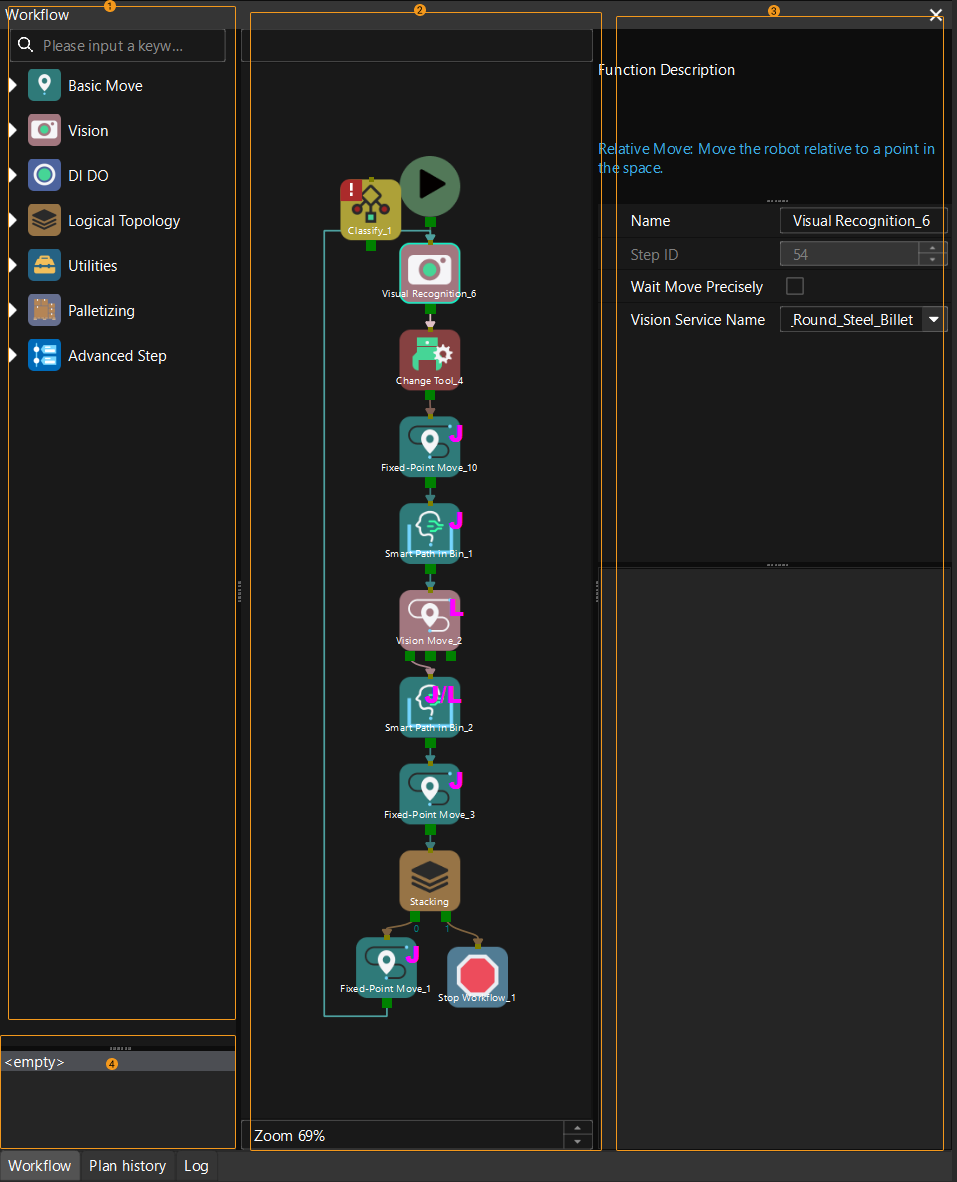
This functional panel consists of ① Step library, ② graphical programming workspace, ③ Step parameter panel, and ④ programming record area, as shown in the figure below.
Please refer to Workflow for detailed instructions on how to build a workflow with Steps.
Step Library
A Step is a graphical programming module used to enable a specific function. Steps are the fundamental modules of robot programming. All Steps are divided into various Step categories according to their functions. For example, “Basic Move” includes Steps related to basic motions of the robot, such as Fixed-Point Move, Relative Move, and Move along Line. You can click the Step category to expand or collapse all Steps.
Steps can be categorized as “move-type Steps” and “non-move Steps.”
-
Move-type Steps: Basic Move, Vision Move, Vision Move (Trajectory), and Palletizing
-
Non-move Steps: Steps that belong to Vision (except Vision Move and Vision Move (Trajectory)), DI DO, Logical Topology, Robot Utilities, and Tools
You can adjust the display settings of the Step Library.
-
Right-click and select Show all in the context menu to expand all Step categories.
-
Right-click and select Collapse in the context menu to collapse all Step categories.
In addition, you can enter a keyword in the search box above the Step Library to search the Step you need.
Graphical Programming Workspace
This area is used for graphical programming. In the process of graphical programming, you can drag all kinds of steps from the step library, each representing a specific function or operation. To define the logic and flow of the program, you need to set the parameters of these steps and then connect the steps.
Right-click on the blank area in the graphical programming workspace, and you can see the following options.
Option |
Description |
Shortcut |
Navigate Up |
Navigate to the previous level of the Procedure |
PgUp |
Navigate Down |
Navigate to the next level of the Procedure (only effective when you right-click on the Procedure) |
PgDown |
Copy |
Copy the selected Step |
Ctrl + C |
Cut |
Cut the selected Step |
Ctrl + X |
Paste |
Paste the copied Step |
Ctrl + V |
Delete |
Delete the selected project |
Delete |
Select All |
Select all Steps in the graphical programming workspace |
Ctrl + A |
Save Screenshot |
Save the screenshot of the workflow to a specified path |
None |
Format |
Automatically format all Steps in the workflow |
Alt + Shift + F |
Pack as Procedure |
Pack multiple Steps as a Procedure |
Ctrl + G |
Unpack Procedure |
Unpack the selected Procedure |
Ctrl + Shift + G |
Import or Export Procedure |
Import the selected Procedure to another Procedure, or export the selected Procedure |
None |
Custom Description |
Add a custom description to the selected Step |
None |
Reset DO |
Reset the DO to 0, which is usually used to turn off the vacuum gripper |
None |
To search for Steps in the workflow, click the blank area in the graphical programming workspace and press Ctrl+F.
In addition, you can press and hold the ctrl key and scroll the mouse to zoom in or out.
Step Mark
Some step marks and their meanings are listed in the following table.
| The marks are located on the corners of the step icons, and maybe change depending on the parameter settings, project running situation, and so on. |
|
This mark represents the step that is currently being planned.
|

|
This mark indicates that there is a warning in the current step; hover the mouse cursor over the warning mark to view the specific warning message. |
|
This mark indicates that there is an error in the current step; hover the mouse cursor over the error mark to view the specific error message. |


|
J mark represents that the current motion type is “Joint motion.” |
|
L mark represents that the current motion type is “Linear motion.” |
|
This mark represents the number of DI port checked in the “Check DI” Step. |
|
This mark represents the “Tag value” set in the “Set Tag for Branch” Step. |
|
This mark represents the port number of exiting the procedure. |
|
This mark represents the current count of the counter. |


Parameter Panel
Select a Step in the workflow and all its parameters will be displayed in the parameter panel. If you check Function Description in the View menu, a brief description of the selected Step will also be displayed at the top of the parameter panel.
Programming Record Area
All your actions, including adding a Step, deleting a Step, adding a connection, and deleting a connection will be recorded in the programming record area.
Click on a record to return to the workflow status at that time.