Use Deep Learning
In this section, you will learn how to apply deep learning to your projects. The overall workflow is shown as follows:

-
Get Prepared: Before model training, certain preparations must be undertaken, including image acquisition and selecting an IPC.
-
Train a Model: Upon the preparations, use the acquired data to train and validate a model in Mech-DLK.
-
Configure and Use the Model: Configure the trained model in Mech-Vision and use the model in relevant Steps to accomplish specific tasks.
-
Model Iteration: After a certain period of usage, you may find that the trained model may not be applicable to certain scenarios. At this point, you should iterate the model.
Get Prepared
Prepare an IPC
The IPC using Mech-DLK for deep learning model training should meet the following requirements.
Authorized software license version |
Pro-Run |
Pro-Train/Standard |
|---|---|---|
Operating system |
Windows 10 or above |
|
CPU |
Intel® Core™ i7-6700 or above |
|
Memory |
8 GB or above |
16 GB or above |
Graphics card |
GeForce GTX 1660 or above |
GeForce RTX 3060 or above |
Graphics card driver |
Version 526.98 or above |
|
|
The Pro-Run version features Mech-DLK SDK deployment, labeling, and Operation Mode. The Pro-Train version supports all features, including module cascading, labeling, training, validation, and Mech-DLK SDK deployment, while the Standard version supports the features of labeling, training, and validation. |
Build an Image Acquisition Project
With a qualified IPC at hand, you can now start to build an image acquisition project. There is no need to build an image acquisition project separately as image acquisition is covered in the vision projects built upon actual application needs.
Make sure the data storage function is enabled so that images can be saved to the specified directory when the built project runs.
-
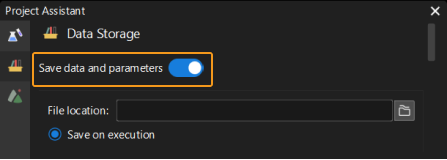
Open the data storage panel. Click Project Assistant tab in the lower-right corner of the interface and then click
 to open the data storage panel.
 -
Enable the data storage feature. Enable the Save data and parameters option.
-
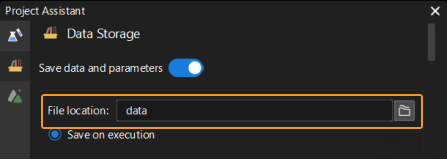
Set the image saving directory. Specify the File location for saving images. In most cases, images are saved in the “data” folder under the project folder.
Acquire Image Data
Once the project is built and deployed, you can start to acquire images.
Ensure Image Quality (Before Acquisition)
Image quality has a huge effect on model stability, and high-quality images often lead to better recognition performance and more accurate predictions. Before image acquisition, adjust the white balance and 2D exposure parameters of the camera to ensure the acquired images are complete.
Adjust White Balance
White balance is the camera setting that helps correct colors, regardless of the lighting conditions, so that white objects actually look white.
If 2D images with distorted color are used for deep learning model training, the distortions will be extracted as the object features for model training, which affects the model’s recognition performance. Therefore, adjusting the white balance of the camera is crucial in acquiring images with color representation. See detailed instructions in Adjust White Balance.
Adjust Exposure Parameters
During model training, all features of the objects in an image will be extracted, such as color and shape. However, if the images are overexposed and underexposed, these features will be lost to some extent, which means model training will be short of some key information. As a result, the model performance is affected. Therefore, adjusting the exposure parameters of the camera is crucial in acquiring high-quality images. See detailed instructions in Adjust White Balance.
Ensure Image Quality (During Acquisition)
A sufficient number of images should be acquired to ensure diverse images are available for model training. Note that for different target objects, the number of images required may differ.
It is common practice to start the project manually for image acquisition to ensure image diversity. The positions and placement of target objects should be adjusted manually for each run of the project.
|
Rigid target objects are entities capable of retaining their shape and size despite experiencing motion and external forces. The relative positions of each point within these objects remain unchanged during such conditions. |
Click here to view the image quantity requirements of rigid target objects under various conditions.
| Single-case target object | Multi-case target object (Single incoming materials) | Multi-case target object (Mixed incoming materials) | Polyhedral target object | |
|---|---|---|---|---|
Image quantity for neat incoming materials |
40–60 |
40–60 |
60–80 |
80–100 |
Image quantity for scattered incoming materials |
60–80 |
40–60 images for each type of target object |
100 |
100–120 |
Note that the acquired images of rigid target objects should cover the situations of the target objects in multiple stations and multiple orientations, as well as in different sparsity, different heights, and various lighting conditions.
Click here to view the image quantity requirements of sacks under various conditions.
| Sacks fully filled and neatly stacked | Sacks loosely filled and with many surface wrinkles | |
|---|---|---|
Image quantity |
20 |
30 |
Note that the images should cover the situations when sacks are of different types and layers and in different lighting conditions, and situations that reflect different arrangement, pallet patterns, and incoming conditions of sacks.
Click here to view the image quantity requirements of cartons under various conditions.
| Single-case cartons | Multi-case cartons (Mixed incoming materials) | Scattered cartons | Cartons with tapes, labels, or strapping | |
|---|---|---|---|---|
Image quantity |
30 images from the highest layer until the pallet is empty |
20 images for each type of carton |
50 images in total.
|
50 |
Note that the images should cover the situations when cartons are of different types and layers and in different lighting conditions, and situations that reflect different arrangements, pallet patterns, and incoming conditions of cartons.
Filter Images (After Acquisition)
After image acquisition, low-quality images should be filtered out, and good ones should be retained. Make sure the retained images can still reflect diversity.
Click here to view the image filtering requirements of rigid target objects, sacks, and cartons.
| Images that should be filtered out | Images that should be retained | |
|---|---|---|
Rigid target objects |
|
|
Sacks and cartons |
|
|
Train a Model
Upon the above preparations, you can now use these images to train a model in Mech-DLK. The general workflow of model training is as follows.

-
Create a New Project: Create a new project for model training.
-
Select an Algorithm: Select the desired deep learning algorithm module.
-
Import Images: Import the acquired images for model training.
-
Label Images: Label the image features to provide the information required by model training.
-
Train a Model: Train a deep learning model after labeling.
-
Validate the Model: After the training is completed, validate the model and check the results.
-
Export the Model: If the model effects can meet your needs, export it to a specified location in the form of a model package.
For detailed instructions, see Use the Instance Segmentation Module.
Configure and Use the Model
The exported model package needs to be configured in Mech-Vision before it is used in relevant Steps for inference. For detailed instructions, see the usage section of Deep Learning Model Package Management Tool.
Model Iteration
After a certain period of usage, you may find that the trained model may not be applicable to certain scenarios. At this point, you should iterate the model. It is common practice to re-train the model with more data, but such an effort could reduce the overall recognition accuracy and might take a long time. Hence, it is recommended to use the Model Finetuning function for model iteration so as to maintain accuracy and save time. For more details, see Deep Learning Model Iteration.
Now, you can watch the video below to learn how to train an instance segmentation model and apply the model.