Calibration Sphere User Guide (ETH)
This section provides usage instructions for the calibration spheres used in the ETH vision system to correct the accuracy drift.
Package Contents
The packing list for the calibration spheres is as follows.
|
| No. | Accessories | Illustration |
|---|---|---|
1 |
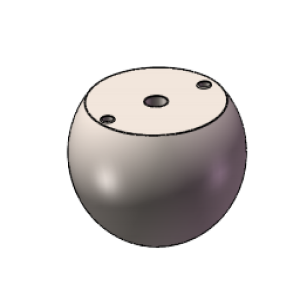
Calibration sphere with a diameter of 60 mm × 1 |
|
2 |
Soft nozzle air blower × 1 |
|
3 |
|
|
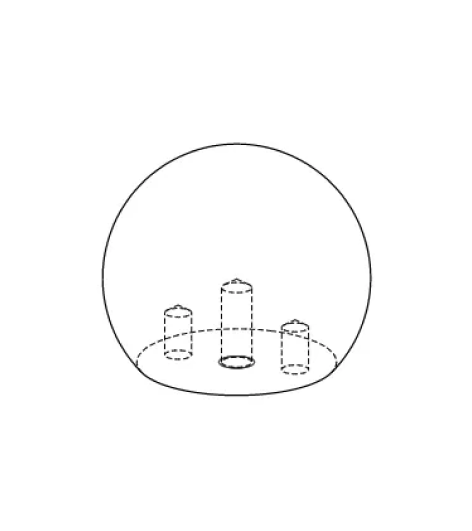

The table below lists the detailed specifications of the calibration sphere.
| Specifications | Illustration |
|---|---|
Calibration sphere ×3
|
|
If the bolts and dowel pins in the package are not the appropriate length, you will need to provide your own. The recommended specifications for the bolts and dowel pins are shown in the table below.
| No. | Specifications | Illustration | Note |
|---|---|---|---|
1 |
Class 12.9 M8 bolt kit × 1
|
|
Used in conjunction with the threaded hole at the center of the calibration sphere. |
2 |
Dowel pins with a diameter of 6 mm × 2
|
|
Used in conjunction with the pin holes on both sides of the calibration sphere. |


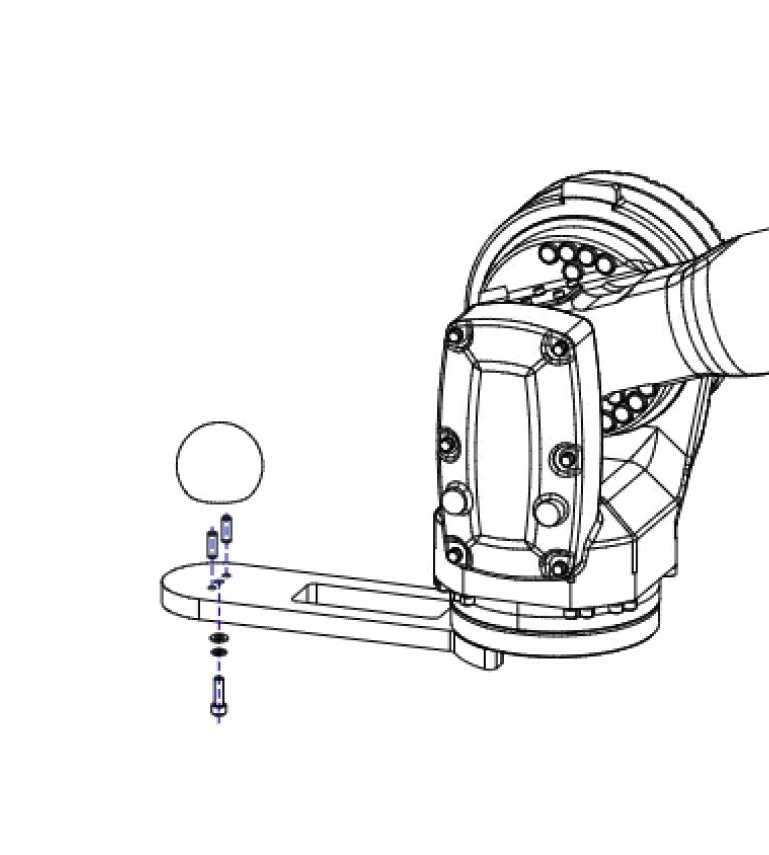
Mounting Diagram
As shown in the figure below, use the bolt and dowel pins to mount the calibration sphere at the end of the robot (such as a sturdy gripper or flange connector).
Installation Notes for Calibration Sphere
Please consider the following requirements before and after mounting the calibration sphere.
-
Before mounting
-
Check if there is any airborne debris (such as dust or welding spatter) in the production environment. If so, a protective cover should be added to the calibration sphere.
-
When handling the calibration sphere, always wear dustproof gloves.
-
-
During mounting
-
It is recommended to apply adhesive to the bolts.
-
Adhesive selection: It is recommended to use the threadlocker.
-
Adhesive application location: At the threaded fastening position.
-
Adhesive quantity control: The adhesive must not overflow the threaded groove, and there should be no adhesive dripping when picking up the bolt after application.
-
-
When using bolts to secure the calibration sphere, it is recommended that the length of the bolt exceeding the nut is approximately 0.3 times the diameter of the bolt.
-
Ensure that the calibration sphere remains unobstructed during image acquisition.
-
Ensure that the robot carrying the calibration sphere can reach as many target object positions as possible.
-
When the robot carries a large or long gripper to the image-capturing position of the calibration sphere, special attention should be paid to avoiding collisions between the gripper and objects around the calibration sphere.
-
-
After mounting
-
After mounting the calibration sphere, use a marker to mark the bolts and contact surfaces for future checks to ensure the calibration sphere has not loosened.
-
Maintenance
To ensure the accuracy and reliability of the collected calibration sphere poses, it is recommended to perform the following checks on the calibration sphere daily.
Looseness Check and Handling
Check for Looseness
-
Examine the surface of the calibration sphere for visible scratches, dents, stains, or other physical damage.
-
Observe the markings on the bolts and contact surfaces to check for the following issues:
-
Are the marks still clearly visible?
-
Have the marks shifted or broken, indicating that the bolts might be loose?
-
|
If any abnormalities are found, they should be recorded and reported to the relevant personnel for handling. |
Handling Looseness
If the calibration sphere is found to be loose or displaced, follow these steps:
-
Find and fix the cause of the looseness, and then fasten the calibration sphere.
-
Run the robot auto-correction program to re-collect calibration sphere poses and generate the drift correction data.
-
Test whether the robot can accurately pick all the target objects.
-
If the robot can accurately pick all the target objects, the process can be completed.
-
If the robot cannot accurately pick all target objects, you will need to redeploy the drift correction feature.
However, before redeployment, you need to determine whether the robot can accurately pick the target objects without the drift correction feature enabled.
To do this, temporarily disable the drift correction feature by unselecting the “Auto-Correct Accuracy Drift in Vision System” parameter of the “Output” or “Path Planning” Step in the vision project. Then, test whether the robot can accurately pick the target objects.
-
If the robot successfully picks all target objects, only the drift correction feature needs to be redeployed.
-
If the robot cannot accurately pick all target objects, ensure that the accuracy of picking target objects is normal (e.g., by adding pick points using the teaching method) before redeploying the drift correction feature.
-
-
Dust Check and Handling
Check the surface of the calibration sphere for dust. If dust is found, clean the calibration sphere as follows.
-
Preparation: Wear dust-resistant gloves to avoid direct skin contact with the calibration sphere’s surface to prevent leaving fingerprints, oil, or other contaminants.
-
Initial cleaning of the calibration sphere: Use a soft nozzle air blower to gently blow off dust, particles, or other suspended impurities from the surface of the calibration sphere.
-
Wipe with a lint-free cloth: Ensure the cloth is free of debris to avoid scratches from friction. Gently wipe the calibration sphere surface with the lint-free cloth.
-
Blow off dust again: Use the soft nozzle air blower again to clean the calibration sphere’s surface, making sure no dust or cloth fibers are left.
-
Inspect the calibration sphere surface: Carefully inspect the surface of the calibration sphere to ensure it is clean, free of obvious dirt, dust, or scratches.
Oil Stain Check and Handling
Check the surface of the calibration sphere for oil stains. If an oil stain is found, clean the calibration sphere as follows.
-
Preparation: Wear dust-resistant gloves to avoid direct skin contact with the calibration sphere’s surface to prevent leaving fingerprints, oil, or other contaminants.
-
Preliminary cleaning of the calibration sphere: Use a non-woven cloth dipped in anhydrous ethanol to gently wipe the surface of the calibration sphere.
-
Wipe the calibration sphere with a non-woven cloth: After wiping, use a clean non-woven cloth to remove any grease stains.
-
Clean the calibration sphere surface with dishwashing liquid: If obvious grease remains on the surface of the calibration sphere after completing the above steps, use dishwashing liquid to clean the surface, then blow dry the surface or let it air dry naturally.
-
Inspect the calibration sphere surface: Carefully inspect the surface of the calibration sphere to ensure it is clean, free of obvious dirt, dust, or scratches.