Compose New Poses by Combining Parts of Input Poses

You are currently viewing the documentation for the latest version (2.2.0). To access a different version, click the "Switch version" button located in the upper-right corner of the page.

■ If you are not sure which version of the product you are currently using, please feel free to contact Mech-Mind Technical Support.

Function

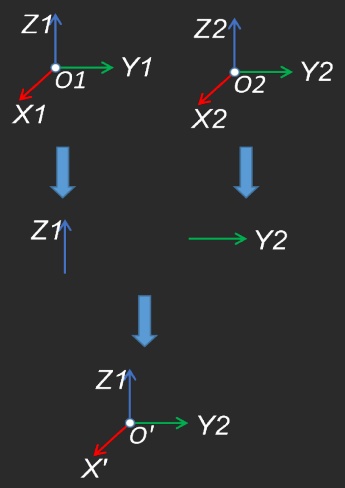
This Step is used to combine the specified parts of input poses into a new pose, supporting flexible axes selection and directional synthesis.
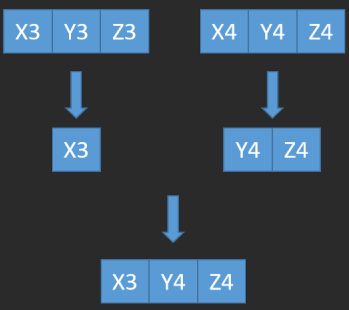
functional description t
functional description r

Usage Scenario

A general pose calculation Step. No fixed usage scenarios.

Input and Output

Input

Input port Data type Description

Z-Axis Orientation

Pose[]

Poses that provide the Z directions.

Y-Axis Orientation

Pose[]

Poses that provide the Y directions.

Base Position

Pose[]

Initialized positions of output poses.

Configurable Position

Pose[]

Pose positions used to override the initialized positions (whether to override depends on the parameter settings).

Output

Output port Data type Description

Composed Pose

Pose[]

New poses formed by the input poses.

Parameter Description

Visualization Settings

Parameter Description

Show Point Cloud In Selected Frame

Description: Display point cloud under the robot reference frame or the camera reference frame.

Default value: Robot Coordinate

Value list: Robot Coordinate, Camera Coordinate

Instruction: When this parameter is set to Robot Coordinate, the Debug Output panel will display the visualized output under the camera reference frame; when it is set to Robot Coordinate, the panel will display the visualized output under the robot reference frame. Please refer to the tuning example for the corresponding result.

This parameter will appear only when the scene point cloud is set in the project.

  • Under the Robot Coordinate, the Debug Output panel is black, and you need to adjust the view to show the point cloud and coordinates.

  • Under the Camera Coordinate, the Debug Output panel only shows the point cloud, and you need to adjust point cloud orientation to show the coordinates.

Pose Type to Visualize

Description: This parameter is used to select the pose type to visualize.
Default value: After
Value list: After, Before, and All
Instruction: Select an appropriate option according to actual needs. Please refer to the tuning example for the corresponding result.

Parameter Description

The Axes of Fourth Input Pose to Use

Parameter description: This parameter is used to specify which position axes of the fourth input pose are used to control the influence of the configurable position input on the base position.
Default value: X
Value list: X, Y, Z, XY, XZ, YZ, XYZ, and None
Instruction: Based on the selected value, the corresponding coordinates of the configurable position will override the respective coordinates of the base position. For example, if the parameter value is set to X, only the X coordinate of the configurable position will override the X coordinate of the base position, while the Y and Z coordinates remain unchanged. If None is selected, the configurable position input will be completely ignored, and only the coordinates of the base position are used.

Tuning Example

Show Point Cloud In Selected Frame

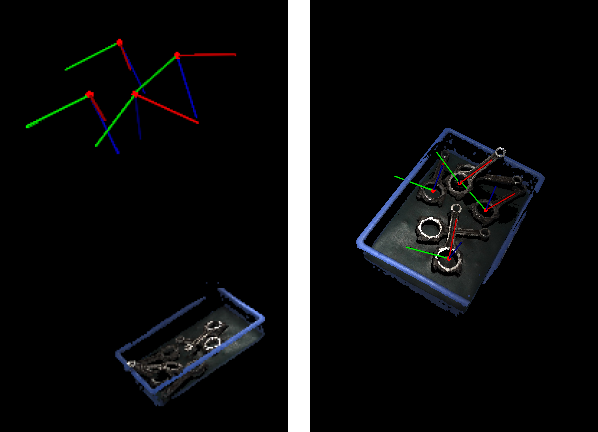
As shown below, the figure on the left shows the point cloud in the camera reference frame, and the figure on the right shows the point cloud in the robot reference frame.

transform poses transform poses

Pose Type to Visualize

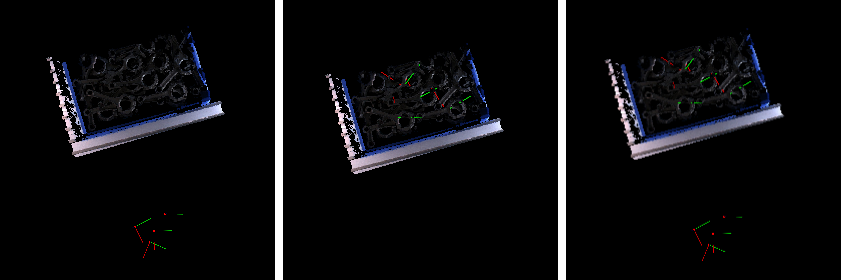
In the case of the robot reference frame, the visualized poses are as follows when the Pose Type to Visualize is set to After, Before, and All.

transform poses pose display settings

Is this page helpful?

You can give a feedback in any of the following ways:

We Value Your Privacy

We use cookies to provide you with the best possible experience on our website. By continuing to use the site, you acknowledge that you agree to the use of cookies. If you decline, a single cookie will be used to ensure you're not tracked or remembered when you visit this website.