AI Optical Character Recognition Tool
Introduction
The "AI Optical Character Recognition Tool" is a deep learning-based visual reading tool that supports custom training for different characters. By completing the wizard-style configuration process, users can quickly implement the full workflow from image acquisition to model inference. This tool is typically used in scenarios that are difficult for traditional algorithms to handle, such as metal engravings, curved surface characters, and complex backgrounds.
This tool has a built-in pre-trained model. After setting the ROI, you can directly perform inference without training from scratch. Users only need to add additional training to optimize the model based on the validation results as needed.

-
Acquire images: Acquire image data for validating and optimizing the model. It is recommended to cover typical conditions in the actual production environment to ensure image quality and diversity and improve the model’s judgment accuracy.
-
Set ROI: Set the ROI on the acquired images, supporting rectangle or ring shapes, accurately selecting the character area to lock the core range for subsequent recognition.
-
Validate and optimize model: Use the acquired images to validate the model recognition performance. You can set character correction, recognition range, judgment conditions, and string concatenation rules according to actual conditions. If the recognition results are inaccurate, you can use the "Additional training" function to supplement images and optimize the model directionally until the performance meets actual requirements.
Usage Workflow
After entering the tool, click the New button in the upper right corner of the model list on the left to create and enter a new model configuration process.
Acquire Images
Acquire image data for validating and optimizing the model.
-
Confirm that the input port for the current step is connected to the image data.
-
When entering the tool, the camera will automatically acquire an image for model validation; you can click the Acquire Images button to acquire new image data for model validation.
|
When acquiring images, it is recommended to cover typical variations in the production site, including:
Diverse images help to more comprehensively validate the model’s effectiveness and improve subsequent optimization efficiency. |
Set ROI
After acquiring images, you need to set the ROI to define the character recognition range.
|
When the "Object Pose" port has input, the ROI will transform in sync with the target pose. The ROI set here is the reference position, and during actual recognition, it will dynamically shift based on the alignment parameters. |
-
Click the Edit button to enter the ROI setting interface.
-
Set character size.
The system will automatically generate an orange default character size rectangle in the visualization area. After selecting it, you can adjust its size by dragging the border. To ensure model inference accuracy, please adjust this box to a size close to the actual character size. Too large or too small will affect recognition performance.
If the character size region is not displayed in the visualization area, please check whether the "Show character size region" switch is enabled.
-
Set the ROI. Two methods are available:
Setting method Description Set all as ROI
The ROI automatically covers the entire image. Suitable for scenarios where the target characters fill the image. To exclude certain areas, you can set mask regions in the next step.
Custom ROI
Select the "Rectangle" or "Ring" selection tool to drag and draw the ROI in the visualization area. Please accurately select the target area based on the actual position and shape of the target characters, avoiding irrelevant backgrounds.
-
Rectangle selection: Drag directly to draw a rectangular ROI.
-
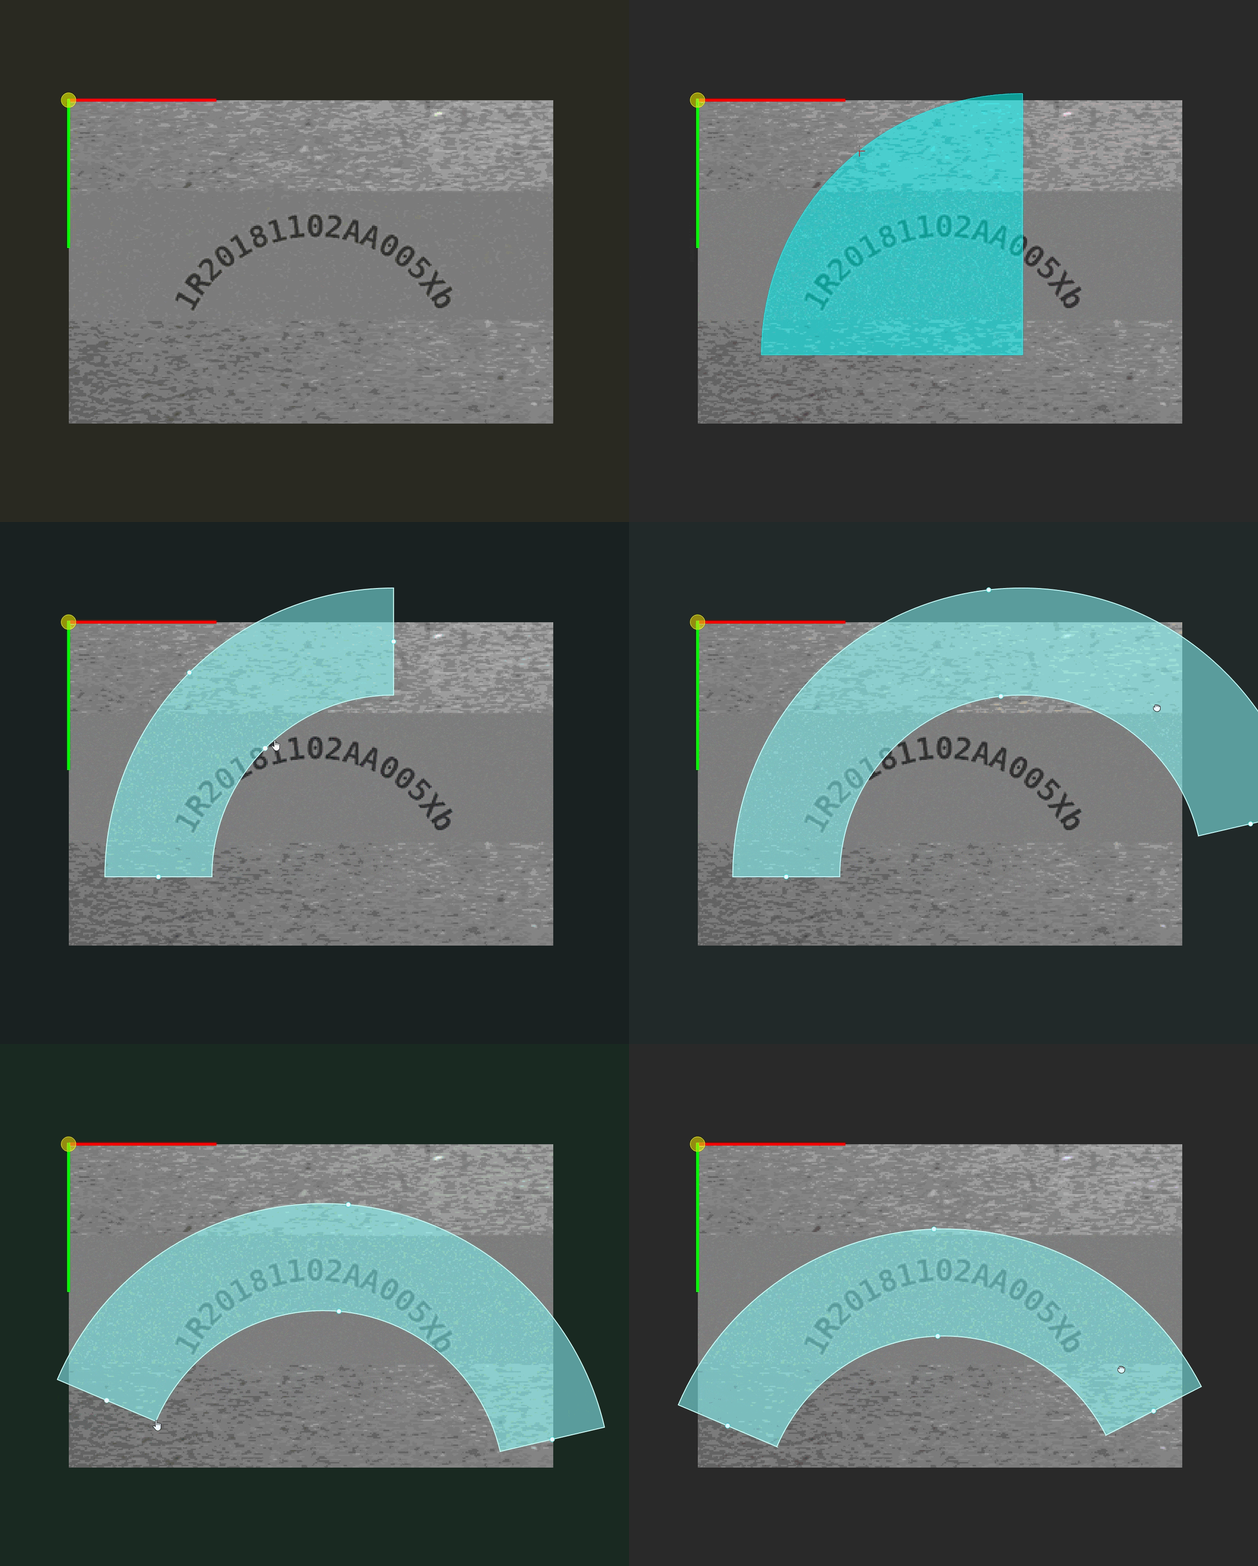
Ring selection: Refer to the image below to drag along the circumference to draw a ring ROI. After drawing is complete, you need to set the reading direction of the circular text to clockwise or counterclockwise.
-
-
Set mask region (optional).
When there are irrelevant interferences such as reflections, shadows, or fixed backgrounds within the target area, you can set mask regions to exclude them, avoiding impact on model training and classification judgment results.
Click the Set mask region button, and use the "Polygon" selection tool to draw the mask region in the visualization area: click the left mouse button to add polygon vertices, and double-click the right mouse button to close the polygon and complete the selection.
-
After the setting is completed, click Save and apply to apply the ROI configuration.
|
When the masks of the character size region, target area, and mask region completely overlap, only the topmost layer supports editing.
|
Validate and Optimize Model
After completing the ROI setting, click the validate button to enter the validation interface.
Set Validation Parameters and Validate Model Performance
You can view or set the following parameters in the validation interface, and observe whether the model’s recognition results meet expectations.
| Parameters | Description |
|---|---|
Validation result |
Parameter description: Displays the character recognition result. After enabling judgment, the validation result will be displayed as OK or NG based on the set judgment conditions. |
Time |
Parameter description: Displays the single inference time (unit: ms). |
Confidence threshold |
Parameter description: The minimum confidence standard for the model to recognize characters. Recognition results below this value will be judged as recognition failure.
|
Character correction |
Parameter description: Used to constrain the types of the first N characters in the recognition result. The number of wildcards entered determines the number of character positions constrained; subsequent characters beyond this length are not affected. When a character at a certain position does not match the constrained type, the model will replace it with the candidate character with the highest confidence of that type. Supported wildcards: ? (any character), $ (letter), % (number), @ (symbol), ! (uppercase letter), & (lowercase letter). Default value: Off. Tuning instructions: Suitable for fixed-format character correction, such as scenarios where the first few positions have clear type requirements. It is recommended to fill in wildcards from left to right according to the actual encoding rules, avoiding over-constraining that may cause incorrect replacements. Tuning example: It is known that the actual encoding format is "number + uppercase letter + number + ...", but the model recognition result is iR20181102ar06Xd", where the first character was incorrectly recognized as a lowercase letter. 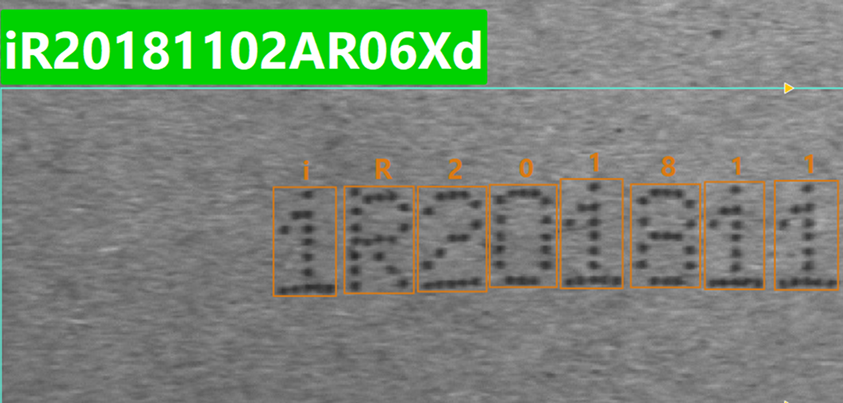
In this case, enter "%!%" in the input box (the 1st position is constrained to a number, the 2nd position is constrained to an uppercase letter, the 3rd position is constrained to a number; the 4th position and beyond are not constrained). After re-inference, the first character is corrected to the number with the highest confidence, and the result becomes "1R20181102ar06Xd". 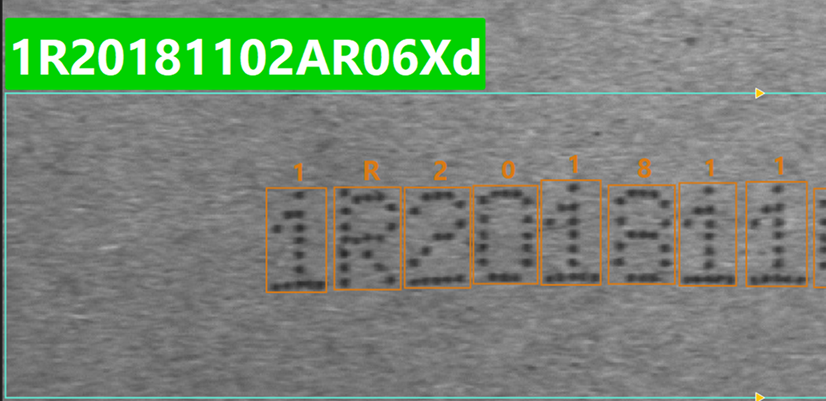
|
Recognition target |
Parameter description: Used to specify the character types to be extracted from the recognition results for further processing. Unselected character types will be ignored.
|
Insert separator |
Parameter description: When multiple lines of characters are recognized, this parameter is used to specify the separator to join segments for the final output.
|
Enable judgment |
Parameter description: Used to validate whether the recognition result meets expectations. Character type, character count, or fixed formats can be specified. Results that do not meet the rules will be judged as NG. Two judgment modes are supported:
Default value: Off. Tuning instructions: Used for automatic compliance checking. Use manual input mode for fixed-format validation, and global variable mode for dynamic content validation. |
Additional Training and Model Optimization (Optional)
If inaccurate recognition results are found during validation (such as character misrecognition, missed recognition, or background false detection), you can use the "Additional training" function for targeted correction until the model performance meets actual requirements.
|
Additional training is recommended in the following situations:
|
The specific operation process is as follows:
-
Click the additional training button on the validation interface to enter the additional training page.
-
Add additional content based on the problem type:
Additional content Description Operation Recognition content
Used to correct missed or misrecognized characters. Select the character area that was not correctly recognized on the image, enter the correct character content for that position, and add it as training content.
-
Click the Add button to draw a rectangle in the visualization area to select the character area.
-
Enter the correct character, and click a blank area to confirm the addition.
-
Click Infer next image, and the system will update the model based on the added content and perform inference validation on the newly acquired image. Repeat the above steps until the training content labeling is completed.
Exclusion content
Used to eliminate background false detection. Select the area on the image that was incorrectly recognized as characters, and mark it as an exclusion area. The recognition results of this area will be removed.
-
Click the Add button to drag and draw the exclusion area in the visualization area. Release the mouse to complete the addition.
-
Click Infer next image, and the system will update the model based on the added content and perform inference validation on the newly acquired image. Repeat the above steps until the exclusion content labeling is completed.
-
-
Click the Train button to retrain the model using the additional training content. After training is completed, the system automatically returns to the validation interface, where you can validate the optimized recognition performance.
Under the current mechanism, characters labeled during additional training are not restricted by the "Character correction" and "Recognition target" validation rules, and may still appear in the recognition results. To avoid conflicts between recognition results and validation rules, it is recommended to only add training content that is consistent with the character correction and recognition target settings.
-
After validation is passed, click the Save and apply button to save the model configuration.
At this point, the model configuration is completed. After closing the tool window, select the model from the "Model Name" parameter drop-down list to use it for character recognition in subsequent inference Steps.