Set up Standard Interface Communication with EFORT
This guide shows how to load the Standard Interface program files to an EFORT robot, and set up the Standard Interface communication between Mech-Mind Vision System and the robot.
| In this section, you will load the robot Standard Interface program and the configuration files to the robot system to establish the Standard Interface communication between the vision system and the robot. |
Preparation
Check Controller and Software Compatibility
|
The models and versions listed below are tested and can be used. For other models and versions, you may refer to this guide for operation. If any issues occur, please contact Mech-Mind Technical Support. |
-
Robot model: ER3H_600
-
Software version: R2T1E_V3.8.0
Click here for instructions
-
Open the teach pendant, go to the login screen, enter the login password, and log in as an 操作员.
-
The default login account is Operator; the default login password is 1975. If the login password has been changed, contact the robot administrator to obtain the password.
-
If subsequent unlocking is required, the unlock password is the same as the login password.
-
-
After logging in, tap the Home icon in the upper-left corner of the teach pendant screen, then tap About to display the robot information.
-
Set up the Network Connection
Connect the Hardware
Plug one end of the Ethernet cable into the port of the IPC and the other end into the LAN port of the robot controller. The following figure shows a sample LAN port.
Set the IP Address
-
On the teach pendant taskbar, click Login. On the login screen, click Permission. In the pop-up dialog, click Get Privileges.
-
If the teach pendant already has privileges, the Privilege Connection button displays Release Privileges.
-
Write operations on the controller are permitted only after privileges are successfully obtained; if privilege acquisition fails, please refer to the robot’s official manual to troubleshoot the cause.
-
-
After logging in, tap the Home icon in the upper-left corner of the teach pendant screen, then tap Setting.
-
Tap System, set the ETH3 IP address in IP Settings, then click Save.
-
In the IPC, set the IP address of the IPC.
To allow communication between the IPC and the robot controller, the IP addresses of the IPC and robot controller must reside in the same subnet. This means that the network portions and subnet masks of the IP addresses should be the same. For example, 192.168.100.169/255.255.255.0 and 192.168.100.170/255.255.255.0 are in the same subnet.
Set up Robot Communication Configuration
-
Open Mech-Vision. You may enter different interfaces. Create a new solution according to the instructions below.
-
If you have entered the Welcome interface, click New blank solution.

-
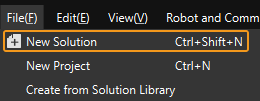
If you have entered the main interface, click on the menu bar.
-
-
Click Robot Communication Configuration on the toolbar of Mech-Vision.
-
In the Robot Communication Configuration window, complete the following configurations.
-
Click the Select robot drop-down menu, and select Listed robot. Click Select robot model, and select the robot model that you use. Then, click Next.
-
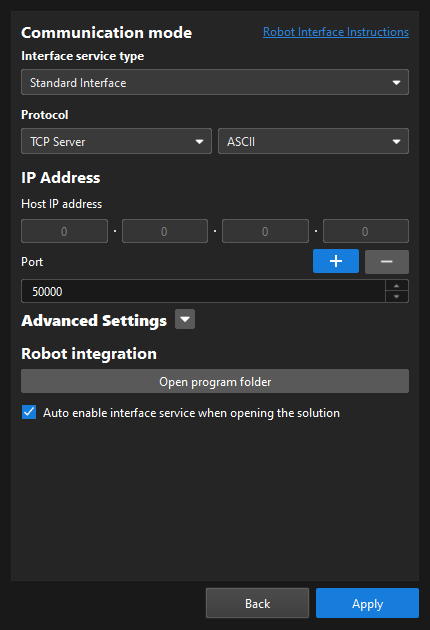
In the Communication mode section, select Standard Interface for Interface service type, TCP Server for Protocol, and ASCII for the protocol format.
-
It is recommended to set the port number to 50000 or above. Ensure that the port number is not occupied by another program.
-
Under Robot integration, click Open program folder.
The files needed for subsequent loading will be copied from this folder. Do not close this folder. -
(Optional) Select Auto enable interface service when opening the solution.
-
Click Apply.
-
-
On the main interface of Mech-Vision, make sure that the Robot Communication Configuration switch on the toolbar is flipped and has turned blue.

Load the Program Files to the Robot
-
On the IPC, copy the
mm_module.asfile from the opened program folder (theEFORTfolder) to the root directory of the flash drive, and then unplug the flash drive.You can also find the program folder in the
Communication Component/Robot_Interface/EFORTpath in the installation directory of Mech-Vision and Mech-Viz. -
Plug the flash drive into the USB port on the back of the robot teach pendant.
-
On the taskbar, click .
-
On the bottom bar, click .
-
On the screen shown, select the
MM_Module.XPL, then press Import.
Test Standard Interface Communication
-
On the teach pendant, tap the Home icon in the upper-left corner of the teach pendant screen, and then tap TCP IP.
If TCP IP is not displayed on the teach pendant interface, click Settings on the taskbar; in the left navigation pane, click App Selection; in the right-side application list, check TCP IP, then click Save. After the robot restarts, TCP IP will appear on the teach pendant interface.
-
On the screen shown, set the communication parameters, then click Save.
-
Protocol Type: Select Client.
-
Socket number: Select Socket 1. The socket number here must match the first parameter value of the MM_Init_Socket instruction.
-
Server IP: Enter the IPC IP address.
-
Port: 50000. If the host port number set in Mech-Vision is modified, the port number 50000 here should be modified accordingly to make it consistent with the host port number set in Mech-Vision.
-
Timeout: 50,000 microseconds.
-
Heartbeat interval: 10,000 microseconds.
-
First character: Set to empty.
-
End character: Check CR($R).
-
-
On the screen shown, select the imported
MM_Module.XPLfile, then press Open. -
In the Program interface, select MM_Com_Test, move the cursor to the first line of the program, and press Set PC.
-
Turn the key switch to Manual Reduced Speed (T1) mode; press the three-position enabling switch (position 1: servos off, position 2: servos on, position 3: servos off) to power the servos; press the ▸ (Start) key on the teach pendant to run the program. The figure below shows the virtual teach pendant interface; the physical teach pendant has corresponding buttons.
-
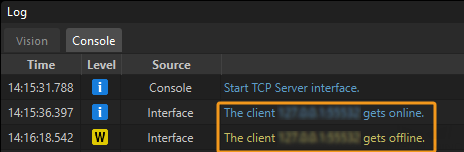
If the communication between the robot and the vision system is set up, a log will be recorded on the Console tab of the Log panel of Mech-Vision.