Set up Standard Interface Communication with ABB (RobotWare 6)
This guide shows how to load the Standard Interface program files to an ABB robot, and set up the Standard Interface communication between Mech-Mind Vision System and the robot.
| In this section, you will load the robot Standard Interface program and the configuration files to the robot system to establish the Standard Interface communication between the vision system and the robot. |
Preparation
Check Controller and Software Compatibility
|
The models and versions listed below are tested and can be used. For other models and versions, you may refer to this guide for operation. If any issues occur, please contact Mech-Mind Technical Support. |
-
Controller model: IRC4 or IRC5
-
RobotWare version: 6.02–6.15
-
Control module: 616-1 PC Interface installed
Click here for instructions
-
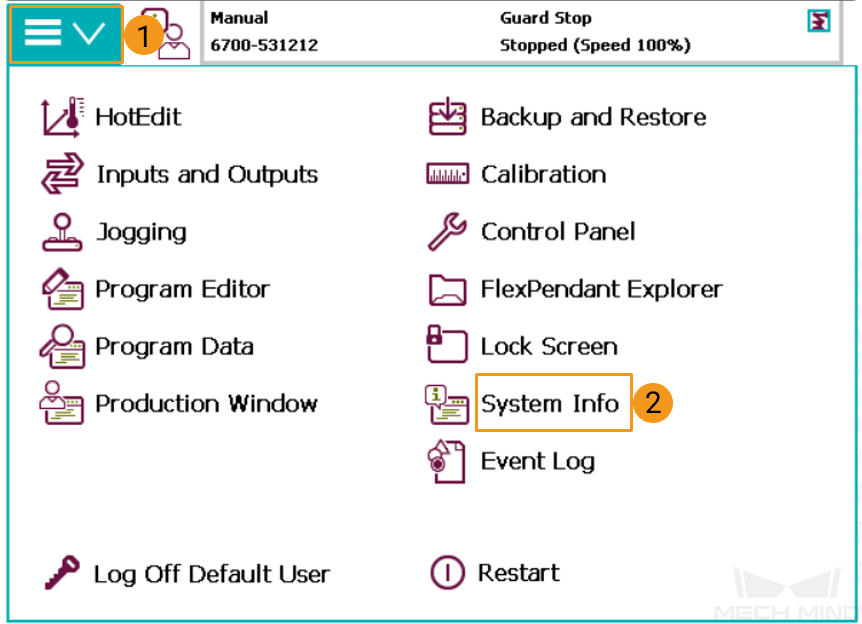
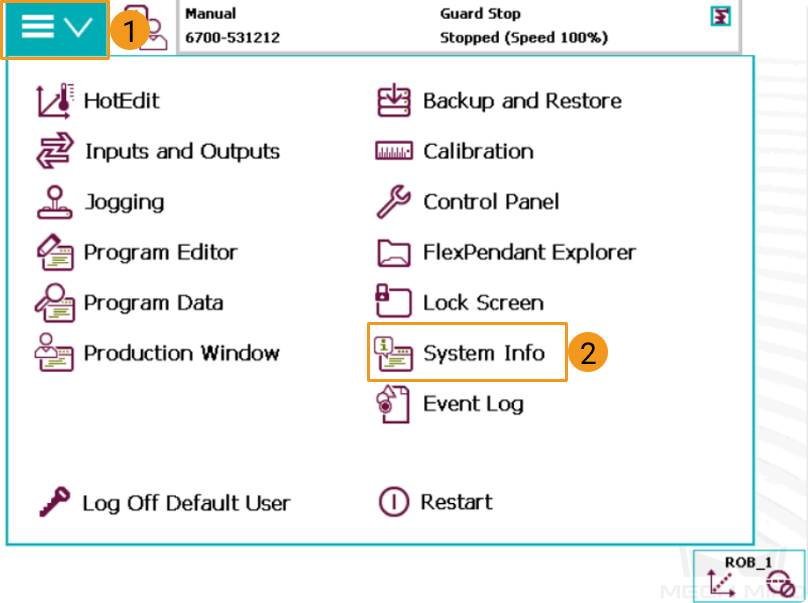
Tap the drop-down button in the upper-left menu bar of the teach pendant interface and select System Info.
-
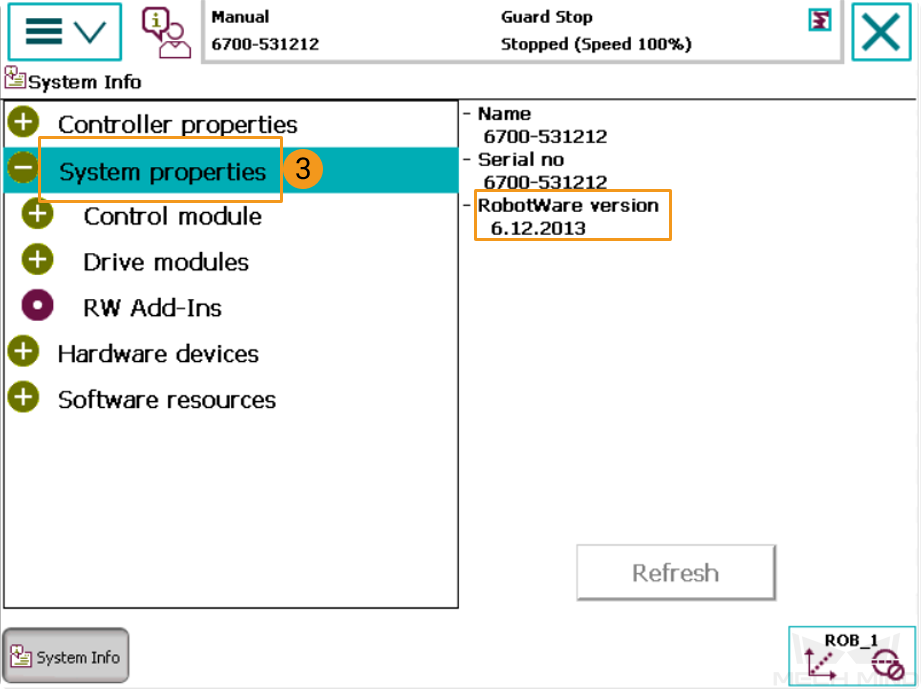
Tap System properties and check if the version of RobotWare is between 6.02 and 6.15 inclusive.
-
Tap Options, and check if the control module 616-1 PC Interface is installed.

-
Set up the Network Connection
Connect the Hardware
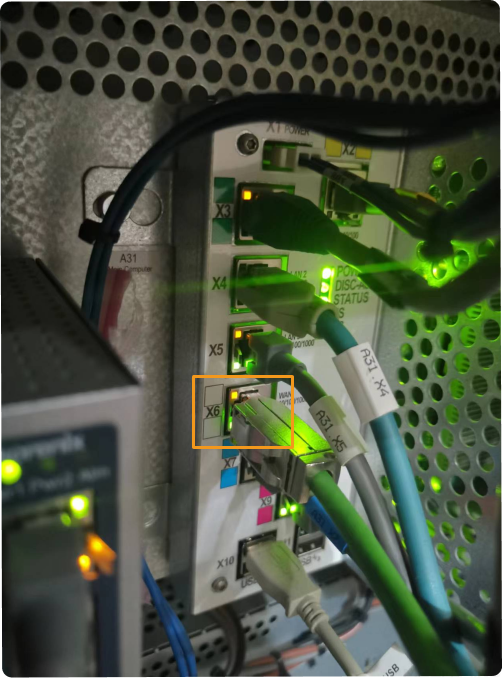
Plug one end of the Ethernet cable into the network port of the IPC and the other end into the X6 port (WAN port) of the robot controller, as shown in the figure below.
Set the IP Address
-
You can set the robot IP address by using the teach pendant or RobotStudio.
-
Set the IP address by using the teach pendant
Click here for instructions
-
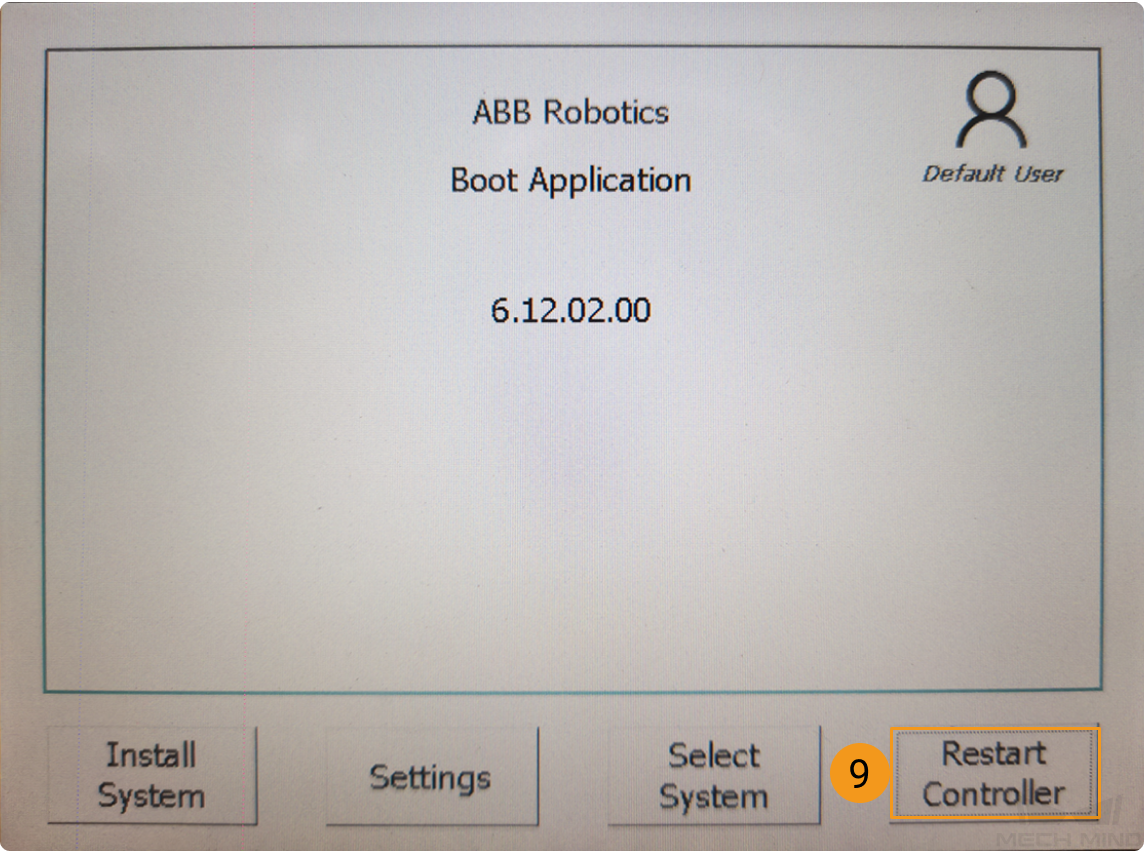
Follow the steps as shown in the figures below to start the boot application.

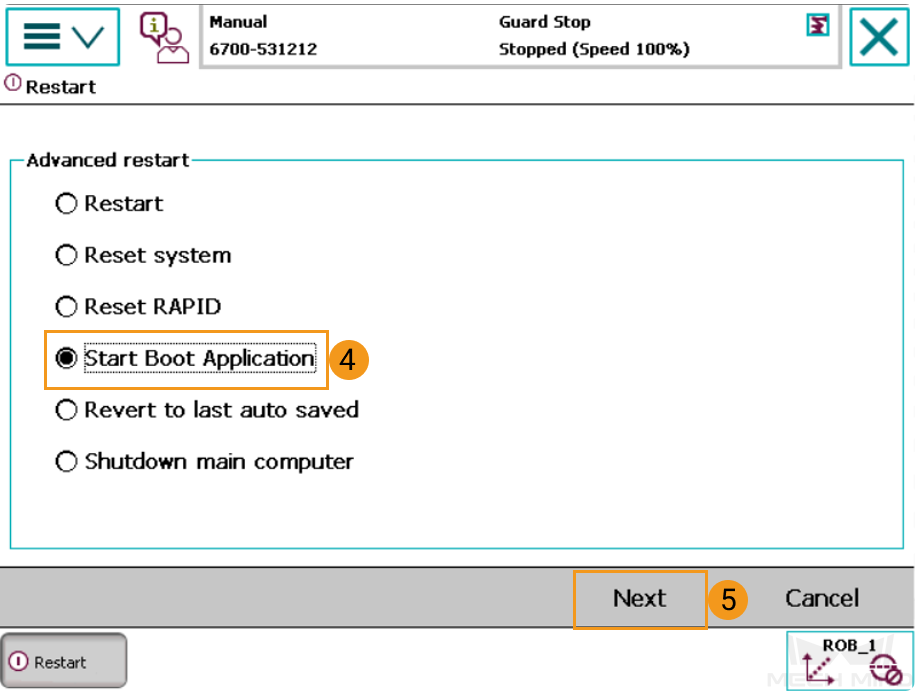
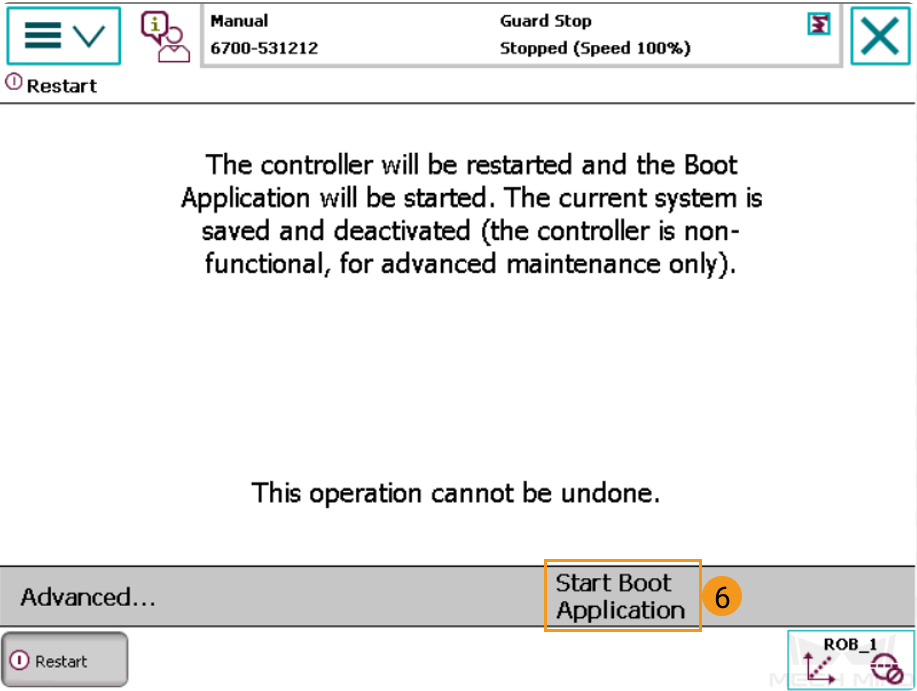
-
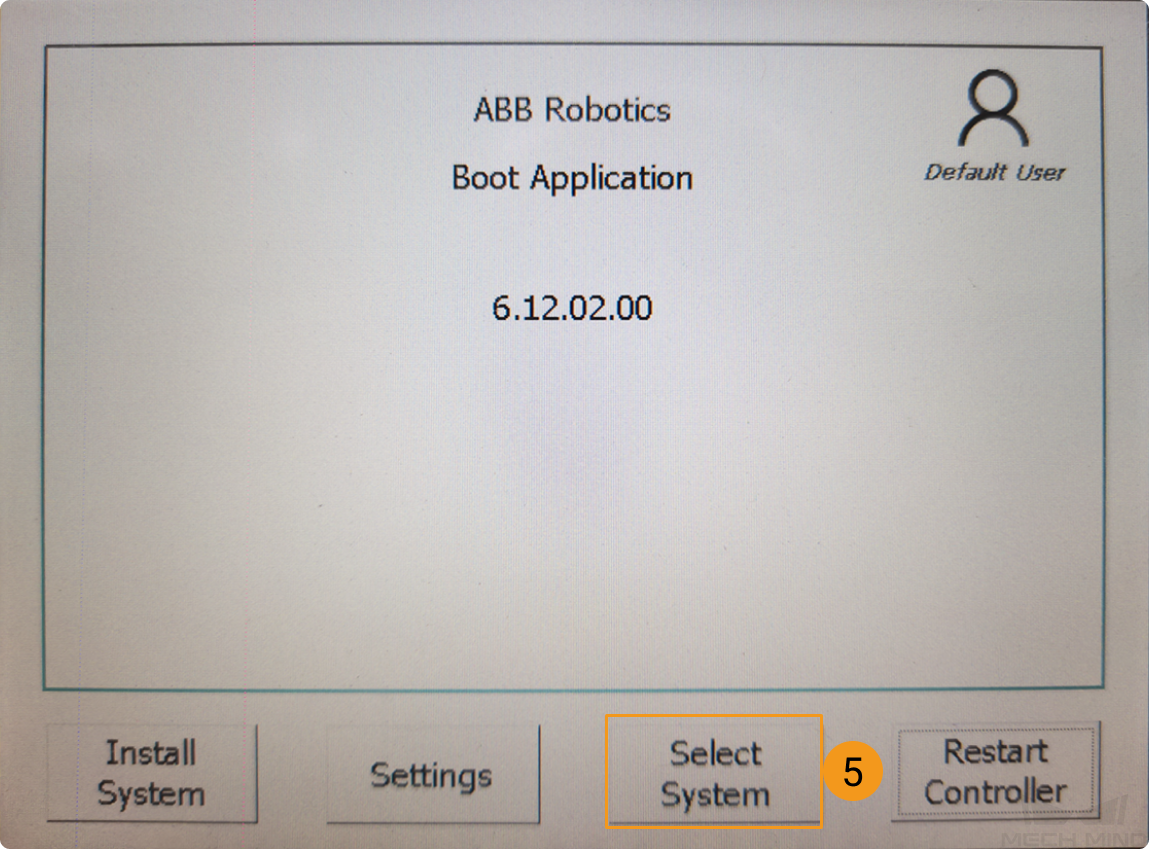
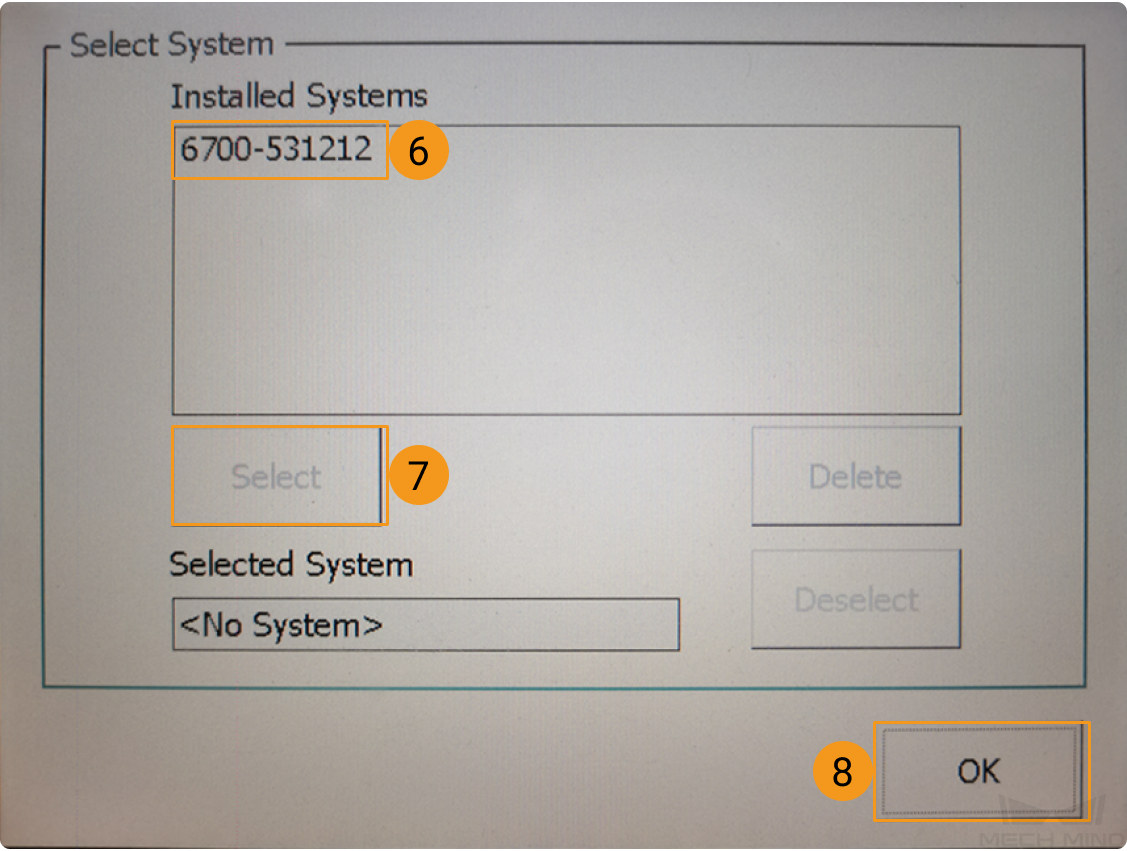
After the restart is complete, the following interface appears. Follow the steps below to configure the IP address. The IP addresses of the robot and the IPC must reside in the same subnet.


-
-
Set the IP address by using RobotStudio
Click here for instructions
-
Follow the steps below to set the IP address and then restart the robot.
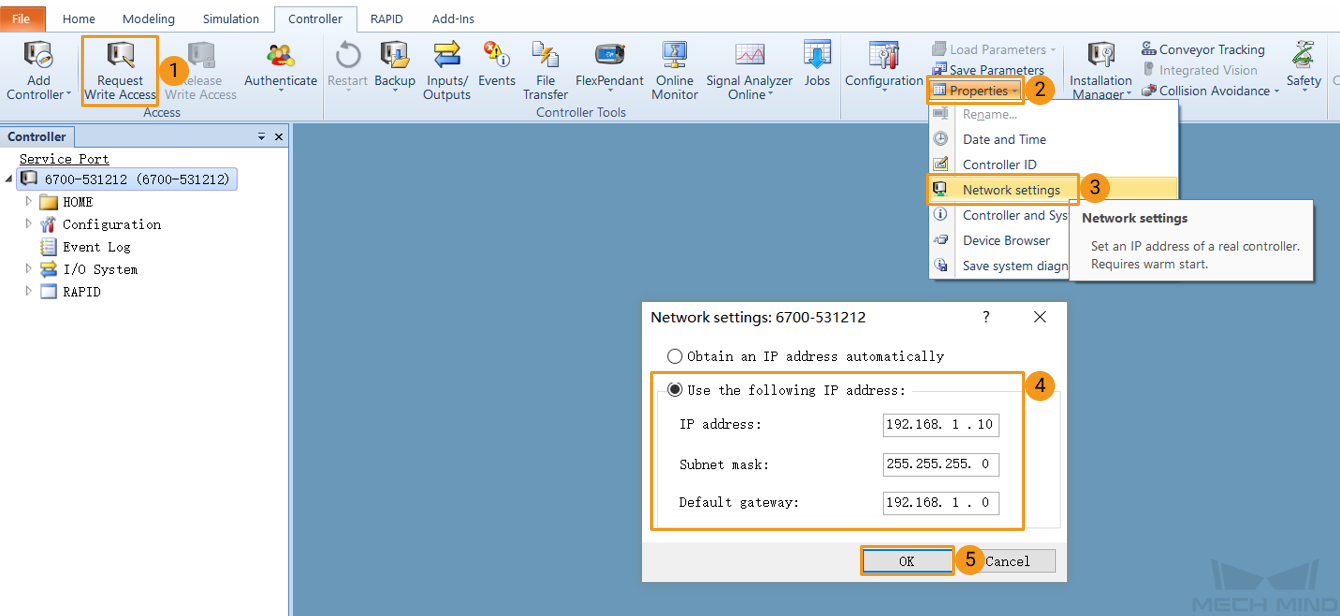
-
Check if the specified IP address takes effect.
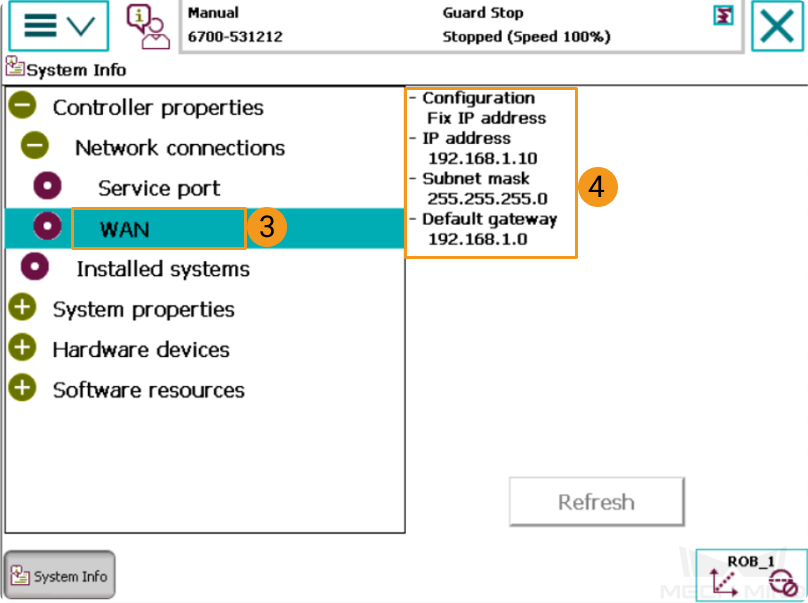
-
-
-
In the IPC, set the IP address of the IPC.
To allow communication between the IPC and the robot controller, the IP addresses of the IPC and robot controller must reside in the same subnet. This means that the network portions and subnet masks of the IP addresses should be the same. For example, 192.168.100.169/255.255.255.0 and 192.168.100.170/255.255.255.0 are in the same subnet.
Set up Robot Communication Configuration
-
Open Mech-Vision. You may enter different interfaces. Create a new solution according to the instructions below.
-
If you have entered the Welcome interface, click New blank solution.

-
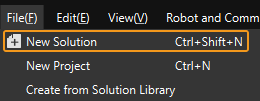
If you have entered the main interface, click on the menu bar.
-
-
Click Robot Communication Configuration on the toolbar of Mech-Vision.
-
In the Robot Communication Configuration window, complete the following configurations.
-
Click the Select robot drop-down menu, and select Listed robot. Click Select robot model, and select the robot model that you use. Then, click Next.
-
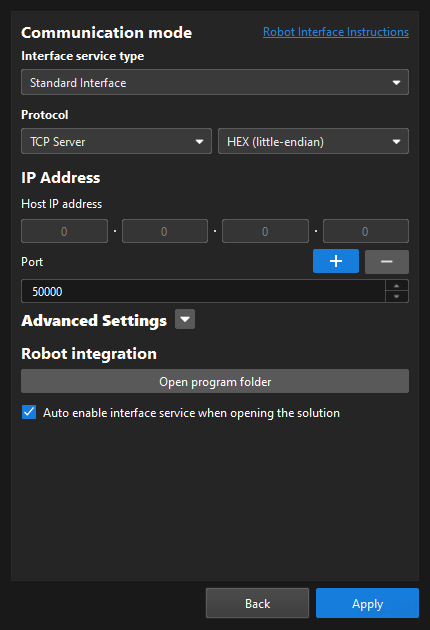
In the Communication mode section, select Standard Interface for Interface service type, TCP Server for Protocol, and HEX (little-endian) for the protocol format.
-
It is recommended to set the port number to 50000 or above. Ensure that the port number is not occupied by another program.
-
Under Robot integration, click Open program folder.
-
If you want to manually load program files, you must perform this step. Otherwise, skip this step.
-
The files needed for subsequent loading will be copied from this folder. Do not close this folder.
-
-
(Optional) Select Auto enable interface service when opening the solution.
-
Click Apply.
-
-
On the main interface of Mech-Vision, make sure that the Robot Communication Configuration switch on the toolbar is flipped and has turned blue.

Load the Program Files to the Robot (Auto)
You can follow the instructions below to allow standard interface programs or standard interface example programs to be auto-loaded to the robot. In this example, Standard Interface programs are auto-loaded by using the following steps. The steps to auto-load Standard Interface example programs are similar.
| If the auto-load process fails and you cannot resolve the issue, proceed to Load the Program Files to the Robot (Manual). |
-
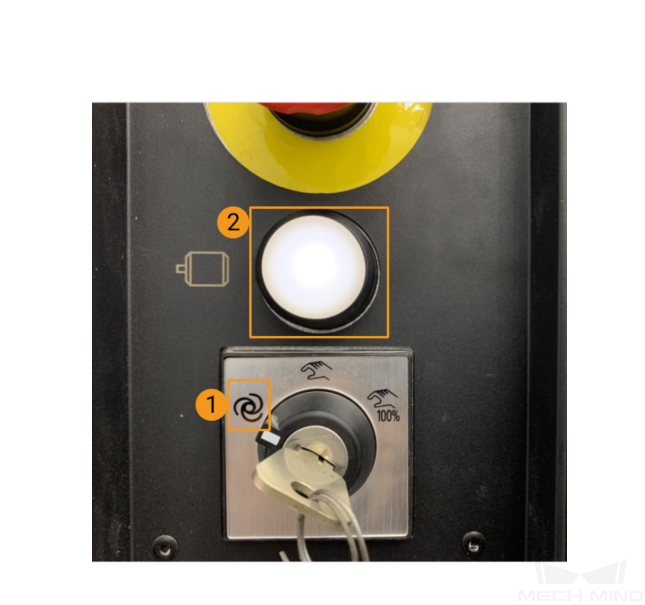
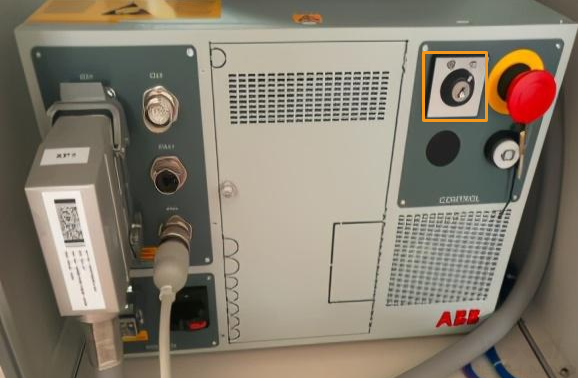
Switch the key in the controller to the automatic mode, and ensure that the motor indicator light is on.
-
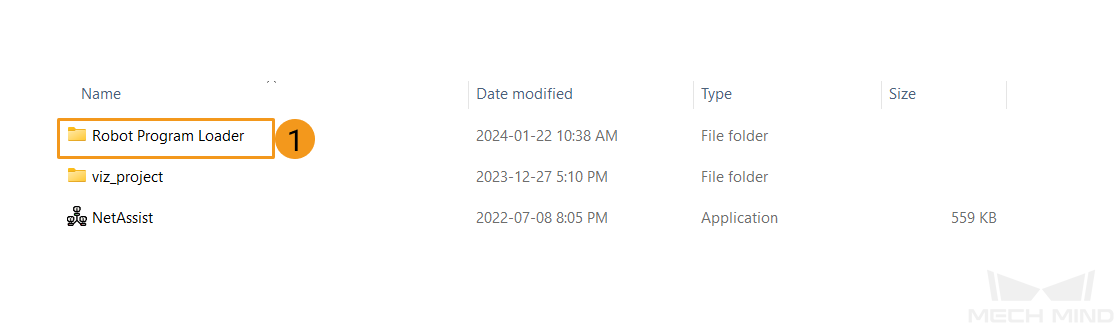
Navigate to the installation directory of Mech-Vision and Mech-Viz, go to the Robot Program Loader folder by using the Communication Component\tool\Robot Program Loader path, and then double-click the Robot Program Loader program to open the loader. The main interface of the loader appears.
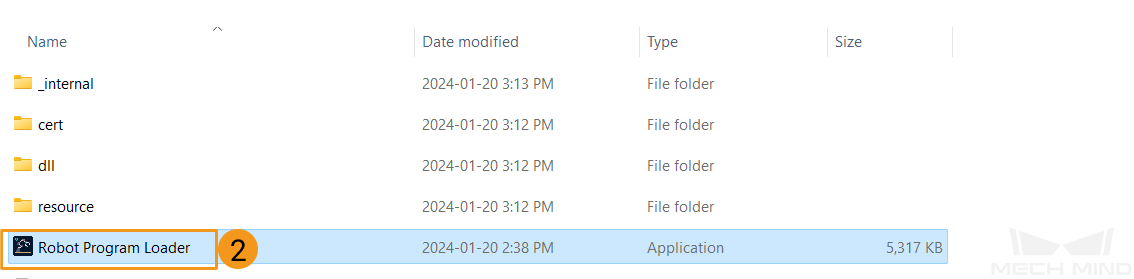
To switch languages in the loader, select a different language from the drop-down list in the upper-right corner and restart the loader for the new language to take effect. -
Select the ABB robot brand, enter the actual robot IP address, and then click Connect.

If the connection fails, click Test network connection in the lower-right corner to troubleshoot the issue. -
In the ABB Program loading interface, select a folder to store the backup files and then click Back up. If the files are backed up, a message that indicates the backup is successful is displayed in the Log section.
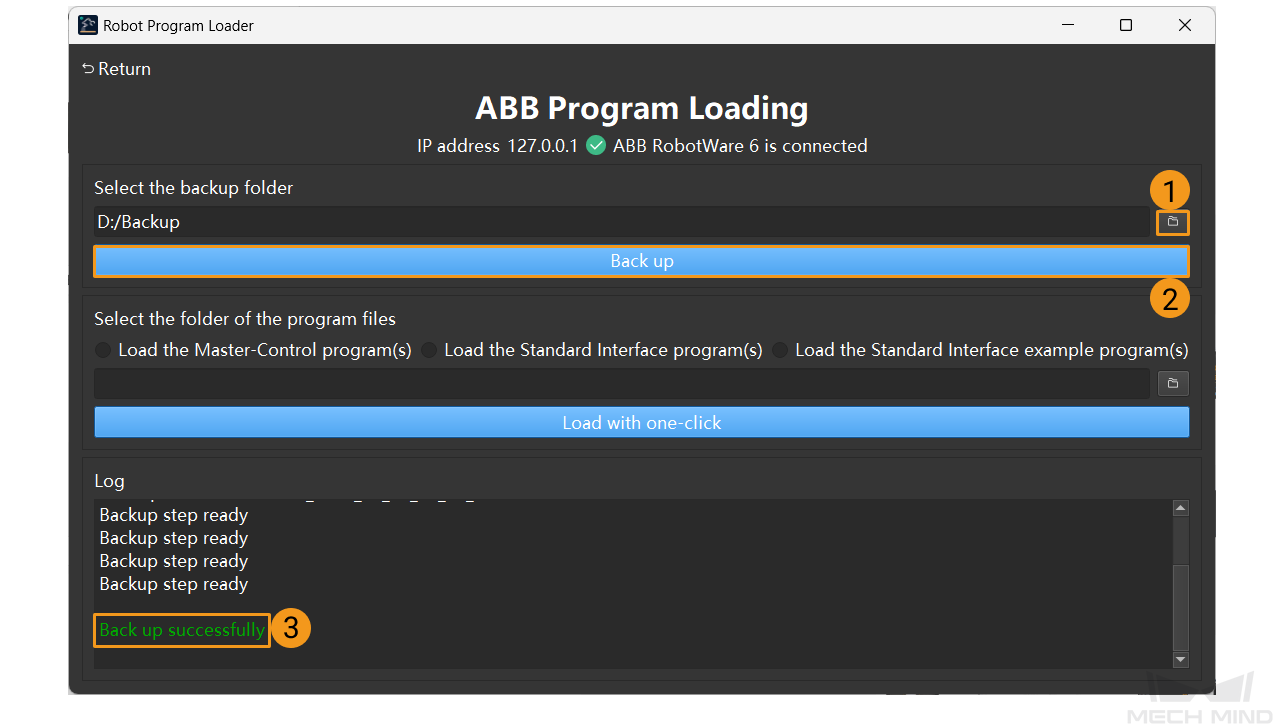
If errors occur in the subsequent loading process, the files can be used to reset the robot system. -
After the backup succeeds, select Load the Standard Interface program to confirm the folder that stores the program files and click Load with one-click. If the files are loaded to the robot, a message that indicates the program files are successfully loaded appears in the Log section.
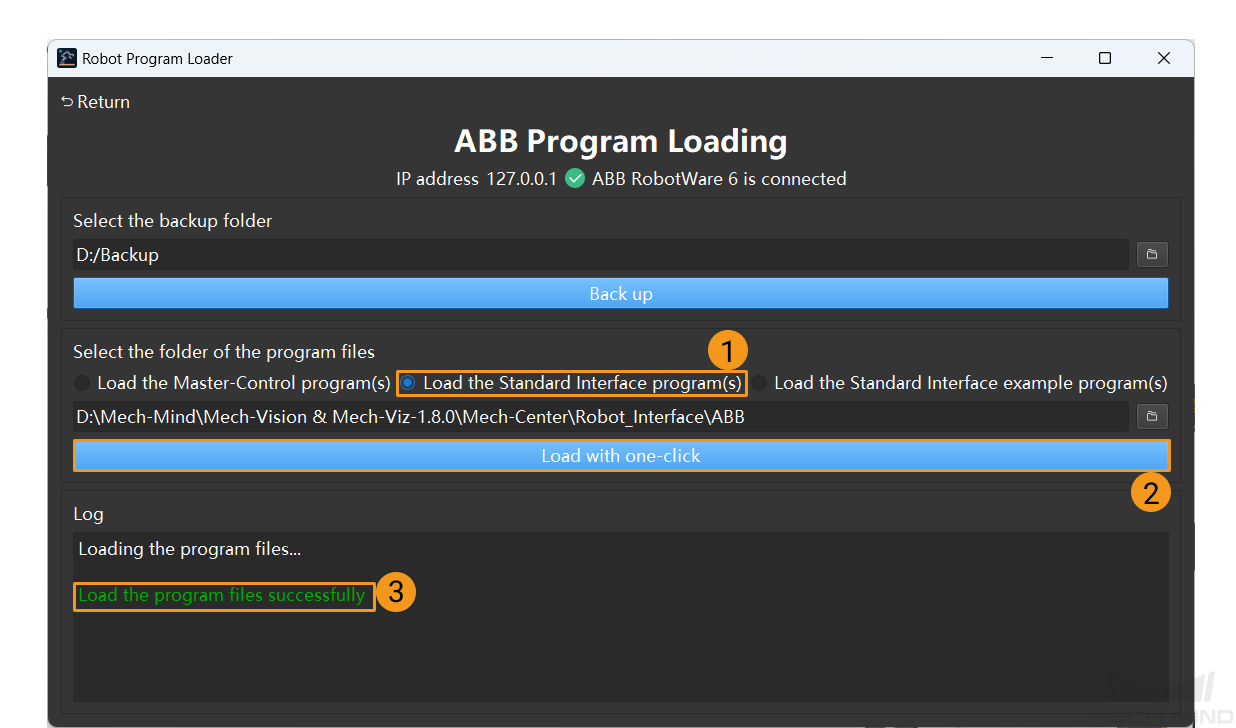
| If you want to load Standard Interface example programs, select Load the Standard Interface example programs and then click Load with one-click. |
After the auto-load process succeeds, proceed to Test Standard Interface Communication.
Load the Program Files to the Robot (Manual)
If the Load the Program Files to the Robot (Auto) process is successful, skip this section.
Before you manually load files to the robot, we recommend that you perform a backup. This way, you can reset the robot system if an incorrect operation occurs.
Prepare Program Files
-
Plug the flash drive into the USB port of the IPC.
-
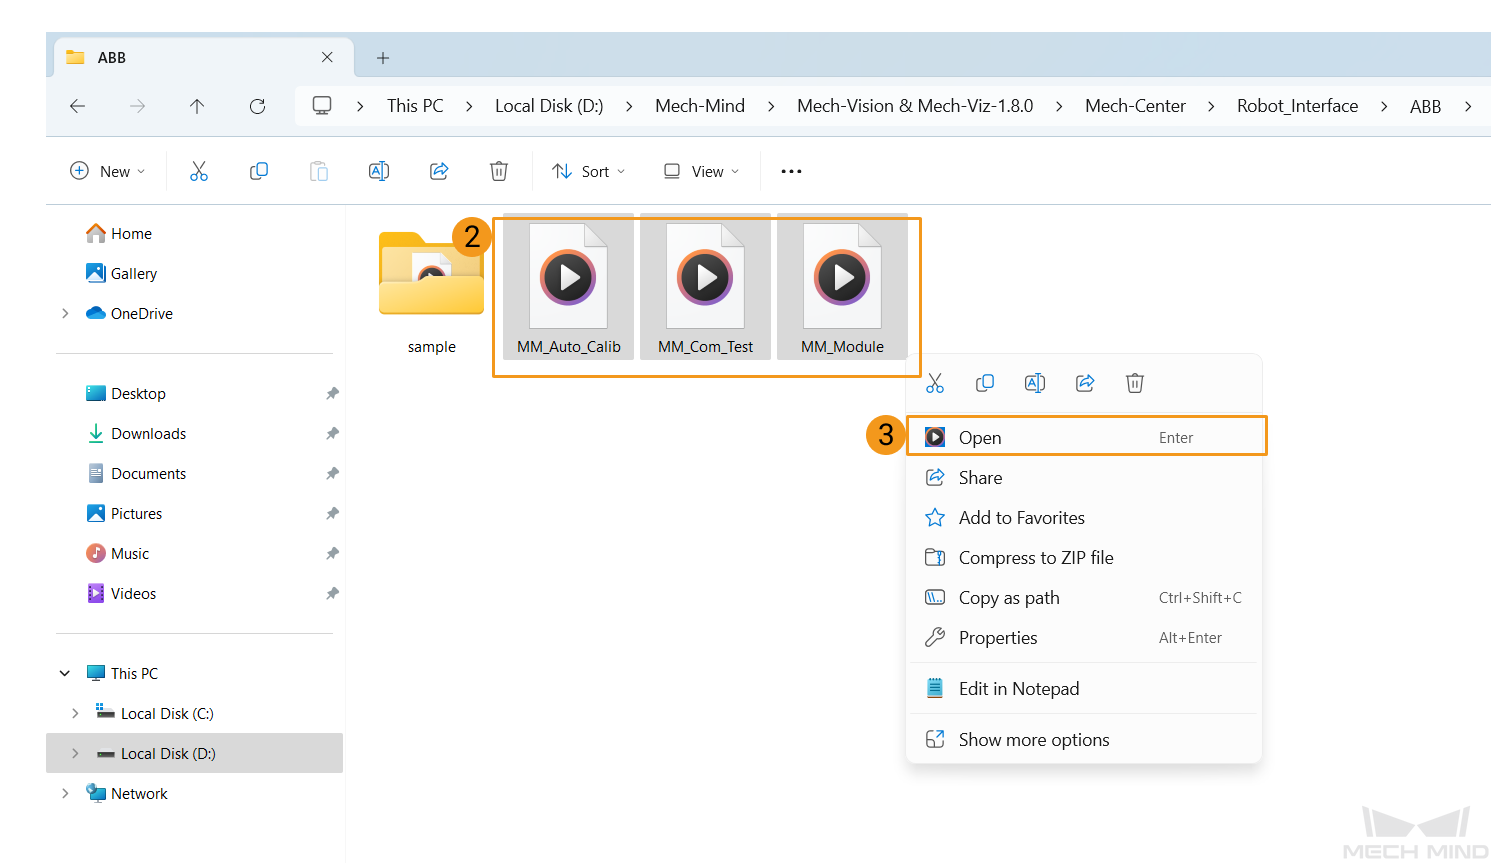
On the IPC, open the
RobotWare 6folder in the program folder (theABBfolder), copy the following three files to the flash drive, and then unplug the flash drive.-
You can also find the program folder in the
Communication Component/Robot_Interface/ABBpath in the installation directory of Mech-Vision and Mech-Viz. -
If a program file with the same name already exists, please delete or rename it before loading the new one.
-
MM_Module.mod (program module file)
-
MM_Auto_Calib.mod (calibration program module file)
-
MM_Com_Test.mod (communication-testing program module file)
-
Load the Files to the Robot
You can load the program files by using the teach pendant or RobotStudio. Before you begin, make sure that the robot is in manual mode.
-
Load the program files by using the teach pendant
Click here for instructions
-
Plug the flash drive into the USB port on the back of the teach pendant.
-
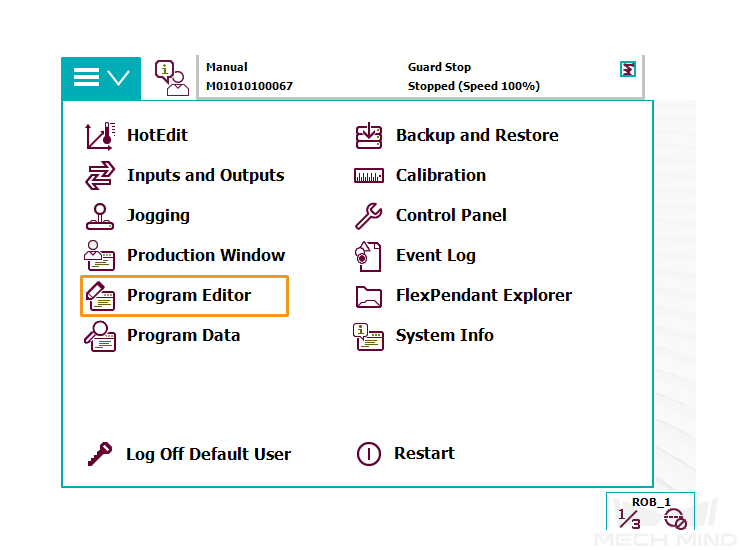
Tap Program Editor.
-
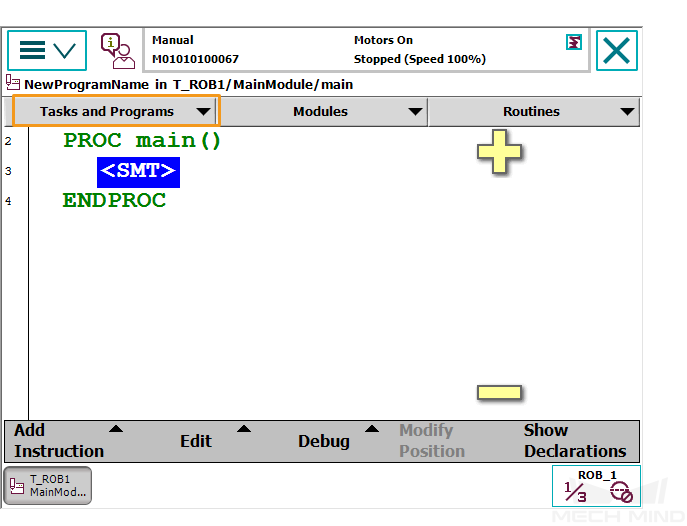
Tap Tasks and Programs.
-
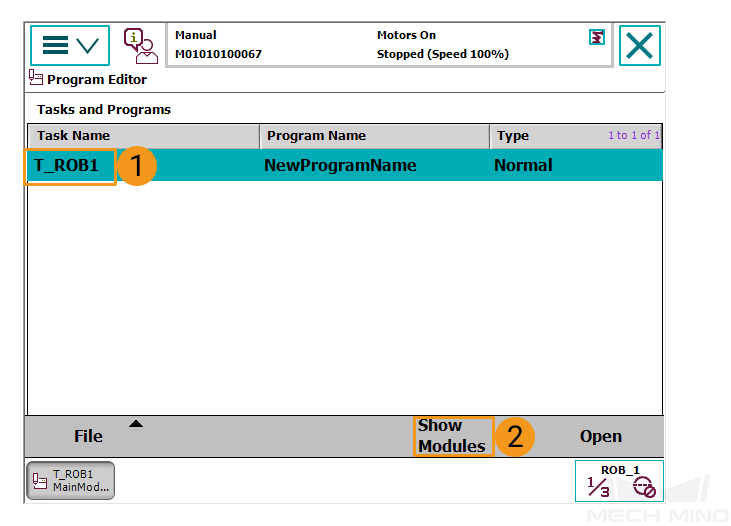
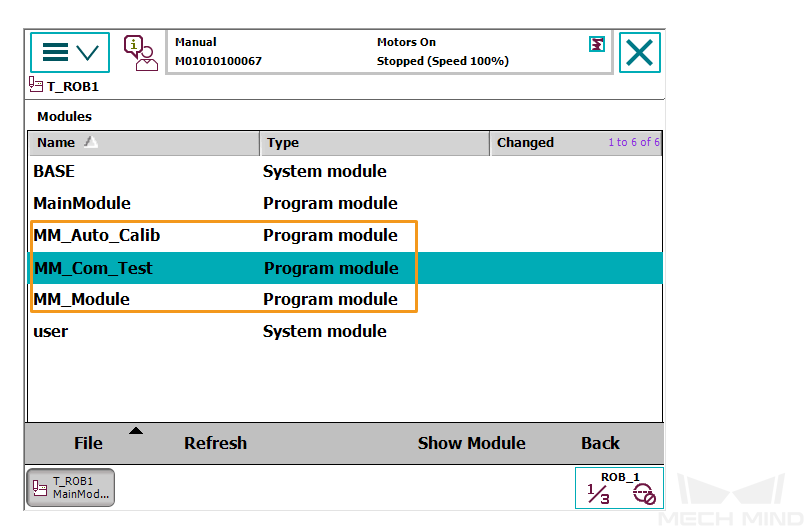
Select T_ROB1 and tap Show Modules.
-
Select .
-
Select Yes in the pop-up window.

-
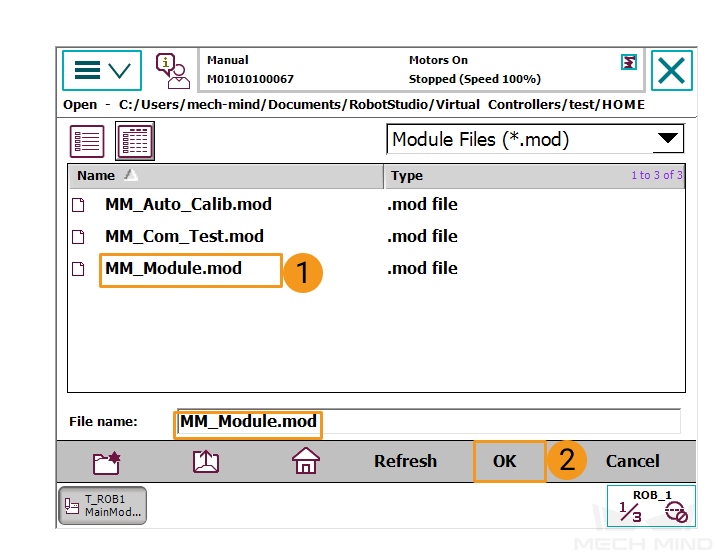
Find the program files in the flash drive and select MM_Module.mod to display MM_Module.mod as the file name in the lower part. Then, tap Yes.
-
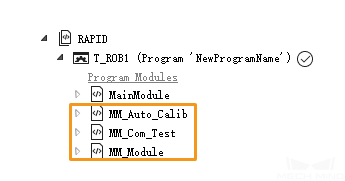
Repeat the preceding instructions to load MM_Auto_Calib.mod and MM_Com_Test.mod. Then, check whether the three files are loaded under T_ROB1.
-
-
Load the program files by using RobotStudio
Click here for instructions
-
Open RobotStudio and connect to the controller.
-
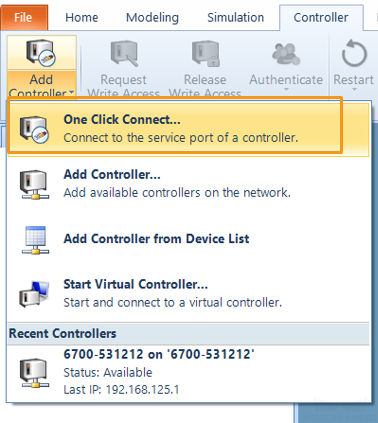
If the robot controller is connected by using the LAN port, click One Click Connect….
-
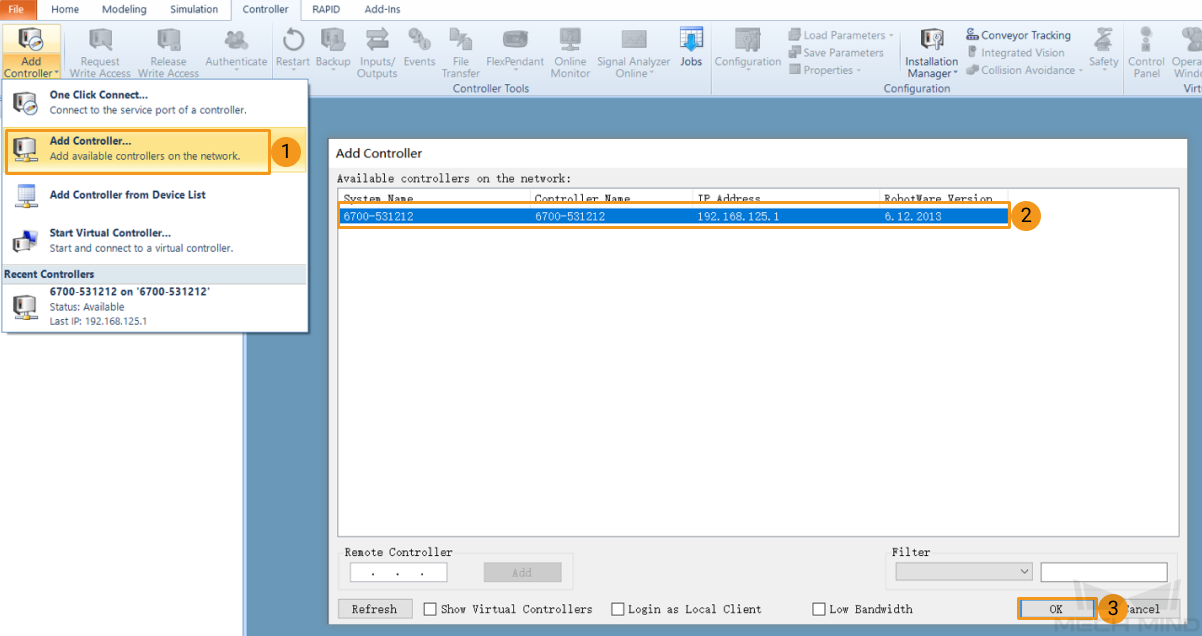
If the robot controller is connected by using the X6 (WAN) port or a switch, click Add Controller and then select the controller and click OK. If the controller is added, RobotStudio will be connected to the service port of the controller automatically.
-
-
Request write access. Click Request Write Access to request the write access to the teach pendant.
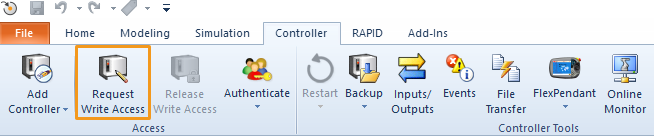
Tap Grant in the Request Write Access window on the teach pendant.
-
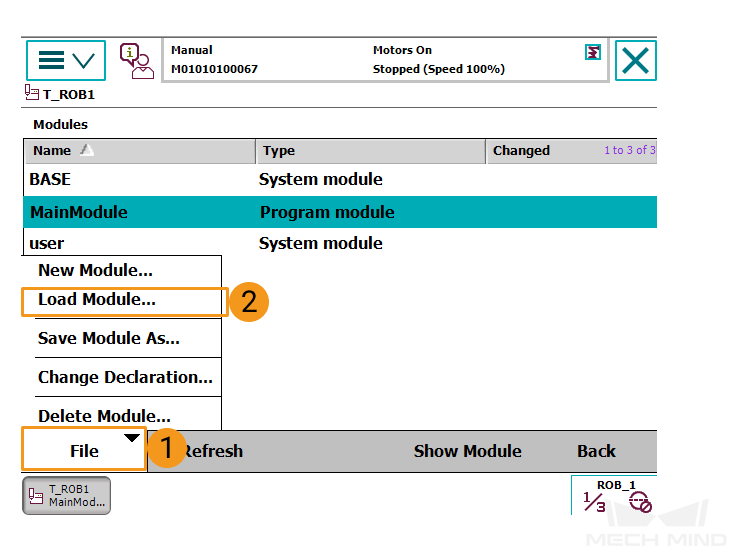
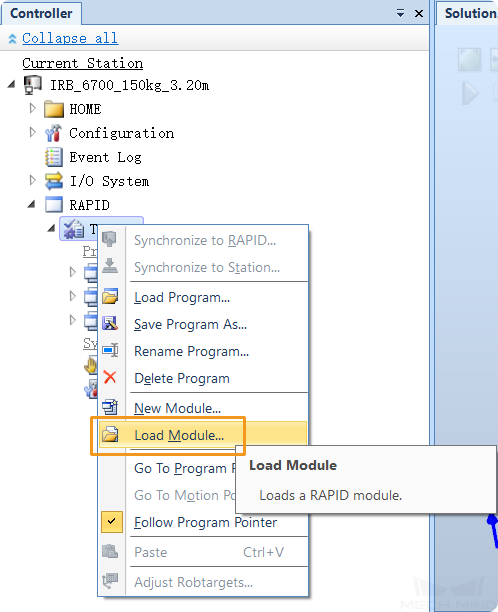
As shown in the figure below, find and right-click T_ROB1, and select Load Module in the menu.
-
Select the program module files and select Open.
-
Confirm that the three program files appear under T_ROB1.
-
Test Standard Interface Communication
Select and Modify the Program Used for the Communication Test
-
Turn the switch on the controller to the manual mode.
-
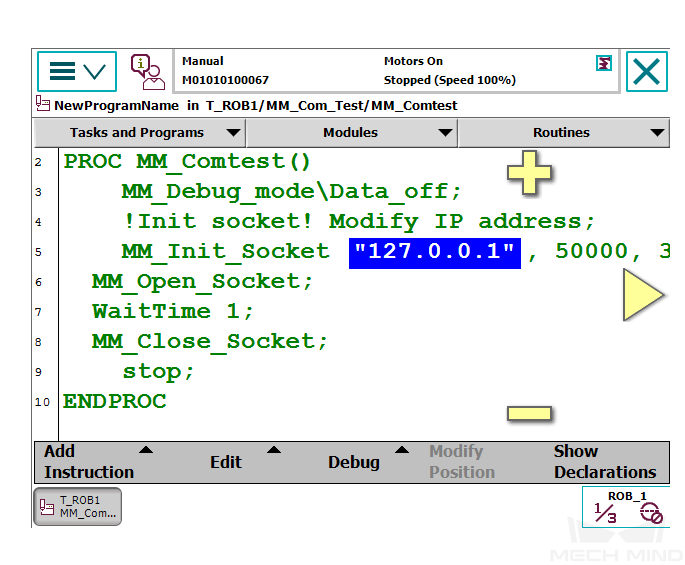
On the teach pendant, tap the menu in the upper-left corner, select , select MM_Com_Test, and then select Show Module.
If you cannot find MM_Com_Test after you select T_ROB1 and program code is displayed, select Tasks and Programs in the upper part. In the Tasks and Programs interface, confirm that T_ROB1 is selected and then select Show Modules to make MM_Com_Test appear. 
-
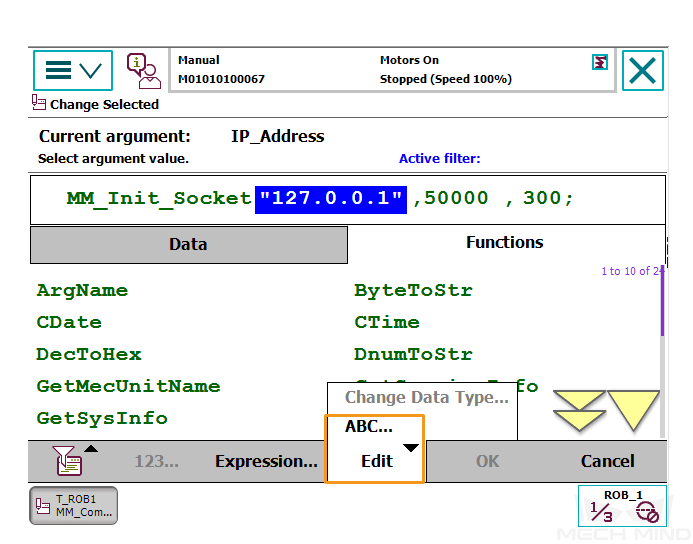
Double-tap the IP address, select , change the IP address to the IP address of the IPC, and then select OK. If the host port number set in Mech-Vision is modified, the port number 50000 here should be changed to the host port number in Mech-Vision.
Run the Program and Test Connection
-
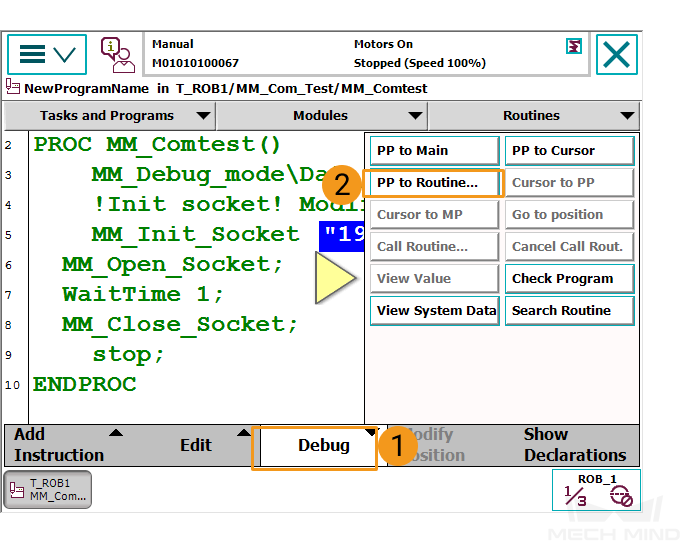
In the following interface, select .
-
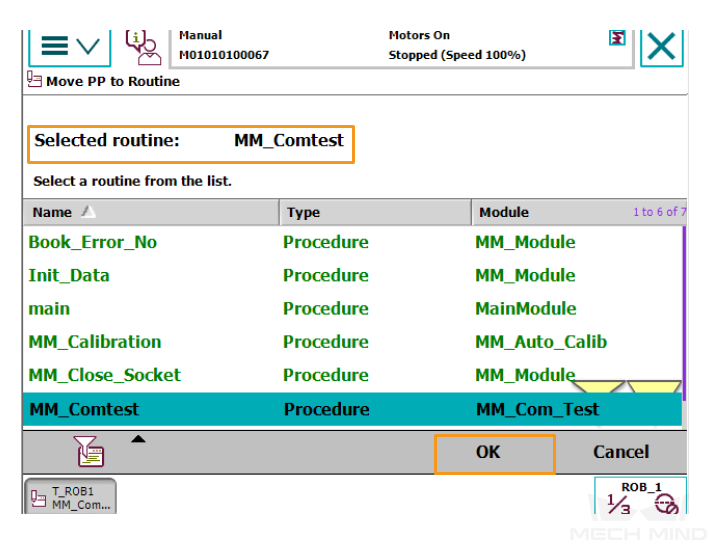
Confirm that MM_Comtest is selected and click OK.
-
Keep holding down the enable button on the right side of the teach pendant (ensuring you do not release it during program execution). Then, repeatedly press the following button to manually step through the program until the program pointer reaches line 9.

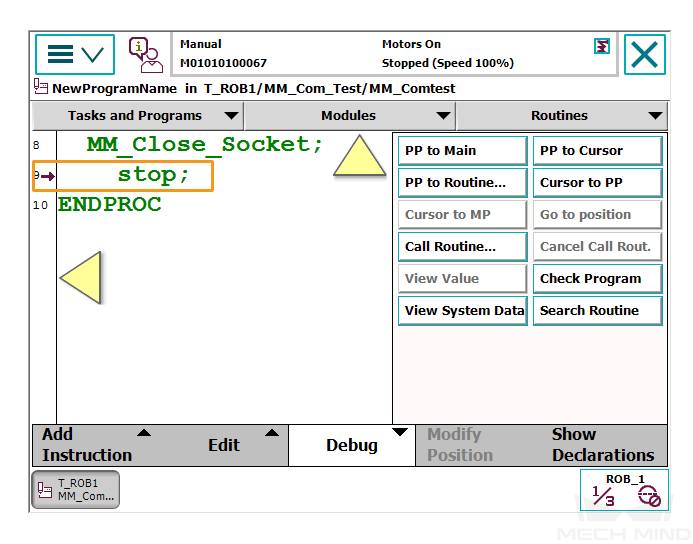
-
Tap the following button to view the following message.
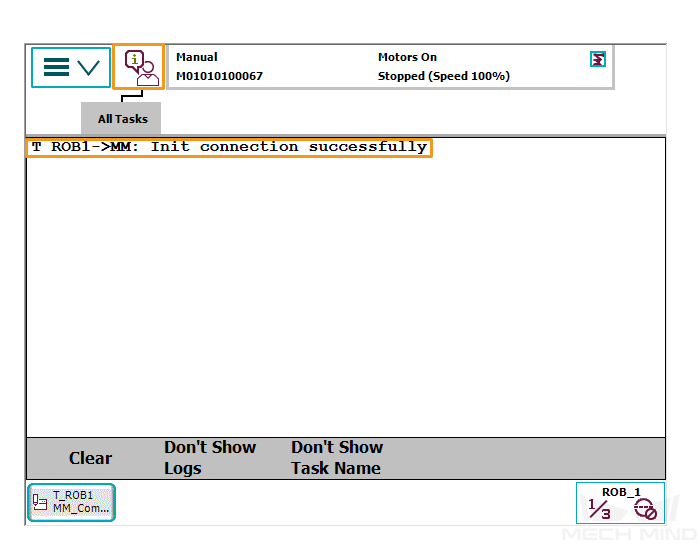
-
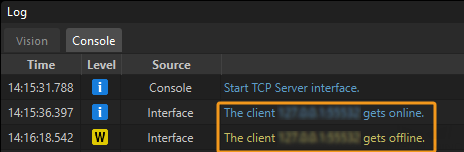
If the communication between the robot and the vision system is set up, a log will be recorded on the Console tab of the Log panel of Mech-Vision.
Appendix
Backup
Before you operate the robot, follow the backup instructions below to back up the system so that the robot system can be restored if an incorrect operation occurs. You can back up the files by using the teach pendant or RobotStudio.
-
Back up the files by using the teach pendant
Click here for instructions
-
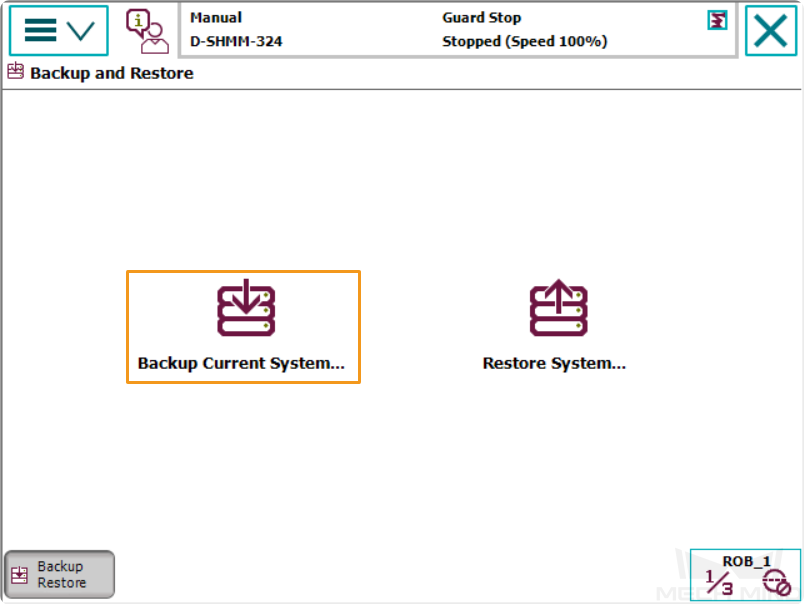
Go to the home interface by tapping the menu in the upper-left corner, and then select Backup and Restore.
-
Select Backup Current System….
-
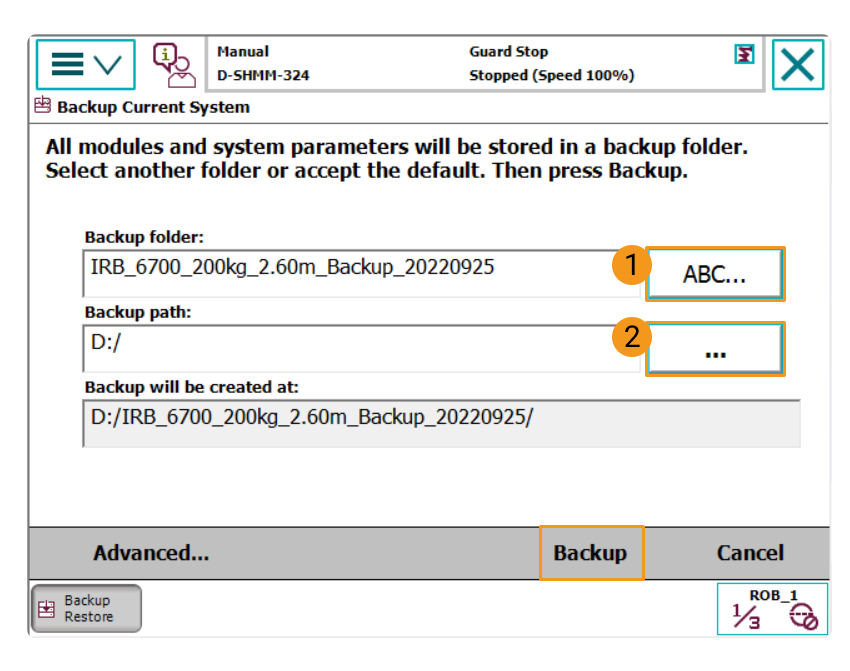
Specify the backup file name by tapping 1, and specify the directory for saving the file by tapping 2. Then, tap Backup in the lower-right corner to start the backup process.
-
-
Back up the files by using RobotStudio
Click here for instructions
-
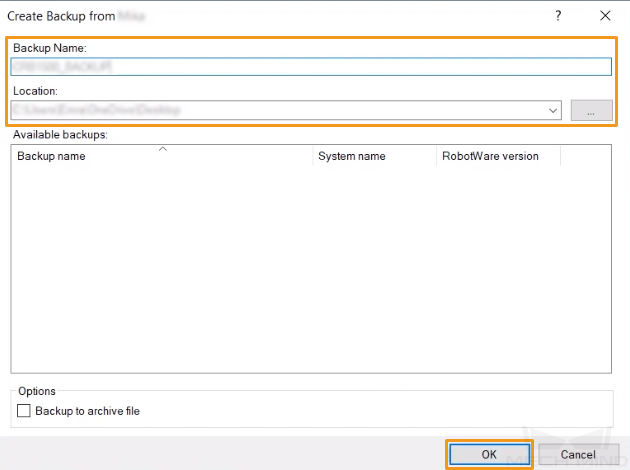
In the home interface of RobotStudio, select the controller you want to backup, and then select .

-
In the pop-up window, confirm the backup name and location and then click OK.
-
Resetting
Two types of resetting exist: resetting the system and resetting RAPID.
-
Resetting RAPID deletes the current RAPID program and data while retaining system parameter settings.
Click here for instructions
-
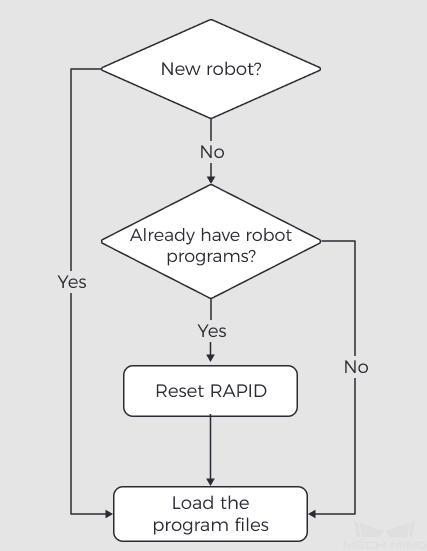
Determine whether you need to reset RAPID based on the following flowchart.
-
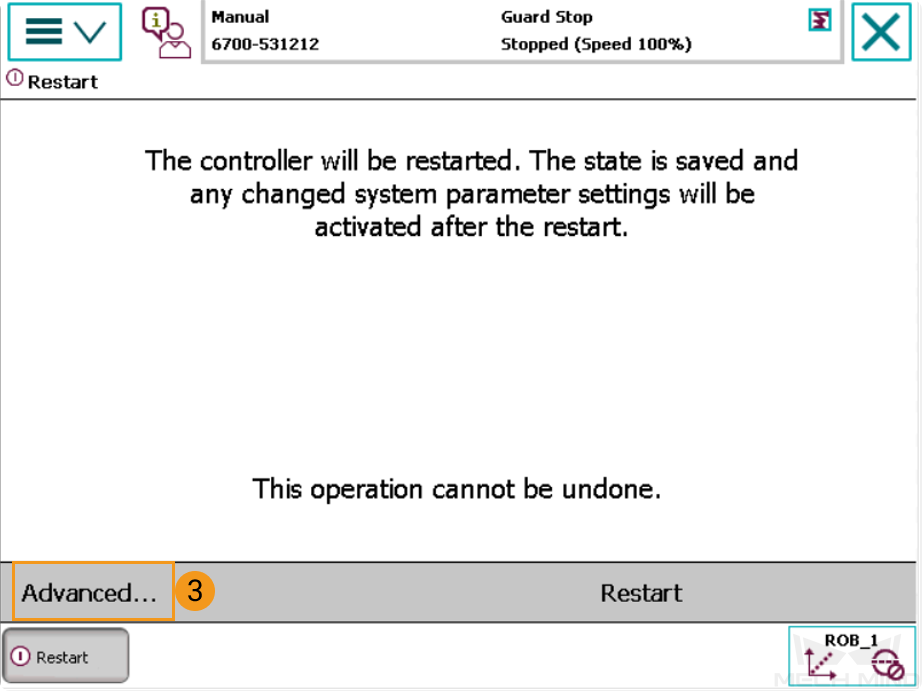
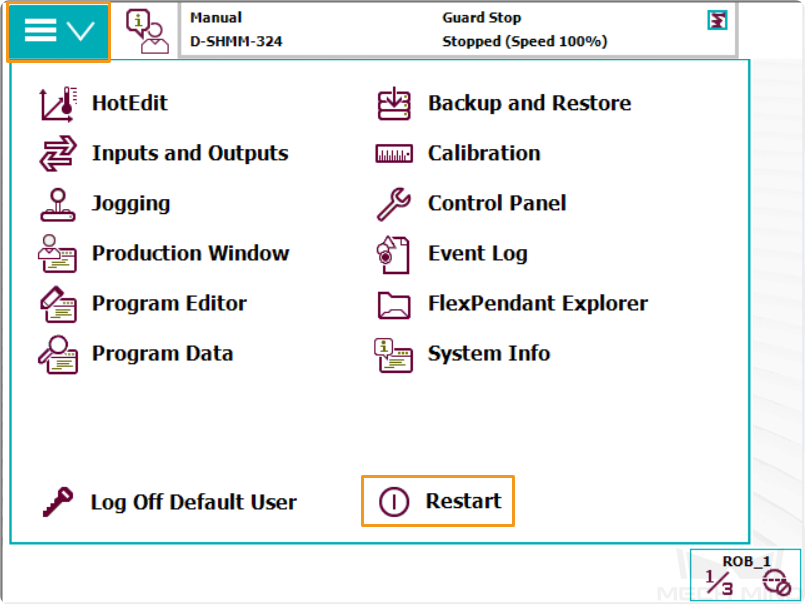
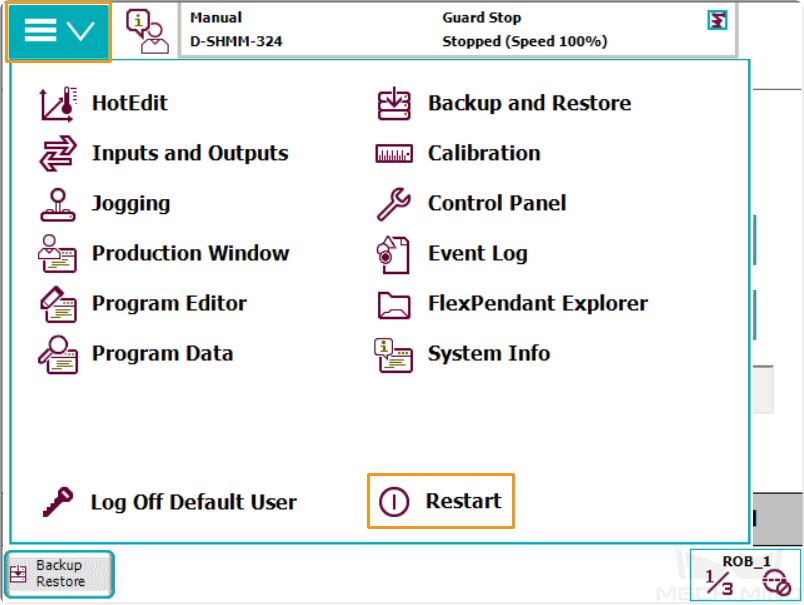
Go to the home interface by tapping the menu in the upper-left corner, and then select Restart.
-
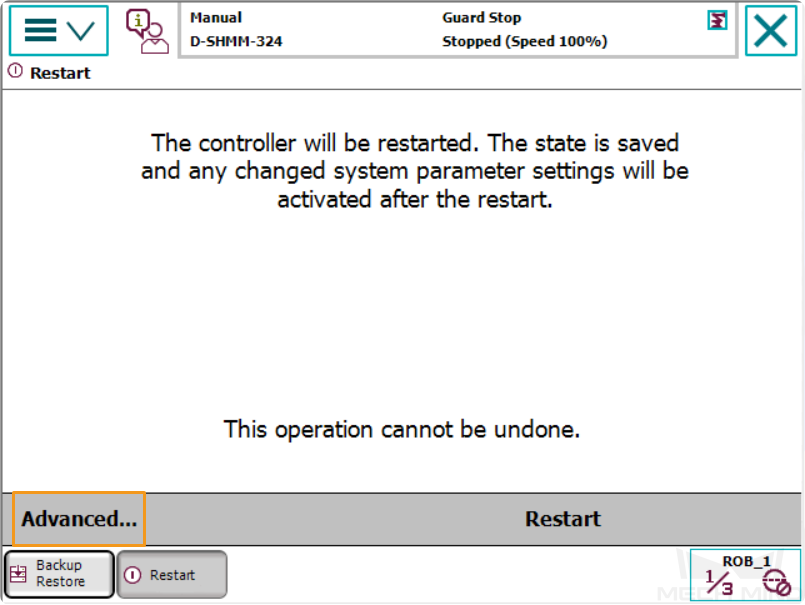
Tap Advanced….
-
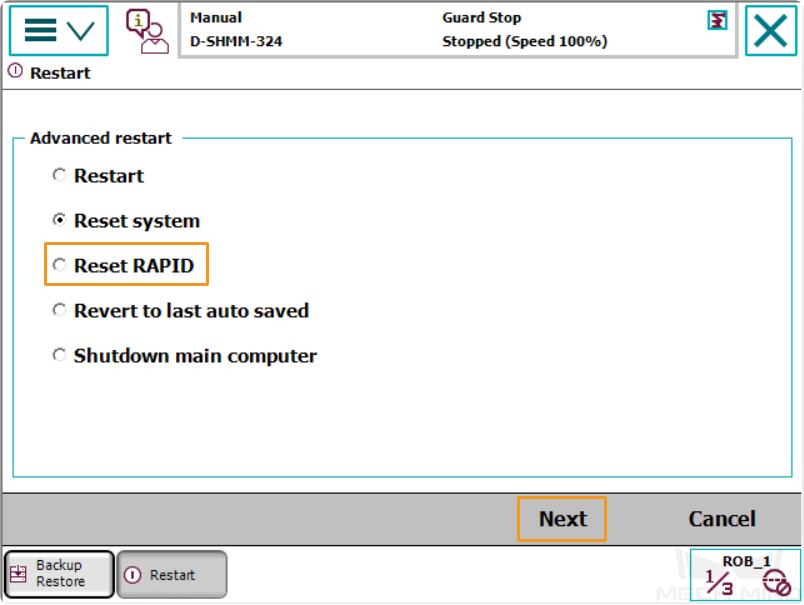
Select Reset RAPID, and then tap Next.
-
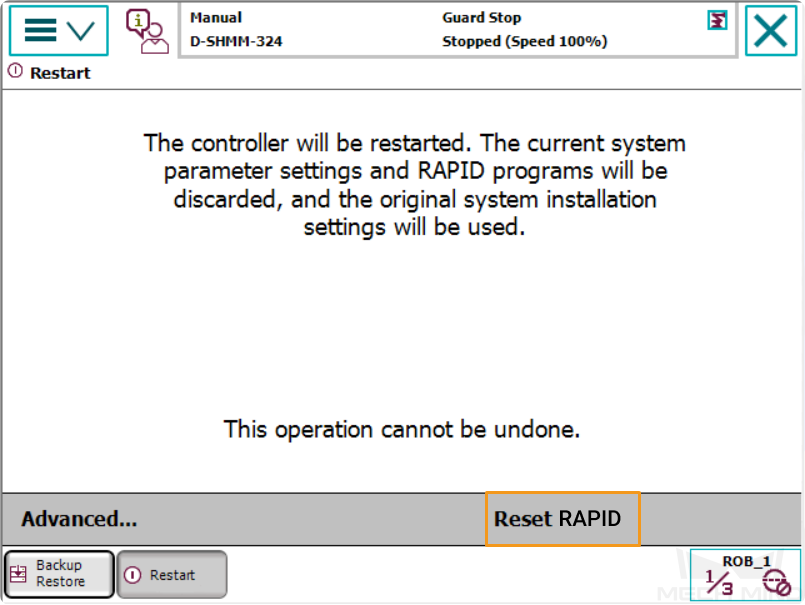
Tap Reset RAPID.
-
-
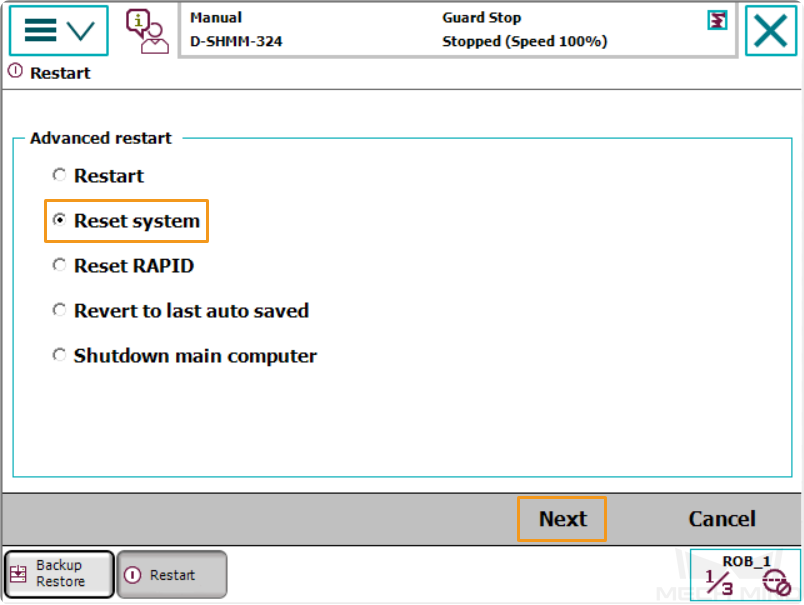
Resetting the system restores the default system parameters and RAPID program, and resets the I/O settings. If a communication board or other communication devices are used, you must re-configure them after the system is reset.
Click here for instructions
-
Resetting the system restores factory settings. Make sure that the backup operation is performed.
-
Go to the home interface by tapping the menu in the upper-left corner, and then select Restart.
-
Tap Advanced….
-
Select Reset system and then tap Next.
-
Tap Reset system.

-