How to Use NetAssist?
Introduction
NetAssist, a network debugging tool for Windows, supports various protocols such as UDP, TCP, and MQTT. It is an essential professional tool for network application development and debugging. It helps designers, developers, and testers of network applications monitor the data transmission and reception of the software or hardware they develop, thereby increasing development speed and simplifying complexity, making it an invaluable assistant for TCP/UDP application development and debugging.
Application Scenarios
During the debugging of the vision system, NetAssist facilitates communication and joint debugging with network devices or network applications by simulating the establishment of TCP or UDP servers or clients, as detailed below.
-
Simulate the server: NetAssist acts a server program to test whether the client can initiate the communication.
-
Simulate the client: NetAssist acts a client program to test whether the server can initiate the communication.
Configuration Options
NetAssist can be found by using the Communication Component\tool path in the installation directory of Mech-Vision and Mech-Viz. You can double-click NetAssist.exe to open NetAssist.
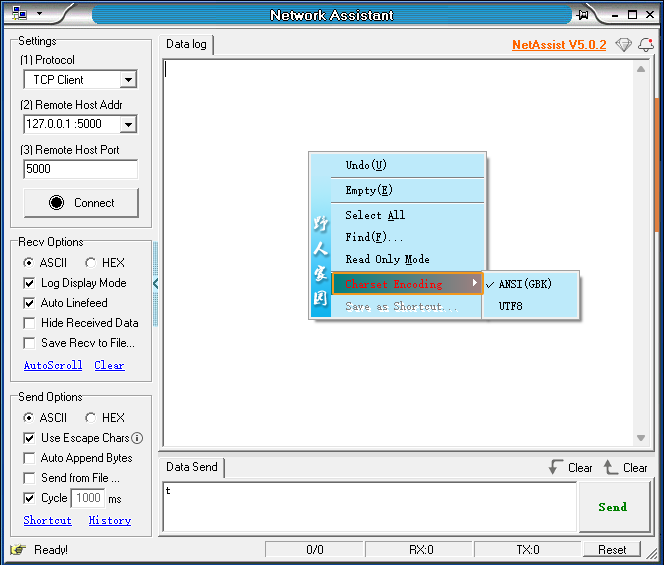
Switch Encoding Formats
NetAssist supports ANSI (GBK) and UTF-8 encoding formats. The default encoding format is ANSI (GBK). The encoding format for the data-sending window and the data-receiving window are independent of each other. You can modify the encoding format by right-clicking on the blank area of each window and selecting Charset Encoding. After the encoding format is modified, NetAssist will not refresh the display of previously received garbled data; only newly received data will be displayed based on the modified encoding format.
| If garbled data appears in the data-receiving window, it is possible that the received data is encoded in UTF-8. In this case, switch the encoding format of the data-receiving window to UTF-8. |
Recv Options
In the Recv Options section on the left of the NetAssist interface, you can configure the data reception format (ASCII or HEX), data display mode, and data storage method.

The following table describes the options in the Recv Options section.
| Option | Description |
|---|---|
ASCII |
The received data is displayed in the ASCII format. |
HEX |
The received data is displayed in the hexadecimal format. |
Log Display Mode |
The data-receiving window not only displays the received data content but also shows the timestamp of the data reception, the data format, the IP address and port number of the data source, as well as the record of the sent data. |
Auto Linefeed |
A new line is generated for each new data record that is received. |
Save Recv to File |
The received data is saved to a file. After this option is selected, a dialog box that allows you to select the file path will be displayed. Take note of the file format. You can select Log file (default) or Data file.
|
AutoScroll |
Click this button to disable or enable AutoScroll. |
Clear |
Click this button to clear the content in the receding window. |
Send Options
In the Send Options section on the left of the NetAssist interface, you can configure options such as the data transmission format (ASCII or HEX), escape character command parsing, automatic appending of extra bytes, file source, and loop cycle.
The following table describes the options in the Send Options section.
| Option | Description |
|---|---|
ASCII |
The data is sent in the ASCII format. |
HEX |
The data is sent in the hexadecimal format. |
Use Escape Chars |
When sending ASCII text that contains escape characters, the escape characters are automatically parsed into the corresponding ASCII data for transmission, making it convenient for users to send non-printable characters in text form. You can click i to see detailed information of escape characters. |
Auto Append Bytes |
Automatically append a checksum or end character to the end of the transmitted data. |
Send from File… |
Save the data to be transmitted as a file and then send the data through the file source, which is typically used for cases that involve a large amount of data. |
Cycle |
Select Cycle and set the cycle time in mm. NetAssist will repeatedly send the input data according to the specified cycle. |
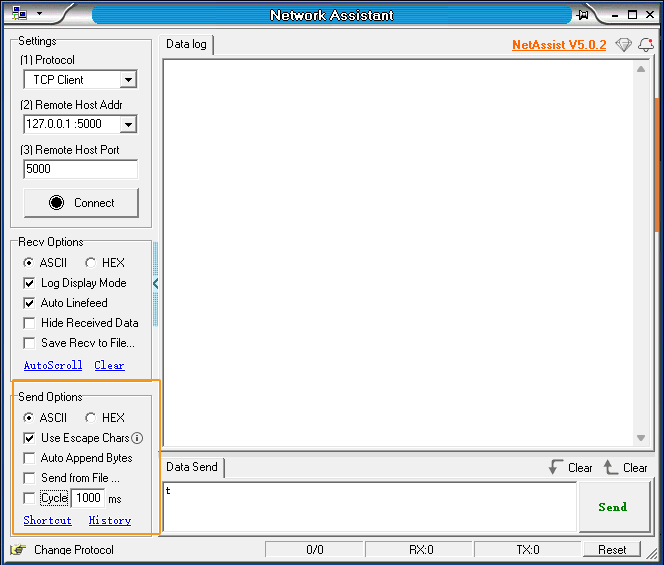
Settings
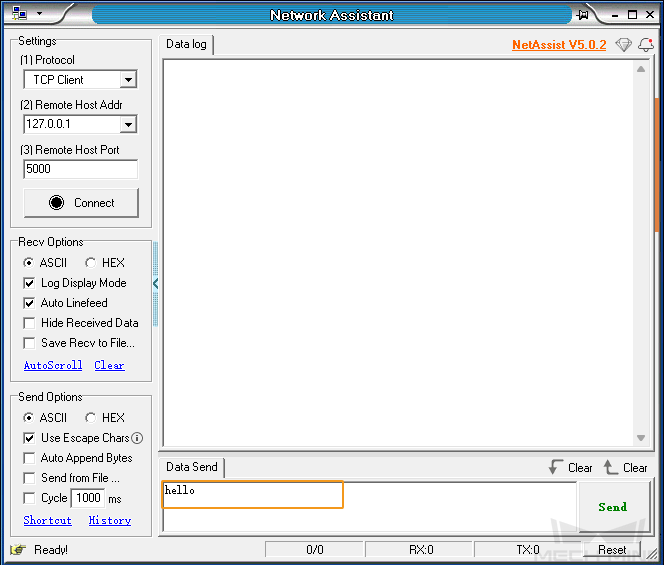
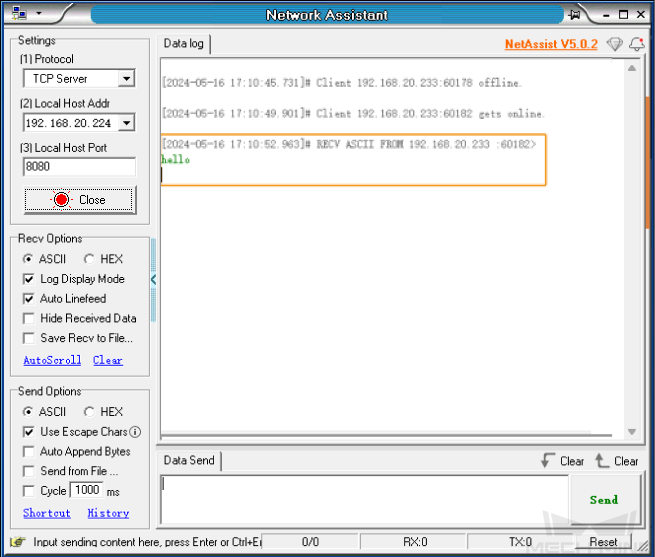
In the Settings section on the left of the NetAssist interface, you can set the protocol to TCP Server, TCP Client, or UDP. The following examples describe TCP and UDP communication settings.
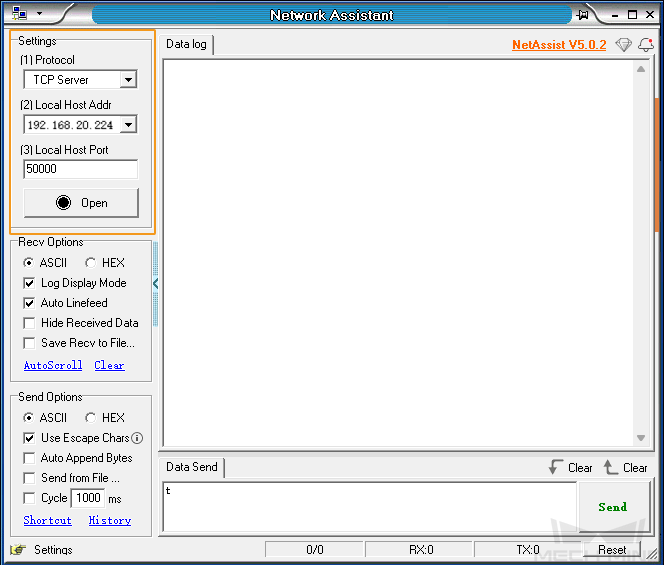
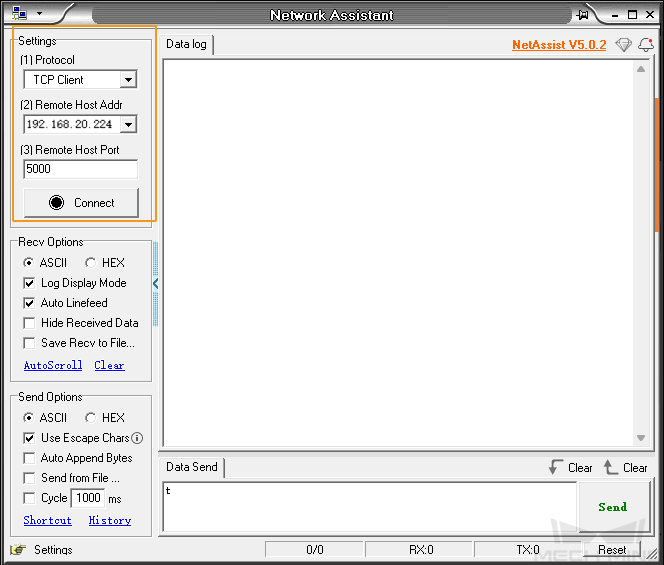
TCP Communication
Assume that computers A and B are on the same local area network (with the IP addresses and port numbers provided below), and each is running a NetAssist program. Computer A is used to simulate a TCP server, while computer B simulates a TCP client.
-
A (TCP server): IP address is 192.168.20.224 and port number is 50000.
-
B (TCP client): IP address is 192.168.20.233.
You can perform the following operations to test the TCP communication between A and B.
-
In the NetAssist program on computer A (TCP server), configure the network settings as shown in the figure below, and then click Open.
-
In the NetAssist program on computer B (TCP client), configure the network settings as shown in the figure below, and then click Open.
-
In the NetAssist program on computer B (TCP client), input hello and then click Send.
-
In the NetAssist program on computer A (TCP server), view the data sent by computer B (TCP client).
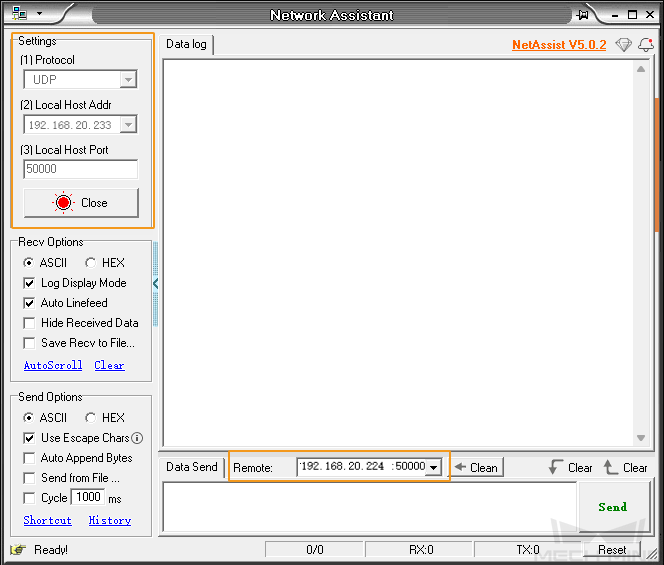
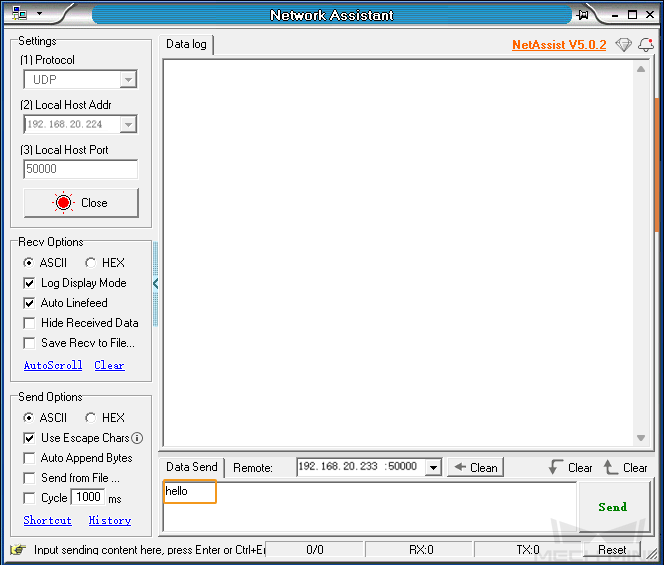
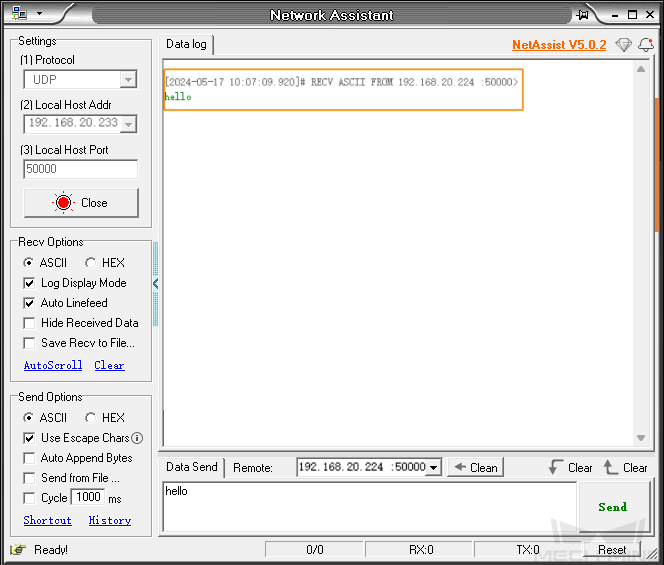
UDP Communication
Assume that computers A and B are on the same local area network (with the IP addresses and listening port numbers provided below), and each is running a NetAssist program. The UDP protocol is connectionless, so there is no need to distinguish between a server and a client.
-
Computer A: The IP address is 192.168.20.224, and the computer listens on port 50000.
-
Computer B: The IP address is 192.168.20.233, and the computer listens on port 50000.
You can perform the following operations to test the UDP communication between A and B.
-
In the NetAssist program on computer A, configure the network settings as shown in the figure below, and then click Open. In the Remote section, specify the IP address and port number of computer B.

-
In the NetAssist program on computer B, configure the network settings as shown in the figure below, and then click Open. In the Remote section, specify the IP address and port number of computer A.
-
In the NetAssist program on computer A, input hello and then click Send.
-
In the NetAssist program on computer B, view the data sent by computer A.
Use NetAssist to Send TCP Standard Interface Commands
The previous section covered the basics of NetAssist. This section describes how to use NetAssist to send TCP Standard Interface commands.
| Please ensure that a Mech-Vision project is properly build in advance and is set to autoloaded. The project ID must appear before the project name. |
-
In the Mech-Vision software on the IPC, set Interface service type, Protocol, and Port, as shown in the following figure.
If TCP Server is selected for Protocol, the configured interface service acts as the TCP server. 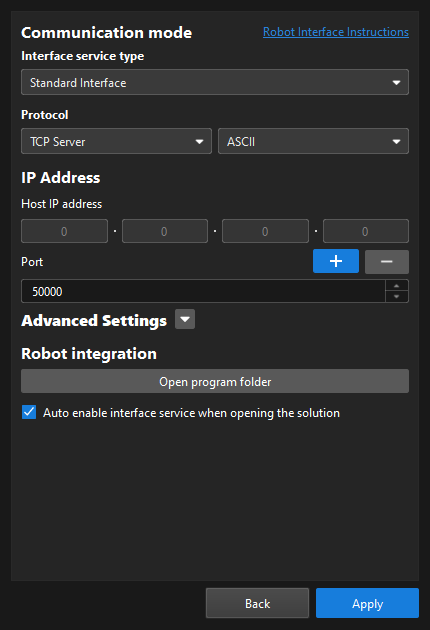
-
On the toolbar of the main interface of Mech-Vision, make sure that the interface service is started.

-
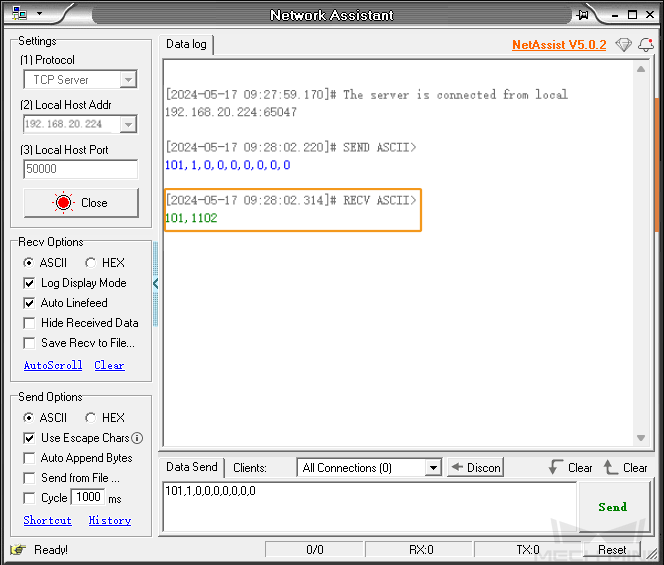
On the IPC, open NetAssist, select TCP Client for Protocol, specify the IP address of the actual IPC and specify the port set in Mech-Vision for Remote, and then click Open.
Note that the data formats for receiving and sending settings must match the protocol format set in the Mech-Vision software. 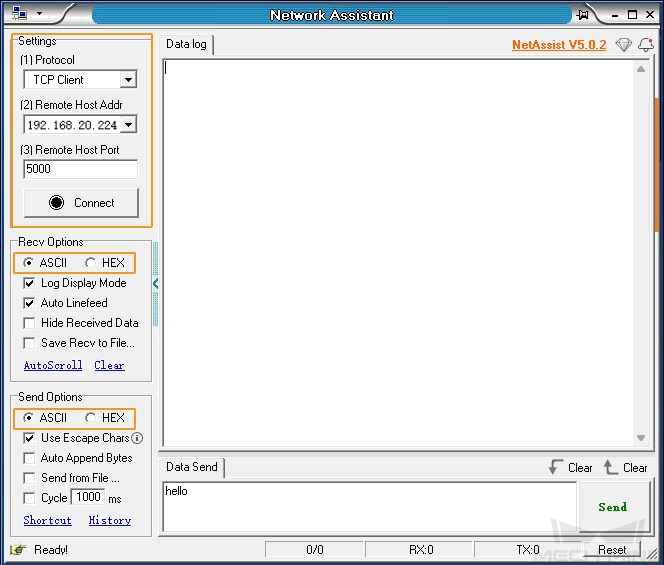
-
In the data-sending window, specify a command, such as 101,1,0,0,0,0,0,0,0, and then click Send.
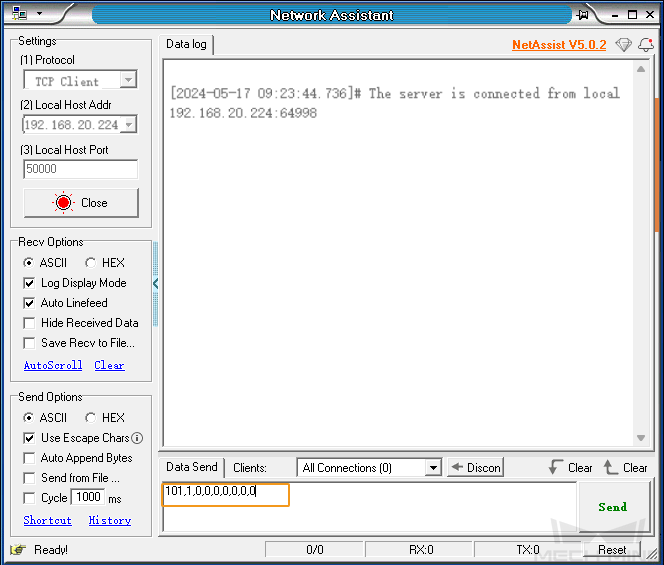
After the command is sent, you can view the data returned by the Mech-Vision software.
FAQ
Security Software Alerts to Issues with NetAssist
The software accesses the network to check version information upon startup. This may result in security software occasionally reporting errors with the software. If such an error occurs during operation, please trust the software.
Error “The specified address is already in use” Displayed in Status Bar During Listening
The listening port is occupied by another program. You can change the listening port or stop the program.
TCP Client Unable to Connect to TCP Server
This issue may have several causes, and a thorough examination of each of the following items is required.
-
When the TCP client connects to the server, ensure that the specified server address and port are correct.
-
Ensure that the correct network adapter address is selected for listening on the server.
-
Ensure that the server is started and actively listening on the specified port.
-
Ensure that the physical network connection between the client and server is intact. To check, run the ping command from the client to ping the server address and see if any data is returned. If you cannot ping the address, check for potential network problems.
-
Ensure that the server’s listening port is not being restricted by the server.
-
Ensure that the server and client reside in the same subnet.