AUBO (ARCS) Set up the Standard Interface Communication
This guide shows how to load the Standard Interface program files to an AUBO (ARCS) robot, and set up the Standard Interface communication between Mech-Mind Vision System and the robot.
Check Controller and Software Compatibility
-
Confirm that the AUBO robot’s control system is ARCS.
-
Confirm that the teach pendant version is 0.31.0-rc.30.
Click here for instructions
-
On the teach pendant Home screen, tap About to view the teach pendant version number.
-
| The standard interface plug-in does not support direct tablet-to-controller communication. If you need to use a tablet for communication, install RealVNC on the tablet and connect to the controller remotely to use the standard interface plug-in properly. |
Set up the Network Connection
Connect the Hardware
Plug one end of the Ethernet cable into the port of the IPC and the other end into the LAN port of the robot controller. The following figure shows a sample LAN port.
Set the IP Address
-
On the teach pendant Home screen, tap , and set the robot’s IP address according to the actual network configuration. After the preceding configurations are completed, click Apply.
-
In the IPC, set the IP address of the IPC.
To allow communication between the IPC and the robot controller, the IP addresses of the IPC and robot controller must reside in the same subnet. This means that the network portions and subnet masks of the IP addresses should be the same. For example, 192.168.100.169/255.255.255.0 and 192.168.100.170/255.255.255.0 are in the same subnet.
Set Euler Angle Convention
-
Open Mech-Viz, click New blank project. In the pop-up dialog, click Get Online Robot Model List, and under Robot Brand, select AUBO. In the right-side panel, select the specific robot model.
-
In the left-side panel of Mech-Viz, right-click the robot, then select Open Robot File Directory.
-
Go up two levels to reach the
Robot Library 2.0directory. -
Open the
robot_euler_angles_convention.jsonin Notepad, and add a field for the robot brand along with its Euler angle convention, referring to the existing information."AUBO": { "euler_angles_convention": "XYZ_S_w,p,r" }, -
Open the
default_robot_communication_settings.jsonin Notepad, and add a field for the robot brand along with its Euler angle convention, referring to the existing information."AUBO": { "is_enable_interface": true, "is_interface_needed": true, "interface_format": "ASCII", "interface_name": "TCP Server" }, -
Exit Mech-Viz.
Set up Robot Communication Configuration
-
Open Mech-Vision. You may enter different interfaces. Create a new solution according to the instructions below.
-
If you have entered the Welcome interface, click New blank solution.

-
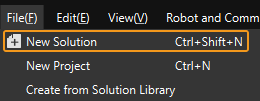
If you have entered the main interface, click on the menu bar.
-
-
Click Robot Communication Configuration on the toolbar of Mech-Vision.
-
In the Robot Communication Configuration window, complete the following configurations.
-
Click the Select robot drop-down menu, and select Listed robot. Click Select robot model, and select the robot model that you use. Then, click Next.
-
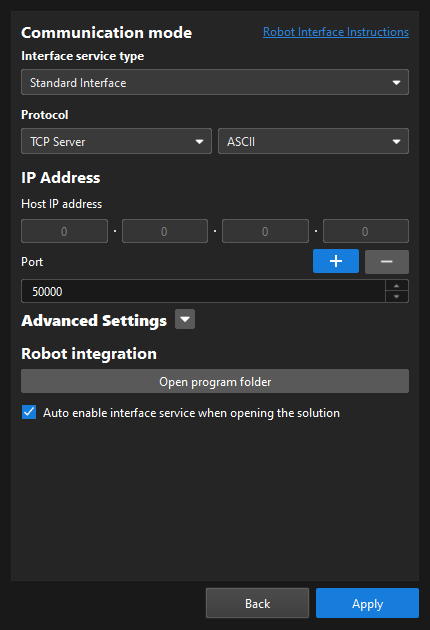
In the Communication mode section, select Standard Interface for Interface service type, TCP Server for Protocol, and ASCII for the protocol format.
-
It is recommended to set the port number to 50000 or above. Ensure that the port number is not occupied by another program.
-
(Optional) Select Auto enable interface service when opening the solution.
-
Click Apply.
-
-
On the main interface of Mech-Vision, make sure that the Robot Communication Configuration switch on the toolbar is flipped and has turned blue.

Load the Program Files to the Robot
-
On the industrial PC, go to the installation directories of the Mech-Vision or Mech-Viz, navigate to the
Communication Component \Robot_Interface\Robot_Plugin\AUBO_CAPfolder, copy themminterface-x.x.x.zipplug-in file to the root (top-level) directory of the USB drive, and then safely eject the USB drive.-
This document uses
mminterface-1.0.0.zipas an example; for other versions of the file, the procedure is similar. -
It is recommended to format the USB drive as FAT32 to ensure the robot can recognize and read it properly.
-
-
Plug the flash drive into the USB port on the back of the robot teach pendant.
-
On the teach pendant Home screen, tap , select your USB drive, then tap next to the
mminterface-x.x.x.zip. -
Click .
-
In the pop-up dialog, select the imported
mminterface-x.x.x.zip, then click Select. -
On the screen shown, set the mminterface plug-in status to On, then click Restart to activate the plug-in.
Test Standard Interface Communication
-
If the robot is powered off, on the teach pendant Home screen tap Power On; after confirming the payload, tap . If the robot is already powered on, skip this step and proceed to the next step.
-
On the teach pendant screen, tap Programming, check Add Before Start, and uncheck Program loops. A Before Start section will appear in the right-side program pane.
-
Click Plugins, select Empty under the Before Start section, click initSocket, and add mm_init_socket to the program. Under the Command tab, enter the IPC IP Address and the host-side Port in the Mech-Vision.
-
Under Robot Programming, click openSocket and closeSocket to add mm_open_socket and mm_close_socket to the program.
-
Save the above program, then click the Run button in the lower-left corner and select Run from Start Point.
-
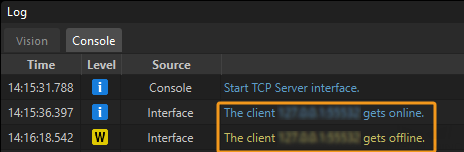
If the communication between the robot and the vision system is set up, a log will be recorded on the Console tab of the Log panel of Mech-Vision.