샘플 프로그램6: MM_S6_Viz_ErrorHandle
프로그램 소개
기능 설명 |
로봇이 Mech-Viz프로젝트 실행을 트리거한 후, 경로 계획 결과를 휙득하고 상태 코드에 따라 계획된 경로를 성공적으로 획득했는지 확인합니다. 성공적으로 계획 경로를 획득하면 로봇은 피킹 및 배치 작업을 실행합니다. 그렇지 않으면, 로봇은 실행이 종료됩니다. |
파일 경로 |
Mech-Vision 및 Mech-Viz의 설치 디렉토리로 이동하여 |
필요한 프로젝트 |
Mech-Vision와 Mech-Viz 프로젝트 |
사용 전제 조건 |
|
| 이 샘플 프로그램은 참고용으로 제공됩니다. 사용자는 실제 상황에 맞춰 이 내용을 바탕으로 수정해야 하며, 해당 프로그램을 그대로 사용하지 않도록 하십시오. |
프로그램 설명
다음에는 MM_S6_Viz_ErrorHandle 샘플 프로그램의 코드와 관련 설명입니다.
| MM_S2_Viz_Basic 샘플과 비하면, 이 샘플은 다양한 오류 상태 코드를 처리할 수 있는 기능만 추가되었습니다.(이 기능의 코드가 굵게 표시됨). 따라서, MM_S6_Viz_ErrorHandle의 MM_S2_Viz_Basic과 일치하는 부분은 다시 설명하지 않습니다. (일치하는 부분에 대한 정보는 MM_S2_Viz_Basic샘플 프로그램 설명을 참조하십시오). |
   1:  !-------------------------------- ;
   2:  !FUNCTION: trigger Mech-Viz ;
   3:  !project and get planned path, ;
   4:  !handle errors according to ;
   5:  !status codes (if no point cloud ;
   6:  !in ROI, retry several times ;
   7:  !before exit loop) ;
   8:  !Mech-Mind, 2023-12-25 ;
   9:  !-------------------------------- ;
  10:   ;
  11:  !set current uframe NO. to 0 ;
  12:  UFRAME_NUM=0 ;
  13:  !set current tool NO. to 1 ;
  14:  UTOOL_NUM=1 ;
  15:  !reset counter ;
  16:  R[99]=0    ;
  17:  !move to robot home position ;
  18:J P[1] 100% FINE    ;
  19:  !initialize communication ;
  20:  !parameters(initialization is ;
  21:  !required only once) ;
  22:  CALL MM_INIT_SKT('8','127.0.0.1',30000,5) ;
  23:  !move to image-capturing position ;
  24:L P[2] 1000mm/sec FINE    ;
  25:  LBL[1:vision] ;
  26:  !trigger Mech-Viz project ;
  27:  CALL MM_START_VIZ(2,10,53) ;
  28:  !check whether viz project has ;
  29:  !been triggered successfully ;
  30:  IF (R[53]<>2103),JMP LBL[99] ;
  31:  !get planned path, 1st argument ;
  32:  !(1) means getting pose in JPs ;
  33:  CALL MM_GET_VIZ(1,51,52,53) ;
  34:  !check whether planned path has ;
  35:  !been got from Mech-Viz ;
  36:  !successfully ;
  37:  IF R[53]<>2100,JMP LBL[99] ;
  38:  !save waypoints of the planned ;
  39:  !path to local variables one ;
  40:  !by one ;
  41:  CALL MM_GET_JPS(1,60,70,80) ;
  42:  CALL MM_GET_JPS(2,61,71,81) ;
  43:  CALL MM_GET_JPS(3,62,72,82) ;
  44:  !follow the planned path to pick ;
  45:  !move to approach waypoint ;
  46:  !of picking ;
  47:J PR[60] 50% FINE    ;
  48:  !move to picking waypoint ;
  49:J PR[61] 10% FINE    ;
  50:  !add object grasping logic here, ;
  51:  !such as "DO[1]=ON" ;
  52:  PAUSE ;
  53:  !move to departure waypoint ;
  54:  !of picking ;
  55:J PR[62] 50% FINE    ;
  56:  !move to intermediate waypoint ;
  57:  !of placing ;
  58:J P[3] 50% CNT100    ;
  59:  !move to approach waypoint ;
  60:  !of placing ;
  61:L P[4] 1000mm/sec FINE Tool_Offset,PR[2]    ;
  62:  !move to placing waypoint ;
  63:L P[4] 300mm/sec FINE    ;
  64:  !add object releasing logic here, ;
  65:  !such as "DO[1]=OFF" ;
  66:  PAUSE ;
  67:  !move to departure waypoint ;
  68:  !of placing ;
  69:L P[4] 1000mm/sec FINE Tool_Offset,PR[2]    ;
  70:  !move back to robot home position ;
  71:J P[1] 100% FINE    ;
  72:  END ;
  73:   ;
  74:  LBL[99:vision error] ;
  75:  !add error handling logic here ;
  76:  !according to different ;
  77:  !error codes ;
  78:  !e.g.: mm_status=2038 means no ;
  79:  !point cloud in ROI ;
  80:  !e.g.: mm_status=3099 means ;
  81:  !failed to open socket ;
  82:  IF R[53]=2038,JMP LBL[2] ;
  83:  JMP LBL[999] ;
  84:   ;
  85:  LBL[2] ;
  86:  !no point cloud in ROI, add ;
  87:  !handling logic here ;
  88:  !self-adding then check retry ;
  89:  !counter ;
  90:  R[99]=R[99]+1    ;
  91:  !jump back to vision retry label ;
  92:  !if the number of retry times is ;
  93:  !less than 3 ;
  94:  IF R[99]<3,JMP LBL[1] ;
  95:  !reset counter and exit loop if ;
  96:  !the number of retry times has ;
  97:  !reached 3 ;
  98:  R[99]=0    ;
  99:  JMP LBL[999] ;
  100:   ;
  101:  LBL[999:other error] ;
  102:  !add other error handling logic ;
  103:  !here ;
  104:  PAUSE ;
위 샘플 프로그램 코드에 해당하는 워크플로는 아래 그림에 표시되어 있습니다.
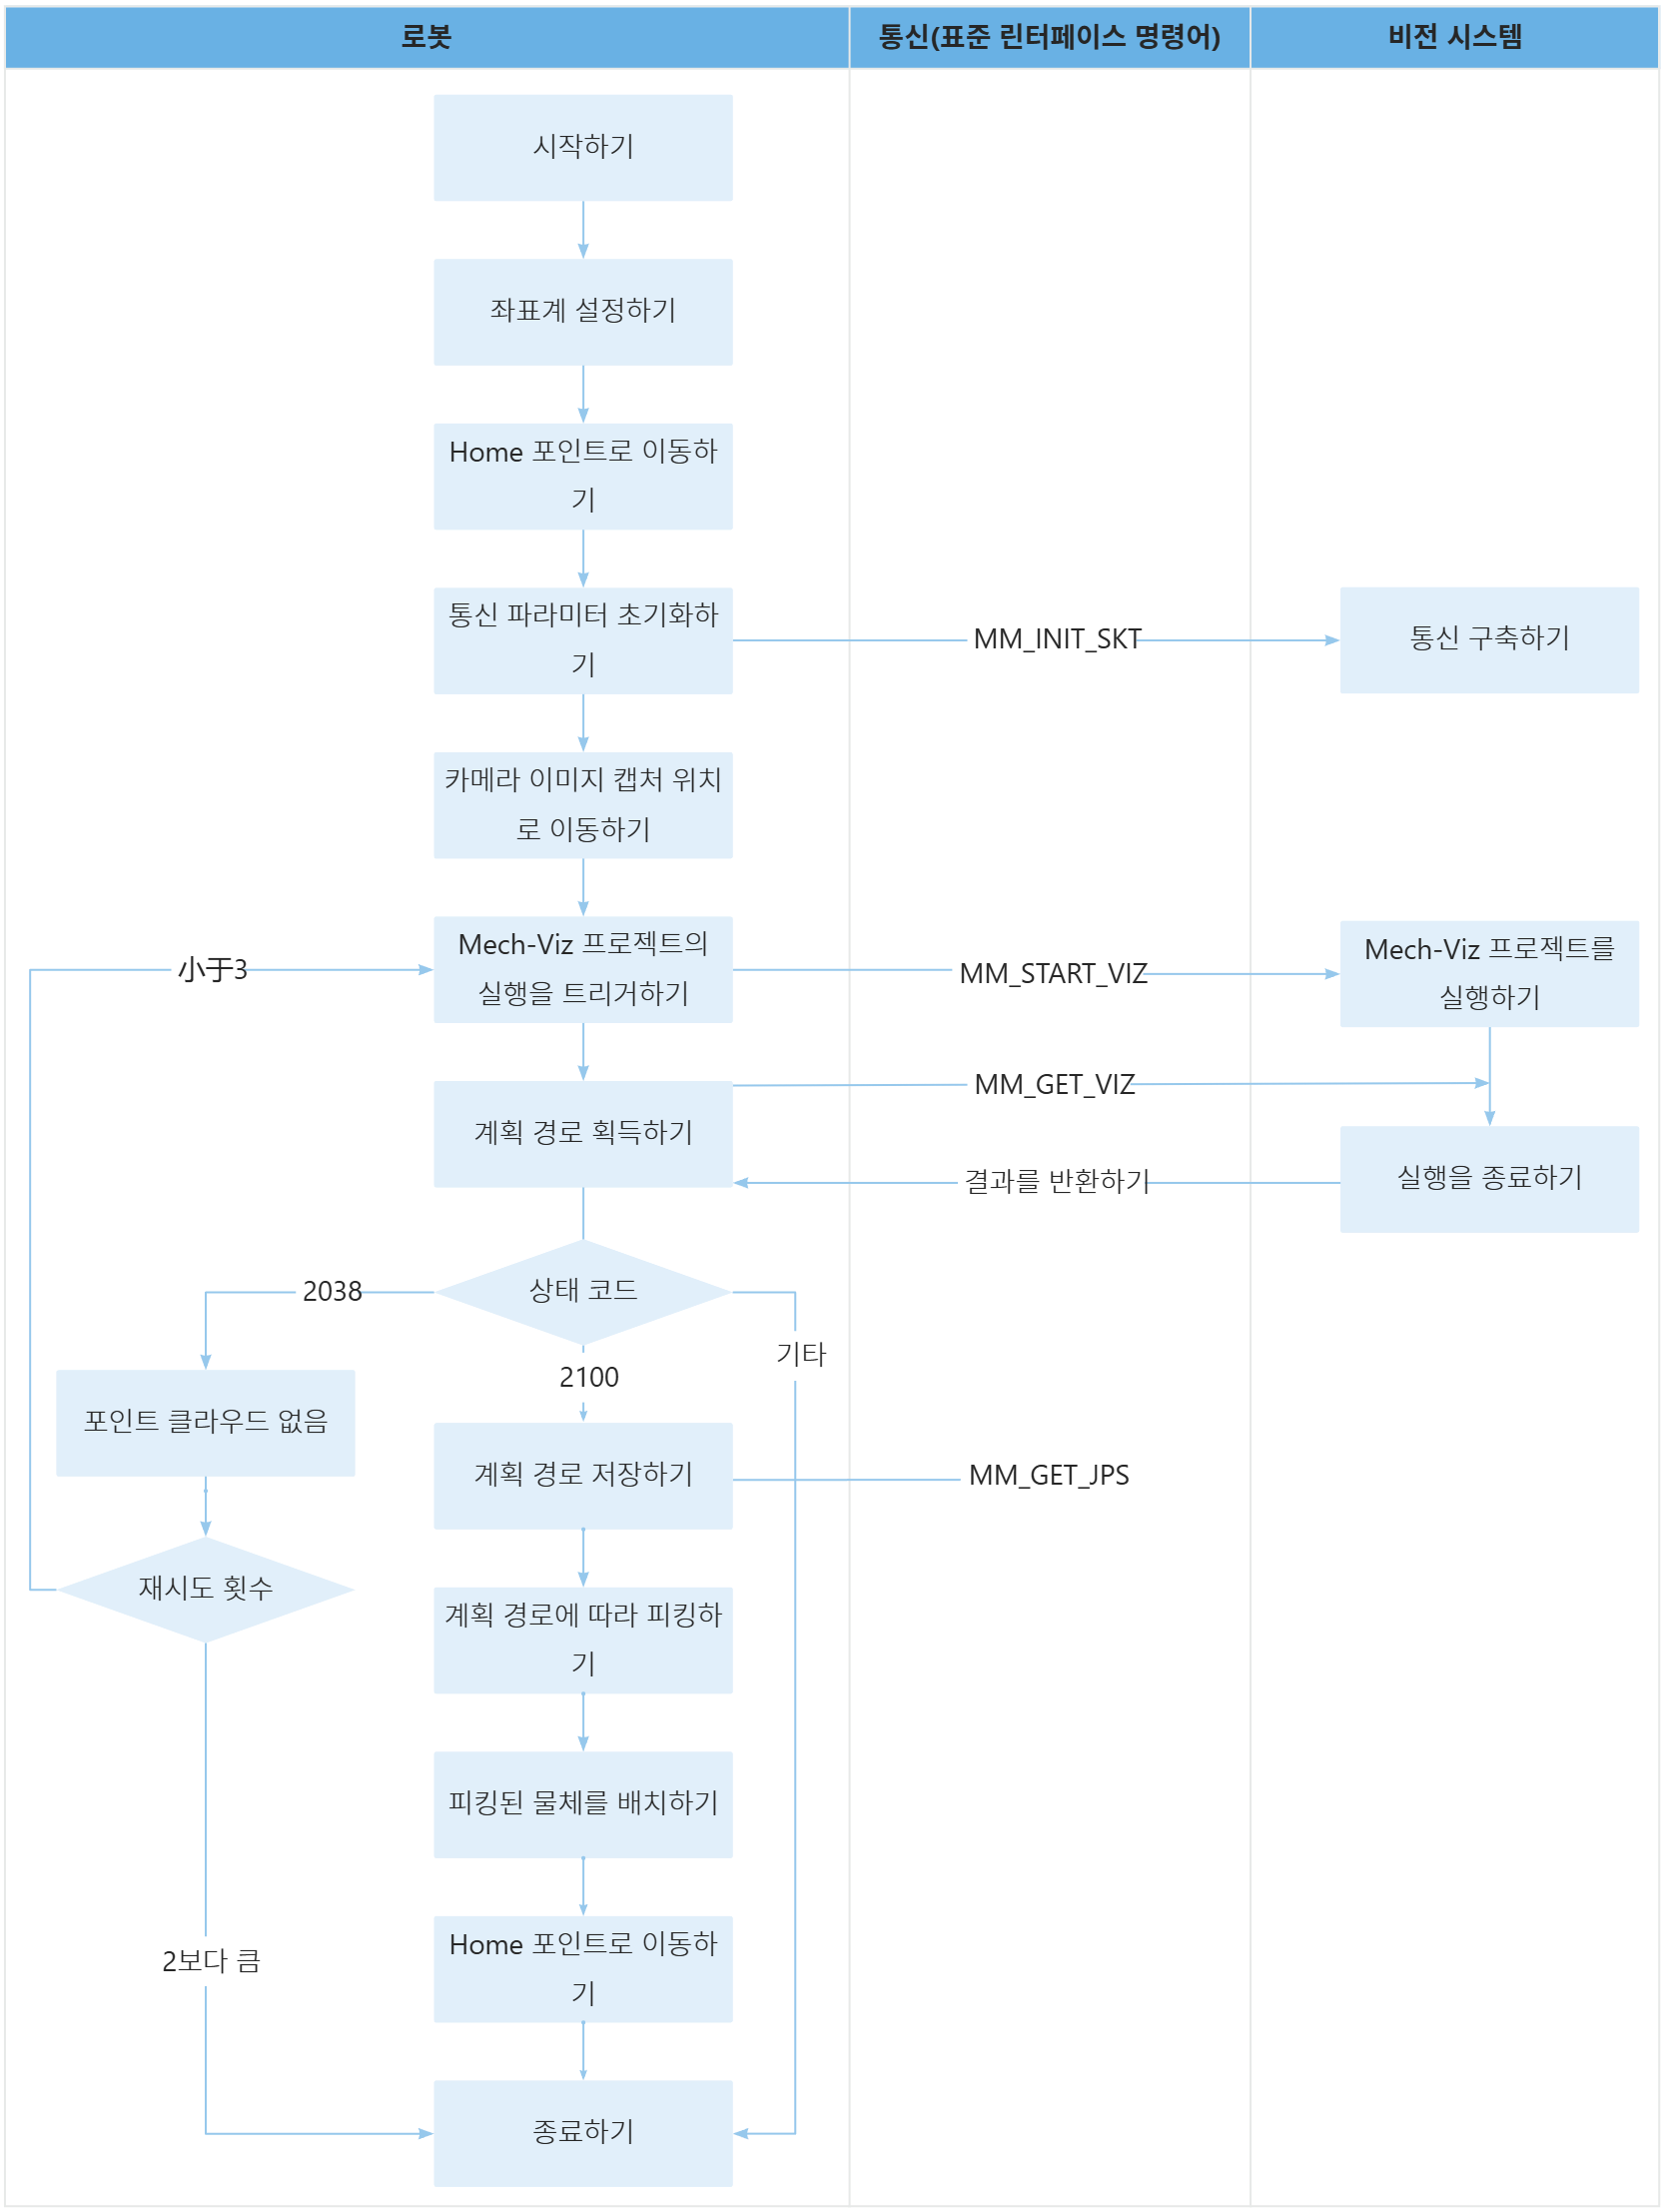
아래 표는 다양한 오류 상태 코드 처리의 설명입니다.
| 워크플로 | 코드와 설명 | ||
|---|---|---|---|
다양한 상태 코드를 처리하기 |
로봇이 MM_GET_VIZ명령어를 실행한 후, 수신된 상태 코드를 R[53] 레지스터 저장할 것입니다. 사용자는 구체적인 상태 코드에 따라 해당 처리를 할 수 있습니다. 이 샘플의 처리 논리를 참조하십시오.
|