1.7.0 Project Migration Guide
The new solution feature in Mech-Vision 1.7.0 introduces a solution-oriented file structure, which requires existing Mech-Vision projects to be migrated to the new structure.
After updating the software to version 1.7.0, please complete the project migration according to this document.
Overview
| Project type | Migration needed | Actions after software upgrade |
|---|---|---|
Communicate through Standard Interface or Adapter and use only Mech-Vision to obtain vision points. |
Migrate the Mech-Vision project(s) to a solution and reconfigure communication in Mech-Vision.
|
|
Use Mech-Viz to accomplish simple path planning. |
Contact Mech-Mind Technical Support and evaluate whether a Mech-Vision solution can satisfy the requirements.
|
|
Use Mech-Viz to master-control the robot. |
Keep using Mech-Center, Mech-Vision, and Mech-Viz in the previous way.
|
|
Use Mech-Viz to accomplish complicated tasks, such as mixed-case palletizing, multi-pick palletizing, and generation of complicated robot paths. |
Actions after Software Update
Migrate Mech-Vision Project into a Solution
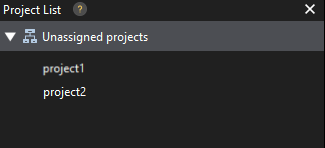
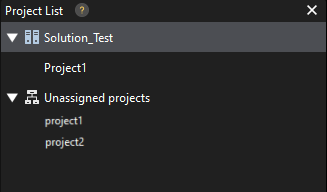
Move unassigned Mech-Vision projects into a solution in the order of original project ID.
| If a project does not belong to a solution, Camera Calibration cannot be used for it. |
1 |
Open the projects in Mech-Vision in the order of original project ID.
|
|
2 |
Select .
|
|
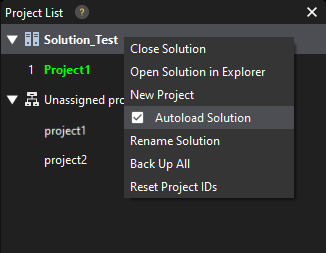
3 |
Right-click the solution name and select Autoload Solution. |
|
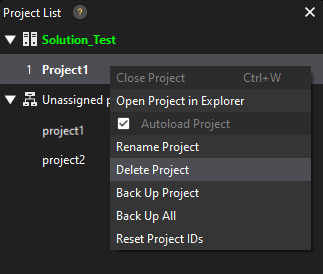
4 |
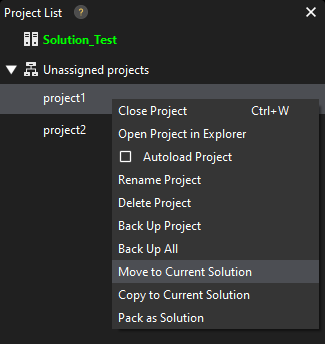
Right-click Project1 and click Delete Project in the context menu. |
|
5 |
Right-click the first unassigned project and select Move to Current Solution.
|
|
6 |
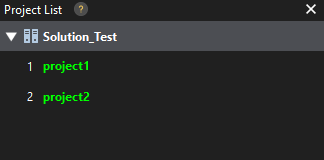
Make sure that the project IDs match those before the migration.
|
|
Configure Robot Communication
Complete robot and interface configuration in Mech-Vision. Before proceeding, please make sure that Mech-Center is not running, and run Mech-Vision only.
-
Click Robot and Interface Configuration on the toolbar of Mech-Vision.
-
In the drop-down menu of Select robot, select “Listed robot”.
-
Click Select robot model, and select the robot in use in the robot library.
-
Click Next to proceed.
-
Configure the interface type, protocol, IP address and other settings according to the actual communication setup.
-
Click Apply to start the interface service. A relevant message will be displayed in the Console tab of the Log panel, and the “Interface Service” icon on the toolbar is flipped.
Modify Run at Startup Settings
Disable Mech-Center to run automatically at startup and enable Mech-Vision to run automatically at startup.
-
Start Mech-Center, and .
-
Clear the Run Mech-Center at PC startup Mech-Center checkbox.
-
Click Save and close Mech-Center.
Enable Mech-Vision to run automatically at startup.
-
Start Mech-Vision, and click .
-
Check the Launch Mech-Vision at startup option, and then click OK.
Add the “Path Planning” Step to Mech-Vision Project
Add the “Path Planning” Step to the Mech-Vision project(s) to plan the robot motion path.
The following project is used as an example.
-
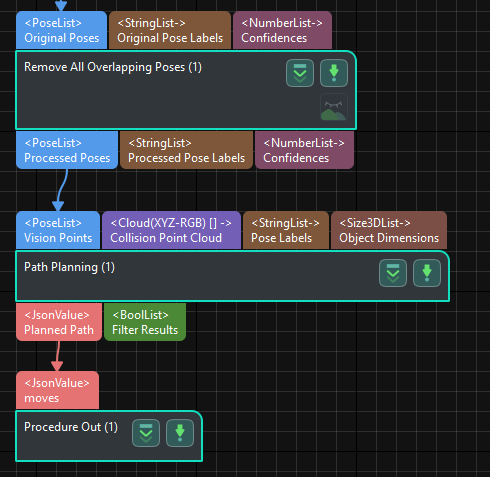
Search “Path Planning” in Step Library and drag it to the graphical programming workspace.
-
Set the “Port Type” parameter in the “Procedure Out” Step to “Predefined (robot path)”.
-
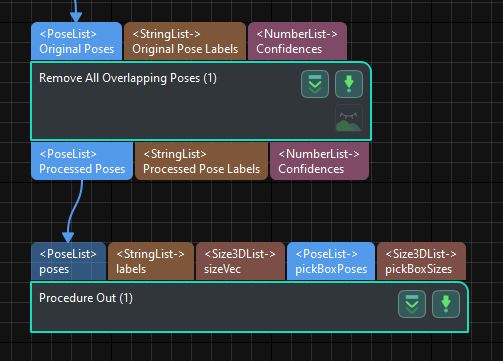
Connect the input and output ports according to the following figure.
-
Click Open path planning tool in the “Path Planning” Step.
-
Complete the configuration according to the section Path Planning Tool.
Load Standard Interface Program to Robot
Load the new Standard Interface program to the robot.
-
After selecting the robot in use in Robot and Interface Configuration, click Open program folder in the Communication Option page. The files in this folder are the Standard Interface program files and example programs.
-
Load the Standard Interface program to the robot according to the instructions in Standard Interface Communication.