Parameter Adjustment in the Supermarket Scenario
In the supermarket scenario, the supermarket picking configuration folder should be used, and then all parameters will be displayed.
It is recommended to use a GeForce GTX 10 Series graphics card with a memory of at least or above 4G when you use the model for this scenario. When you run this Step for the first time, the deep learning model will be optimized according to the hardware type and the one-time optimization process takes about 10 to 30 minutes depending on the computer configuration. Please wait for a while. After the model is optimized, the execution time of the Step will be greatly reduced.
Parameter Adjustment Order
-
Select Picking Configuration Folder Path first.
-
Set a Working Distance to limit the range for the camera to capture the data.
-
Adjust the Pose Processing parameter group to control the upward offset along the Z-axis to avoid damaging the object.
-
Perform Suction Cup Configuration, select whether to enable suction cups based on the mask heftiness and span, and enable sections of suction cups.
-
Configure Pose Sorting Logic and set weights for pose height and suction cup size.
Parameter Description
Working Distance
- Minimum Working Distance
-
Default value: 0
Instruction: The shortest distance between the camera and the object(s) in the scene. If a bin is used, please set this value to the distance from the bottom of the camera to the top edge of the bin. Please configure the value according to the actual situation.
- Maximum Working Distance
-
Default value: 3000 mm
Instruction: The longest distance between the camera and the object(s) in the scene. If a bin is used, please set this value to the distance from the bottom of the camera to the bottom edge of the bin. Please configure the value according to the actual situation.
Contour Detection (Special Shapes)
- Contour Detection
-
Default setting: Unselected.
Instruction: Select to detect the contour of the object. Once this option is selected, the Special Shape Filter parameter will appear.
Special Shape Filter (frequently used for parcel picking scenarios)
- Filter Out Narrow Objects
-
Default setting: Unselected.
Instruction: Once this option is selected, object whose smallest cuboid bounding box’s shortest edge is below the set threshold will be considered as the narrow object and therefore ignored.
- Short Edge Length Lower Limit
-
Default value: 0
Instruction: This option will appear once the Filter Out Narrow Objects is selected. Object whose smallest cuboid bounding box’s shortest edge is below this value will be considered as the narrow object and therefore ignored. Please configure the value according to the actual situation.
Example: When the value is set to 30, objects whose actual lengths are less than 30 mm will be filtered, as shown below. The top and bottom figures show the recognition result before and after filtering, respectively.

- Filter Out Long Objects
-
Default setting: Unselected.
Instruction: Once this option is selected, object whose smallest cuboid bounding box’s longest edge is higher than the set threshold will be considered as the long object and therefore ignored.
- Long Edge Length Upper Limit
-
Default value: 0
Instruction: This option will appear once the Filter Out Long Objects is selected. Object whose smallest cuboid bounding box’s longest edge is higher than this value will be considered as the long object and therefore ignored. Please configure the value according to the actual situation.
Example: When the value is set to 180, objects whose actual lengths are longer than 180 mm will be filtered, as shown below. The top and bottom figures show the recognition result before and after filtering, respectively.

Overlap Detection
- Overlap Detection
-
Default setting: Unselected.
Instruction: Please select this option when there are overlapping objects. Once this option is selected, the overlapping objects will be detected and their picking priority will be reduced.
- Max Number of Objects
-
Default value: 6
Instruction: This option will appear once Overlap Detection is selected. It defines the maximum number of objects which are considered overlapping objects. Please configure the value according to the actual situation. The higher this value, the more objects will be considered overlapping, and therefore it will be harder to complete the picking task. However, the target objects are less likely to be damaged.
Example: When the value is set to 6, no more than 6 overlapping objects will be detected, as shown below. The left and right figure shows the recognition results before and after setting the value. The objects in red are overlapping objects.
Suction Cup Configuration
This parameter determines the output result of the “Suction Cup Label” output port of the “Predict Pick Points” Step.
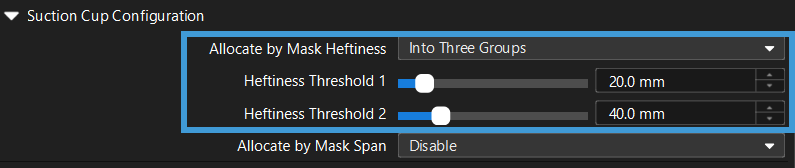
- Allocate by Mask Heftiness
-
Default setting: Disable.
Options: Disable, Into Two Groups, and Into Three Groups.
Instruction: The objects will be allocated to different groups according to the smallest inscribed circle’s radii of their masks, and the suction cup configuration of different groups will be different.
- Heftiness Threshold 1
-
Default value: 0
Instruction: The first threshold of the smallest inscribed circle’s radii. Objects with radii below this threshold will be allocated to group 1, while objects with radii above this threshold will be allocated to group 2.
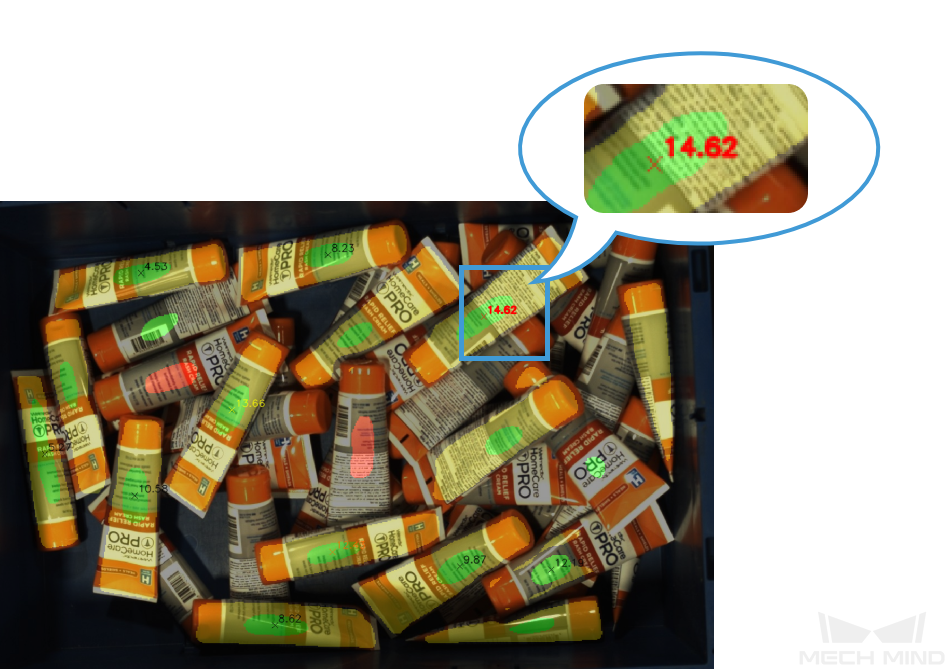
Example: As shown in the figure below, when the detected inscribed circle’s radius of the object mask is below 20 mm, the suction cup’s label will be labeled as “Small.”

- Heftiness Threshold 2
-
Default value: 0
Instruction: The second threshold of the smallest inscribed circle’s radii. Objects with radii below this threshold will be allocated to group 2, while objects with radii above this threshold will be allocated to group 3.
Example: As shown in the figure below, when the detected inscribed circle’s radius of the object mask is greater than 40 mm, the suction cup’s label will be labeled as “Large”, and if the radius is between 20 mm and 40 mm, the label will be labeled as “Medium.”
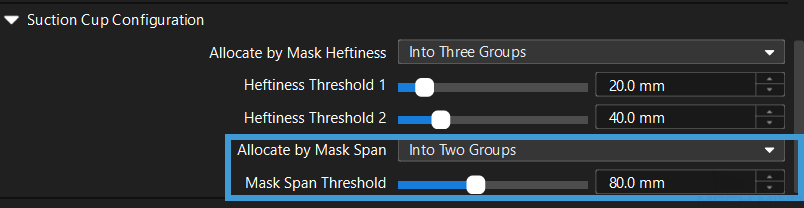
- Allocate by Mask Span
-
Default setting: Disable.
Options: Disable and Into Two Groups.
Instruction: The objects will be allocated to different groups according to the smallest bounding box’s diagonal of their masks, and the suction cup configuration of different groups will be different.
- Mask Span Threshold
-
Default value: 80
Instruction: Object(s) with diagonals below this threshold will be marked as “Short”, or else will be marked as “Long.”
Example: As shown in the figure below, the detected object will be labeled as “Long” when its length is greater than 80 mm, or else it will be labeled as “Short.”
Pose Sorting Logic
- Pose Height Weight
-
Default setting: 3
Options: 1, 2, 3
- Suction Cup Size Weight
-
Default setting: 1
Options: 0, 1, 2, 3
- Object Length Weight
-
Default setting: 1
Options: 0, 1, 2, 3
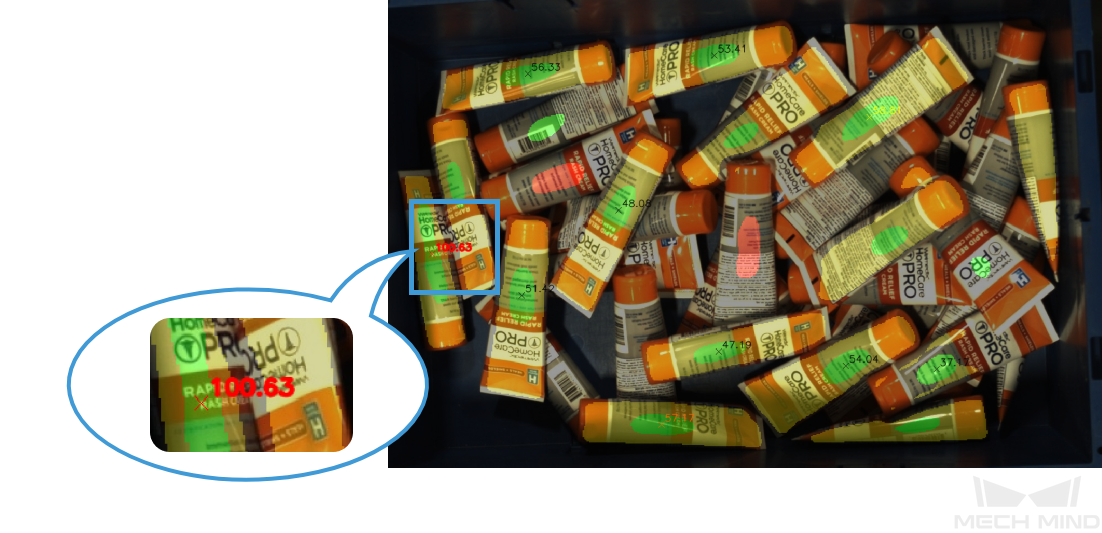
Instruction: When the Pose Height Weight, Suction Cup Size Weight, and Object Length Weight are specified, the final score is calculated according to the equation: Final Score = Pose Height × Pose Height Weight + Suction Cup Size × Suction Cup Size Weight + Object Length × Object Length Weight, and objects with higher final score will be prioritized for picking.
Visualization
- Enable
-
Default setting: Selected.
Instruction: Select to enable visualization.
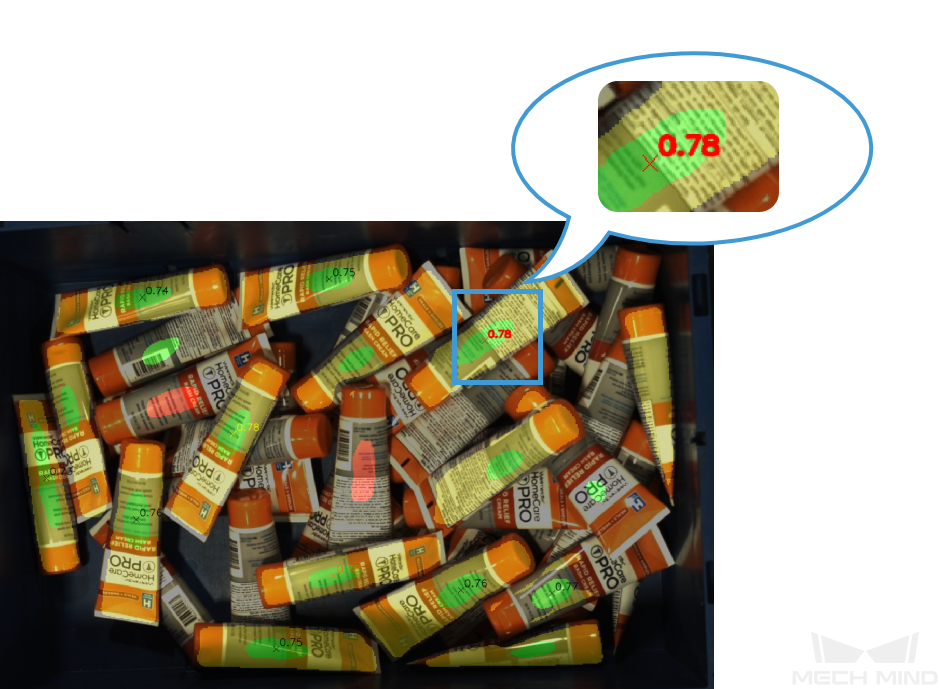
- Visualization Type
-
Default setting: Final Score.
Options: Final Score, Show Suction Cup Diameter, Show Object Length, and Show Pose Height.
Instruction: Select the options for visualization.
Example:
-
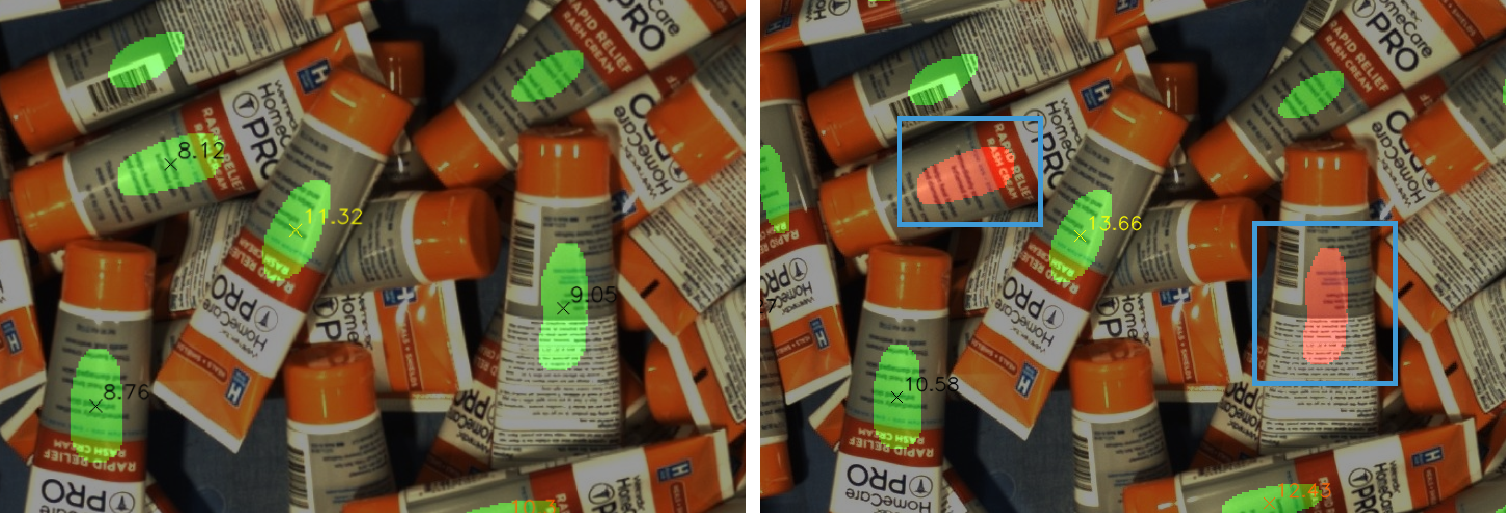
When Final Score is selected as the Visualization Type, the visualization result is shown below. The object with red text on it will be picked first.
-
When Show Suction Cup Diameter is selected as the Visualization Type, the visualization result is shown below. The object with red text on it will be picked first.

-
When Show Object Length is selected as the Visualization Type, the visualization result is shown below. The object with red text on it will be picked first.
-
When Show Pose Height is selected as the Visualization Type, the visualization result is shown below. The object with red text on it will be picked first.
-