Sequence Editor
This section introduces how to use the Sequence Editor. You can configure actions for different measurement events, sort, run, delete, and save actions in the Sequence Editor.
|
Description of Sequence Editor
Sequence Editor is a tool used in inline measurement software to configure and manage the measurement process. Through this tool, you can achieve flexible orchestration and automation of processes. This tool supports visualization, facilitating quick configuration and optimization of the measurement process, thus improving measurement efficiency and standardization.
This section covers the following topics:
Sequence Editor Interface Description
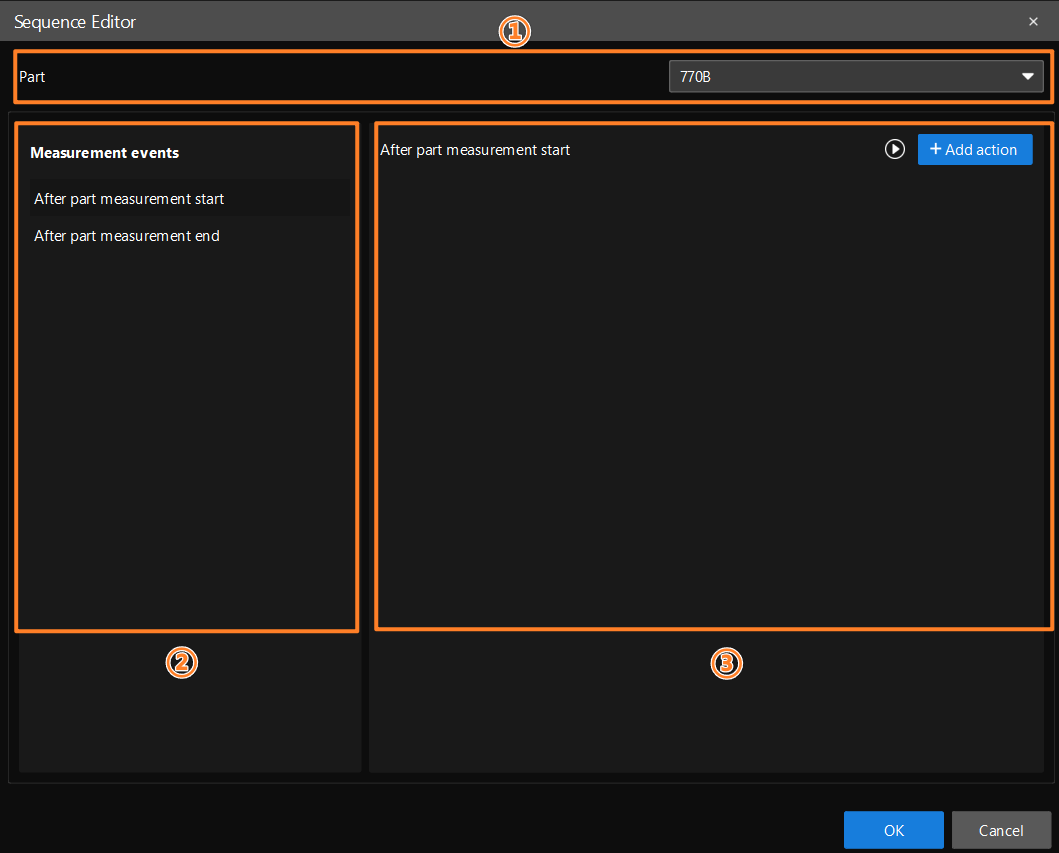
The interface of Sequence Editor consists of the following three parts:
| Section | Description |
|---|---|
Part selection |
Used to select the part for the current sequence configuration. Different parts correspond to different measurement task configurations. |
Measurement events |
Used to select the timing for triggering the sequence execution, including After part measurement start and After part measurement end. Different events correspond to different configurable actions. |
Action Configuration Area |
Displayed after a measurement event is selected, used to configure specific execution actions. The action types supported by different measurement events are different. Therefore, you must select a measurement event first before configuring the action. |
| In the opened Sequence Editor window, the loaded part is selected by default. If there are multiple parts in the current interface, you can switch to other parts for configuration. If there are no available parts in the current interface, the Sequence Editor button is unavailable. |
Configure the Measurement Start Event Action
Select After part measurement start in Measurement events, and then click Add action.
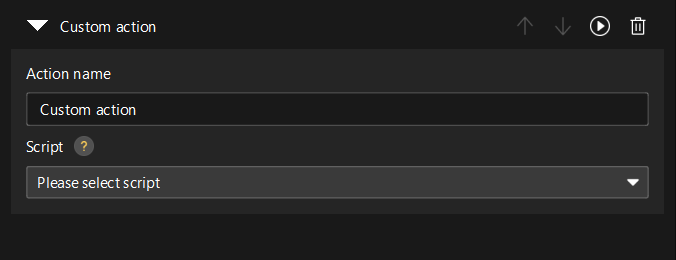
Select a Custom action in the Action Type and configure the following parameters:
-
Action name: used to set the name of the action, which can be customized according to business requirements.
-
Script: The script file to select for execution.
After configuration, click OK to save the configuration.
The script file must be stored in the /gems folder of the project directory, or else it will not be recognized by the system.
|
Configure the Measurement End Event Action
Select After part measurement end in Measurement events, and you can choose among the following actions:
Export Report
In the After part measurement end actions, select Export report, and then click to enter the Export report settings interface.
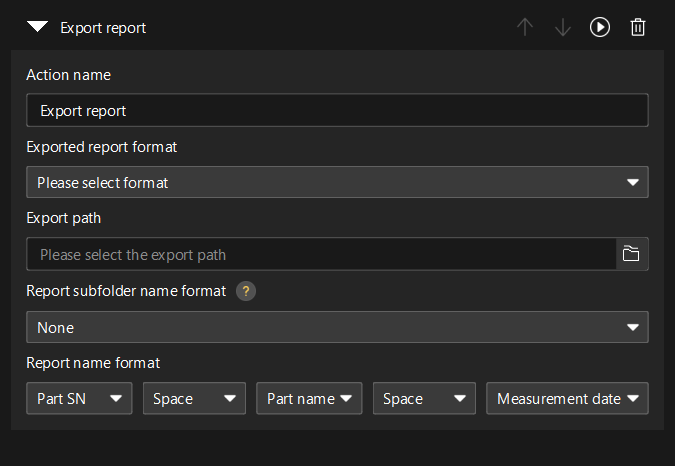
Once this option is selected, you can set the following parameters in the Action Configuration Area:
-
Action name: The original action name is displayed by default. You can modify it according to business needs.
-
Exported report format: used to select the type of report to be exported.
-
Export path: used to set the path for exporting the report file.
-
Report subfolder name format: used to set the naming convention for subfolders during export, such as date.
-
Report name format: used to set the rules for exporting file names.
After configuration, click OK to save the configuration.
| The reports subfolder can be organized as follows: automatically create a subfolder by date (default), or do not create a subfolder and all reports are stored directly in the export path. |
Export and Upload Report
In the After part measurement end actions, select Export and upload report, and then click to enter the settings interface.
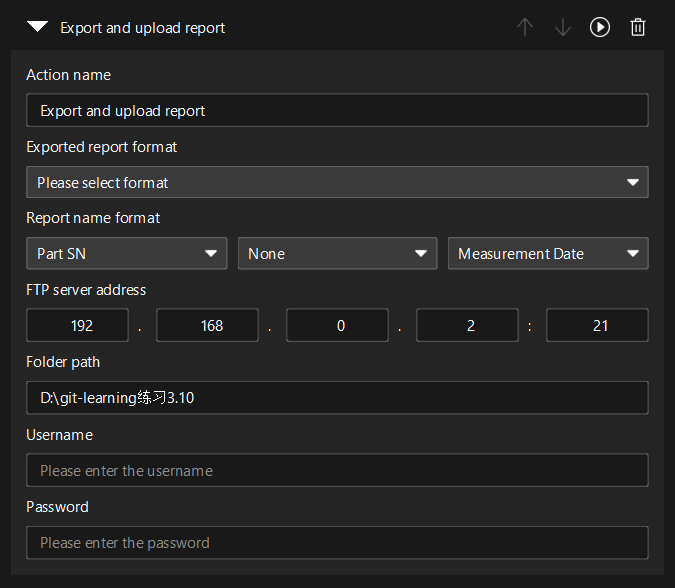
Once this option is selected, you can set the following parameters in the Action Configuration Area:
-
Action name: The original action name is displayed by default. You can modify it according to business needs.
-
Exported report format: used to select the type of report to be exported.
-
Report name format: used to set the naming convention for the exported file.
-
FTP server address: used to set the destination server address for the upload.
-
Folder path: Specify the directory to upload to the FTP server.
-
Username: The account information used to log in to the FTP server.
-
Password: The authentication password used to log in to the FTP server.
After configuration, click OK to save the configuration.
Custom Upload Action
In the After part measurement end actions, select Custom upload action, and then click to enter the settings interface.
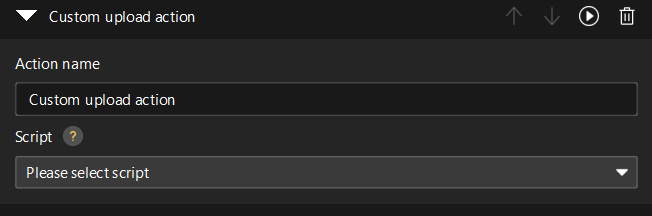
Once this option is selected, you can set the following parameters in the Action Configuration Area:
-
Action name: Set the name of the action, which can be customized according to business needs.
-
Script: The script file to select for execution.
After configuration, click OK to save the configuration.
The script file must be stored in the /gems folder of the project directory, or else it will not be recognized by the system.
|
Custom Action
In the After part measurement end actions, select Custom action, and then click to enter the settings interface.

Once this option is selected, you can set the following parameters in the Action Configuration Area:
-
Action name: used to set the name of the action, which can be customized according to business requirements.
-
Script: The script file to select for execution.
After configuration, click OK to save the configuration.
The script file must be stored in the /gems folder of the project directory, or else it will not be recognized by the system.
|
Event and Action Operation
The Sequence Editor supports ascending, descending, running, and deleting operations on events or actions.
Common operations related to actions are as follows:
-
Run: Click the Run button next to the action to execute it.
-
Running result: The Run button is available when there are no empty fields in the action parameters. After execution, the running result will be displayed after the action name, and you can view the details.
-
Running details:
-
If the action runs successfully, you can check the execution time and status.
-
If the action fails, you can check the execution time, execution status, and reasons for the failure.
-
-
Delete: After clicking the Delete button, a secondary confirmation message will pop up.
-
Click Confirm and delete the action.
-
After clicking Cancel or Close the pop-up window, the deletion operation will not be performed.
-
Save and Close
The Sequence Editor includes the OK, Cancel, and Close buttons.
-
OK: Unavailable by default and linked to action parameters.
-
When there are empty fields in the action parameters, the OK button is disabled.
-
The OK button is available when there are no empty fields in the action parameters.
-
-
Cancel: Available by default. After clicking Cancel, the current parameters will not be saved, and the Sequence Editor window will be closed.
-
Close: Available by default. If there is no unsaved content in the current interface, clicking the Close button will not save the parameters in the current window and directly close the Sequence Editor window.
|
If there is unsaved content in the current interface, a secondary confirmation message will pop up when you close Sequence Editor. |
Through the above steps, you can configure the Sequence Editor.