サンプルプログラム17:MM_S17_Vis_ParseLabel
プログラム概要
機能 |
ロボットはMech-Visionプロジェクトをトリガーして実行し、ビジョン結果を取得します。その後、ラベルを解析し、解析されたラベルに基づいて異なる処理ロジックを追加し、把持および配置を実行します。 |
ファイル場所 |
Mech-VisionとMech-Vizソフトウェアのインストールディレクトリにある |
必要なプロジェクト |
Mech-Visionプロジェクト(出力 ステップの labels ポートにデータがある必要があります) |
使用前提 |
|
| このサンプルプログラムは参考用です。ユーザーは実際の状況に応じて、このプログラムを基に変更を加える必要があります。このプログラムをそのまま使用しないでください。 |
プログラム説明
以下はMM_S17_Vis_ParseLabelサンプルプログラムのコードと関連する説明です。
| このサンプルは、MM_S1_Vis_Basicサンプルに比べて、ラベル解析機能(太字部分のコード)のみが追加されています。そのため、MM_S1_Vis_Basicサンプルと同じ部分のコードについては、以下で再度説明することはありません(詳細は MM_S1_Vis_Basicサンプルの説明 をご参照ください)。 |
DEF MM_S17_Vis_ParseLabel ( )
;---------------------------------------------------
; FUNCTION: trigger Mech-Vision project and get
; vision result, then parse the label info
; Mech-Mind, 2023-12-25
;---------------------------------------------------
;set current tool no. to 1
BAS(#TOOL,1)
;set current base no. to 0
BAS(#BASE,0)
;move to robot home position
PTP HOME Vel=100 % DEFAULT
;initialize communication parameters (initialization is required only once)
MM_Init_Socket("XML_Kuka_MMIND",873,871,60)
;move to image-capturing position
LIN camera_capture Vel=1 m/s CPDAT1 Tool[1] Base[0]
;trigger NO.1 Mech-Vision project
MM_Start_Vis(1,0,2,init_jps)
;get vision result from NO.1 Mech-Vision project
MM_Get_VisData(1,pos_num,status)
;check whether vision result has been got from Mech-Vision successfully
IF status<> 1100 THEN
;add error handling logic here according to different error codes
;e.g.: status=1003 means no point cloud in ROI
;e.g.: status=1002 means no vision result
halt
ENDIF
;save first vision point data to local variables
MM_Get_Pose(1,Xpick_point,label,toolid)
;parse label info received from Mech-Vision, eg. "label=56" will decompose into 5 and 6
label_1=label / 10; !label_1=5
label_2=label - label_1*10; !label_2=6
;add handling logic according to decomposed label value
IF label_1==5 THEN
;add handling logic a
halt
ELSE
;add handling logic b
halt
ENDIF
;calculate pick approach point based on pick point
tool_offset={X 0,Y 0,Z -100,A 0,B 0,C 0}
Xpick_app=Xpick_point:tool_offset
;move to intermediate waypoint of picking
PTP pick_waypoint CONT Vel=50 % PDAT1 Tool[1] Base[0]
;move to approach waypoint of picking
LIN pick_app Vel=1 m/s CPDAT2 Tool[1] Base[0]
;move to picking waypoint
LIN pick_point Vel=0.3 m/s CPDAT3 Tool[1] Base[0]
;add object grasping logic here, such as "$OUT[1]=TRUE"
halt
;move to departure waypoint of picking
LIN pick_app Vel=1 m/s CPDAT2 Tool[1] Base[0]
;move to intermediate waypoint of placing
PTP drop_waypoint CONT Vel=100 % PDAT2 Tool[1] Base[0]
;move to approach waypoint of placing
LIN drop_app Vel=1 m/s CPDAT4 Tool[1] Base[0]
;move to placing waypoint
LIN drop Vel=0.3 m/s CPDAT5 Tool[1] Base[0]
;add object releasing logic here, such as "$OUT[1]=FALSE"
halt
;move to departure waypoint of placing
LIN drop_app Vel=1 m/s CPDAT4 Tool[1] Base[0]
;move back to robot home position
PTP HOME Vel=100 % DEFAULT
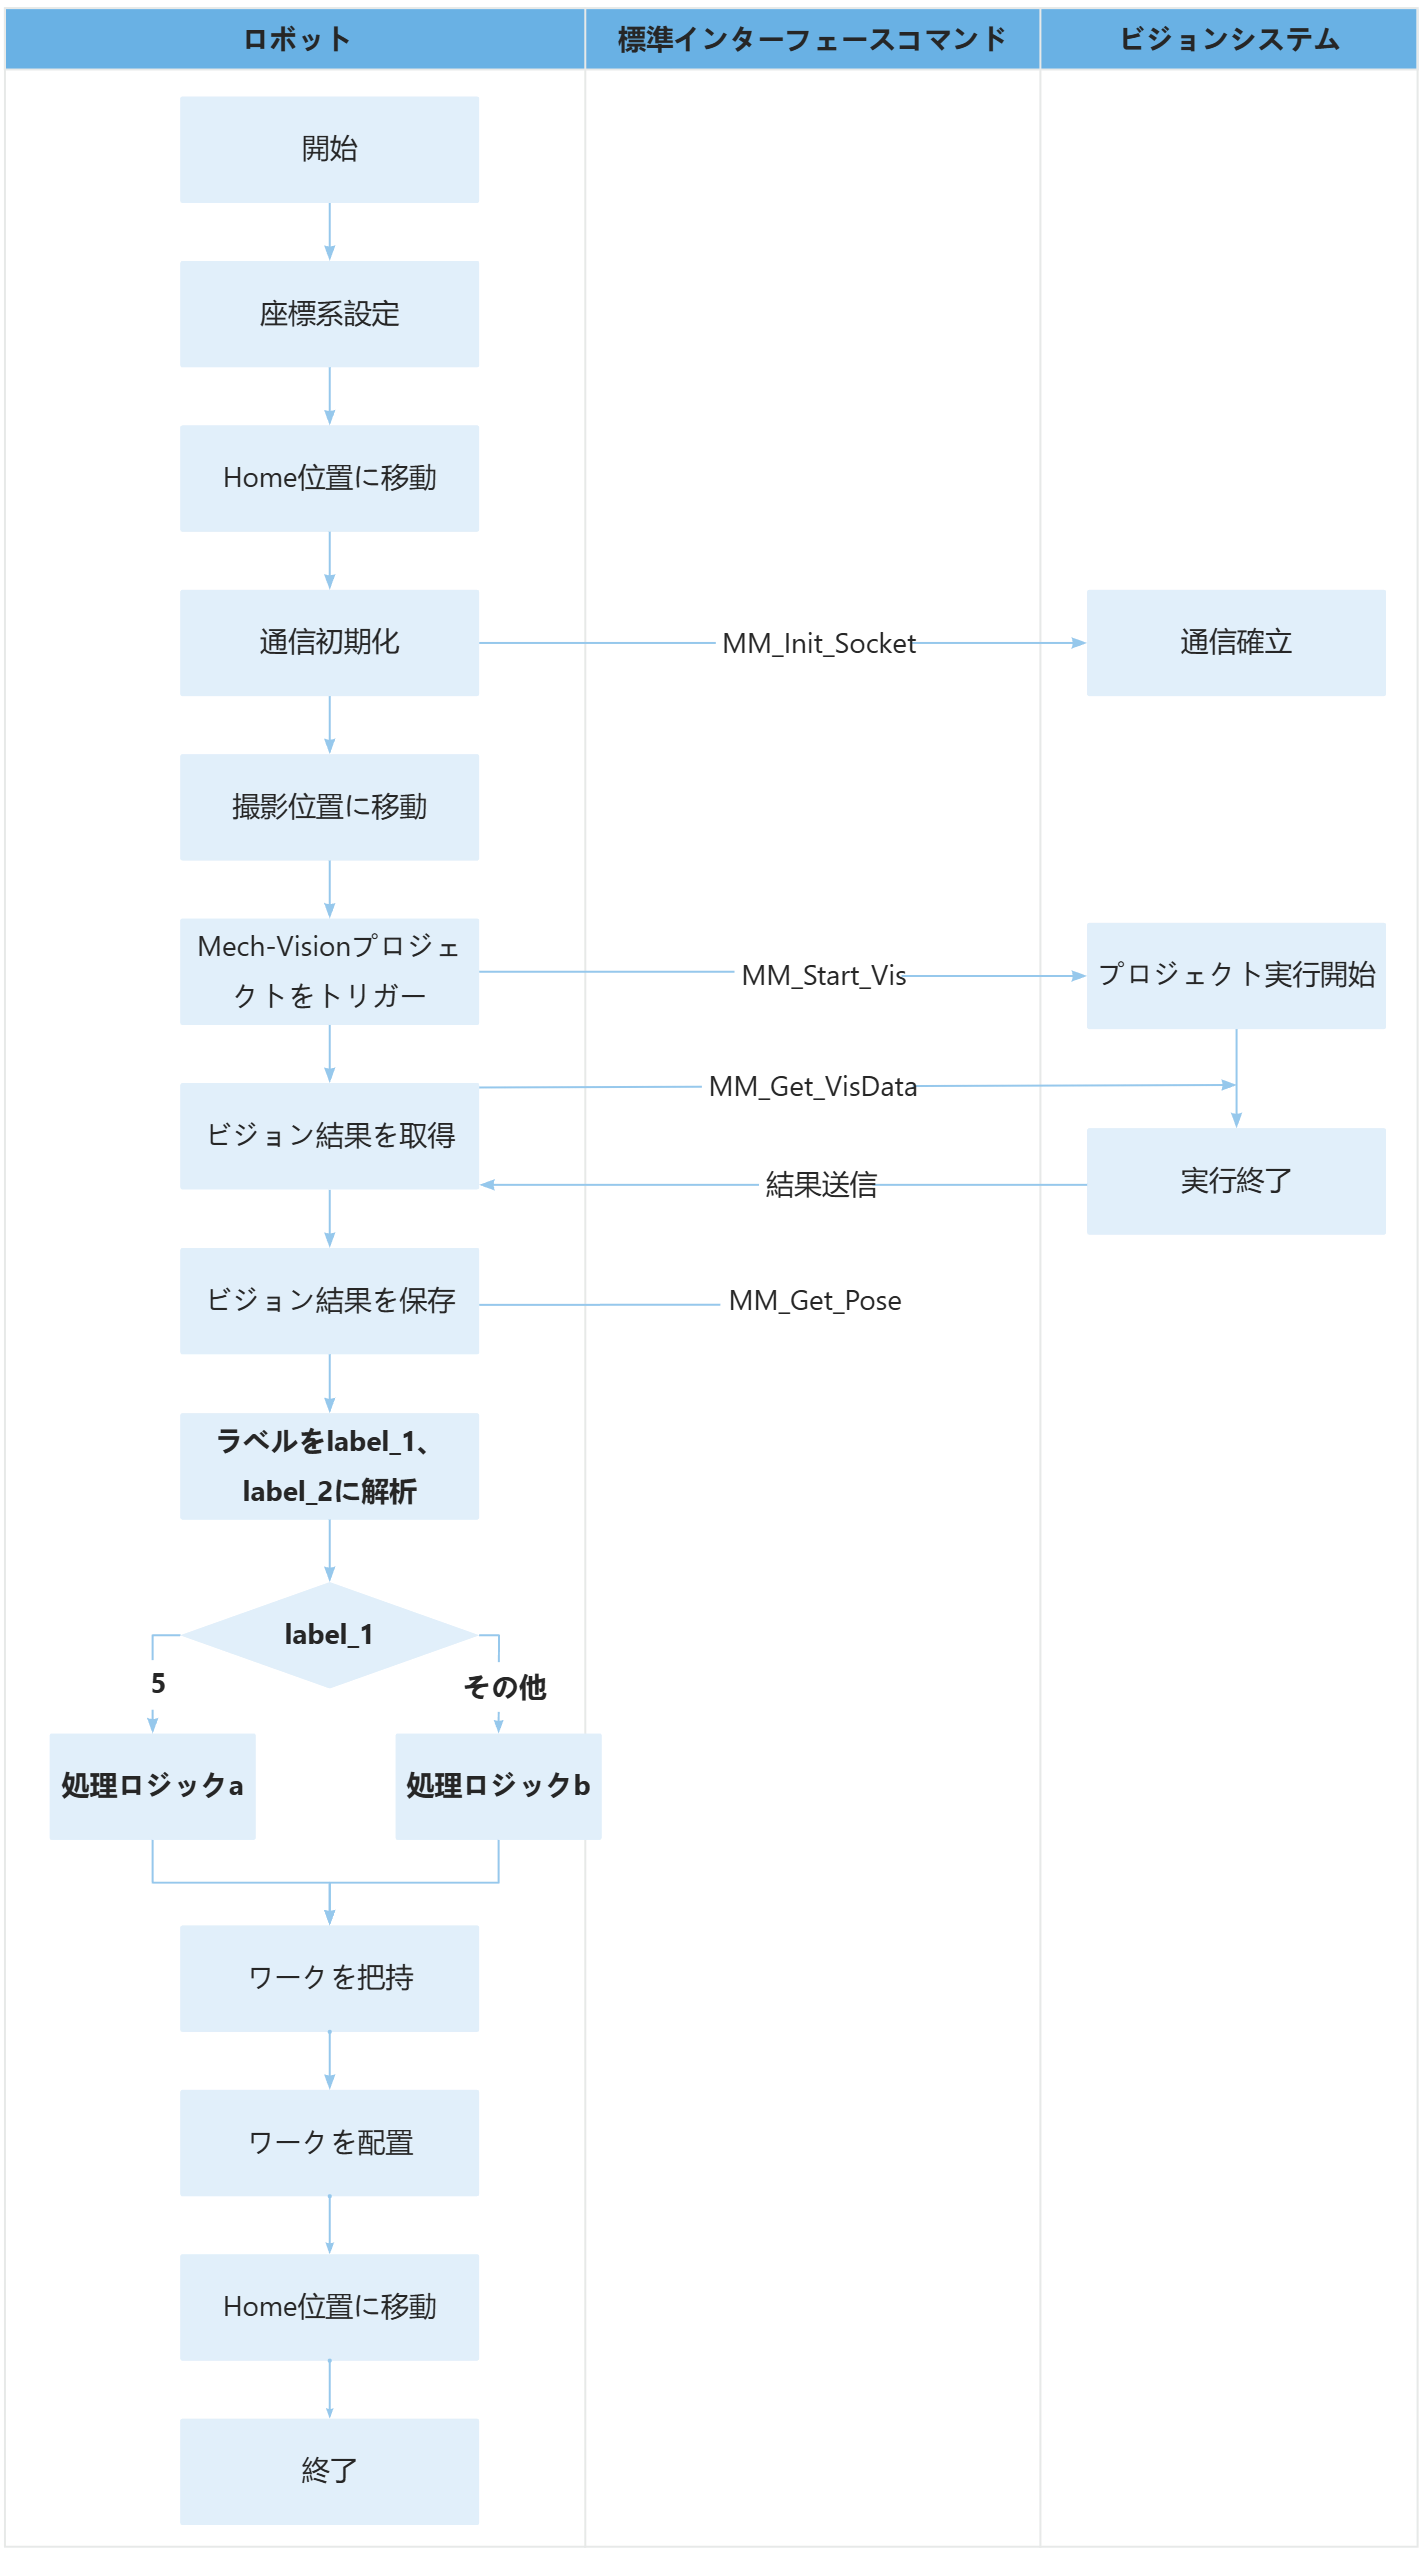
END上記のサンプルプログラムの処理流れは、下図の通りです。
下表は、ラベル解析機能のコードとその説明です。コマンド名のリンクをクリックすることで、その詳細を確認できます。
| 処理流れ | コートと説明 |
|---|---|
ラベルをlabel_1、label_2に解析 |
MM_Get_Pose コマンドを使用して、ビジョンポイントのツール位置姿勢、ラベル、ロボットハンド番号をそれぞれ変数Xpick_point、label、toolidに保存できます。本サンプルでは、変数labelの値を56とします。この場合、「label / 10」はlabelを10で割った商(つまり5)を意味し、「label - label_1*10」はlabelを10で割った余り(つまり6)を意味します。 これで、ラベルはlabel_1とlabel_2に解析されます(つまり、56は5と6に解析される)。 |
解析されたラベル値に応じた処理ロジックの追加 |
上記のコードは、label_1が5の場合は処理ロジックaを実行し、それ以外の場合は処理ロジックbを実行することを意味します。実際の適用シーンに応じて、異なるラベル値に対して異なる処理ロジックを追加することができます。 |