Standard Interface Programming for JAKA
This document introduces how to write a Standard Interface program by using JAKA’s programming feature. You can apply the example program with a little modification. There is no requirement on the version of the robot controller when using the example programs provided in this section.
Load the Example Programs
-
Open the JAKA folder in
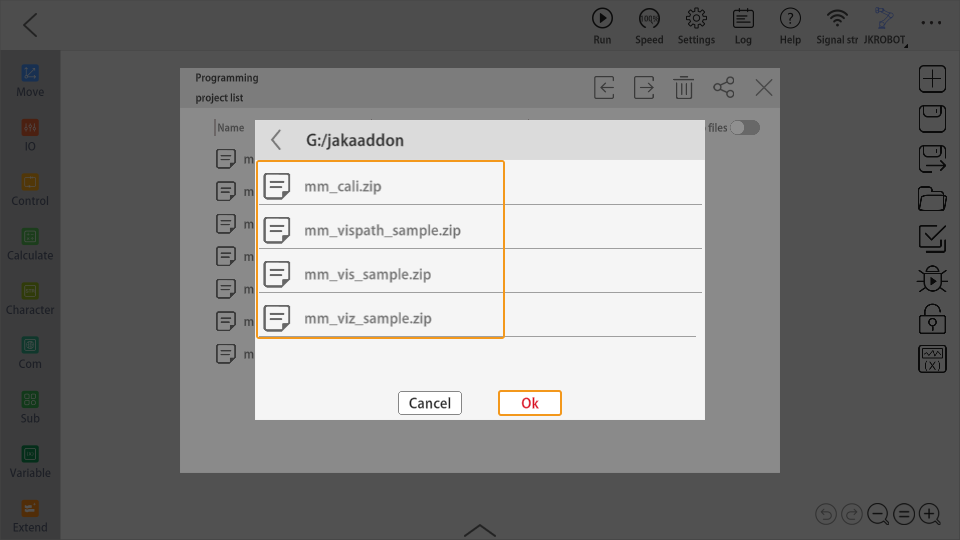
Communication Component\Robot_Interface\JAKAin the installation directory of Mech-Vision & Mech-Viz. Copy themmCali.zip,mmVis.zip,mmVisPath.zip, andmmViz.zipfiles to the machine where JAKA Zu APP is installed. The subsequent operations require importing the four files copied here. -
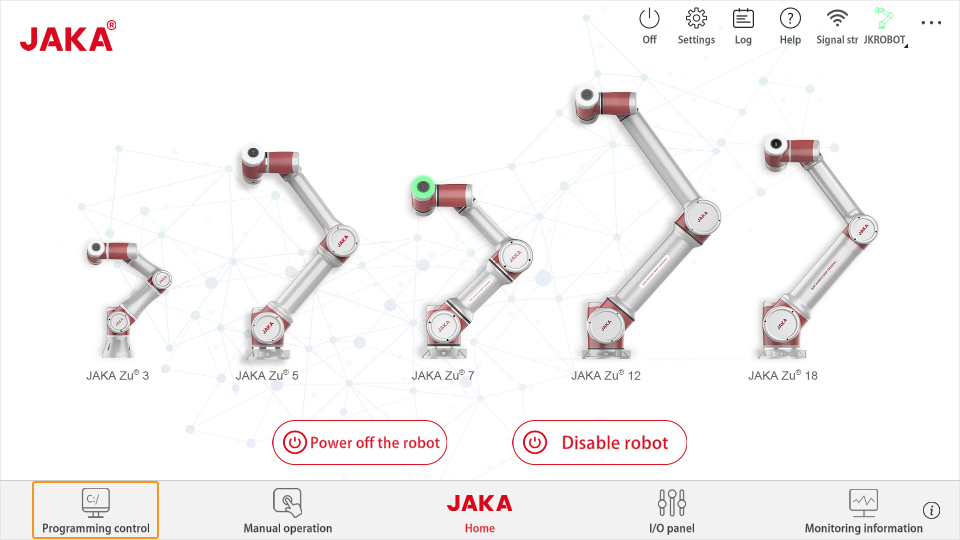
Go back to JAKA’s main interface, and click Programming control in the lower left corner.
-
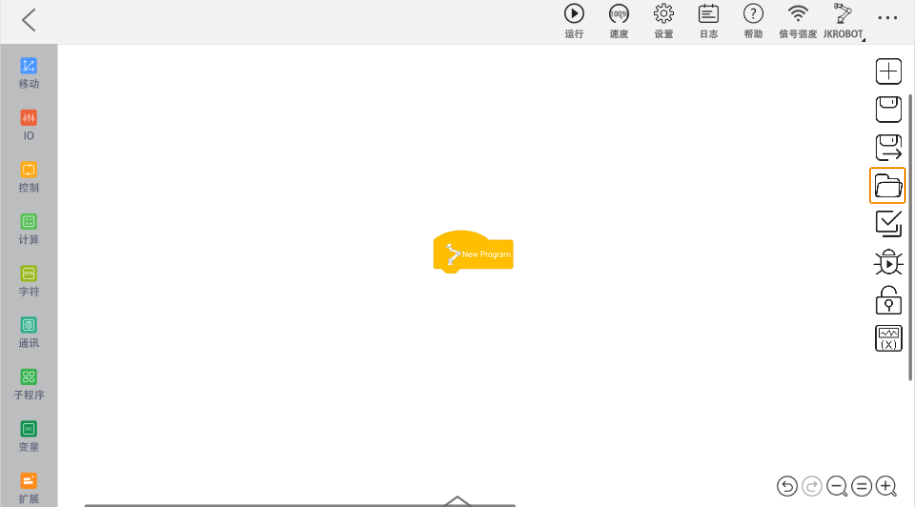
Click the folder icon on the right side.
-
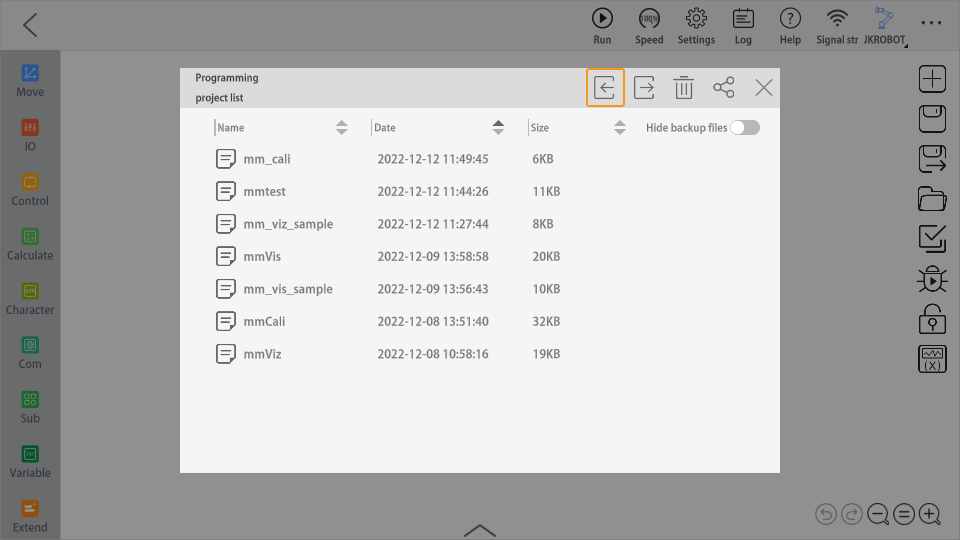
Click the import icon.
-
Select the files in the figure below and click Ok.
Calibration
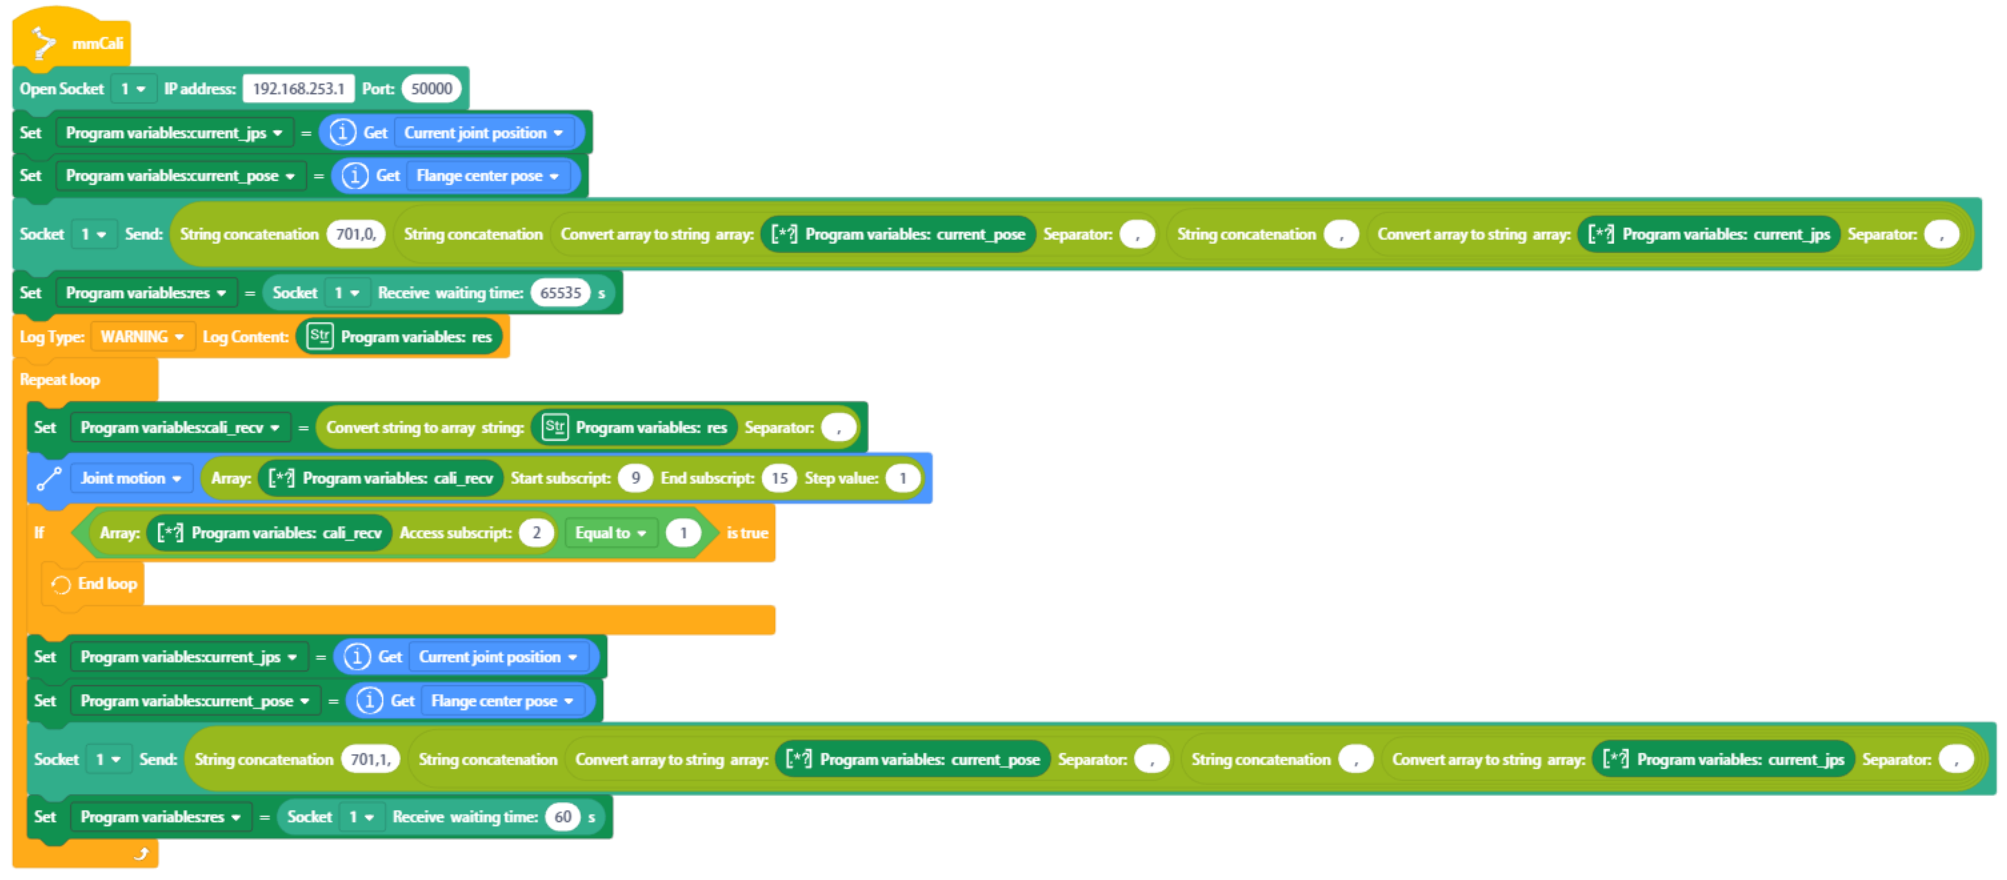
In the Programming control window, open the loaded mmCali program.
Program Description
You will only need to make the following two modifications:
-
Step 1: Modify the IP address and port number in the Open SOCKET command. The IP address set here is the IP address of the IPC, which should be on the same subnet as that of the robot.
-
Step 9: You can select the Linear movement, and set the Start subscript to 3 and the End subscript to 9.
Obtain Vision Result from Mech-Vision
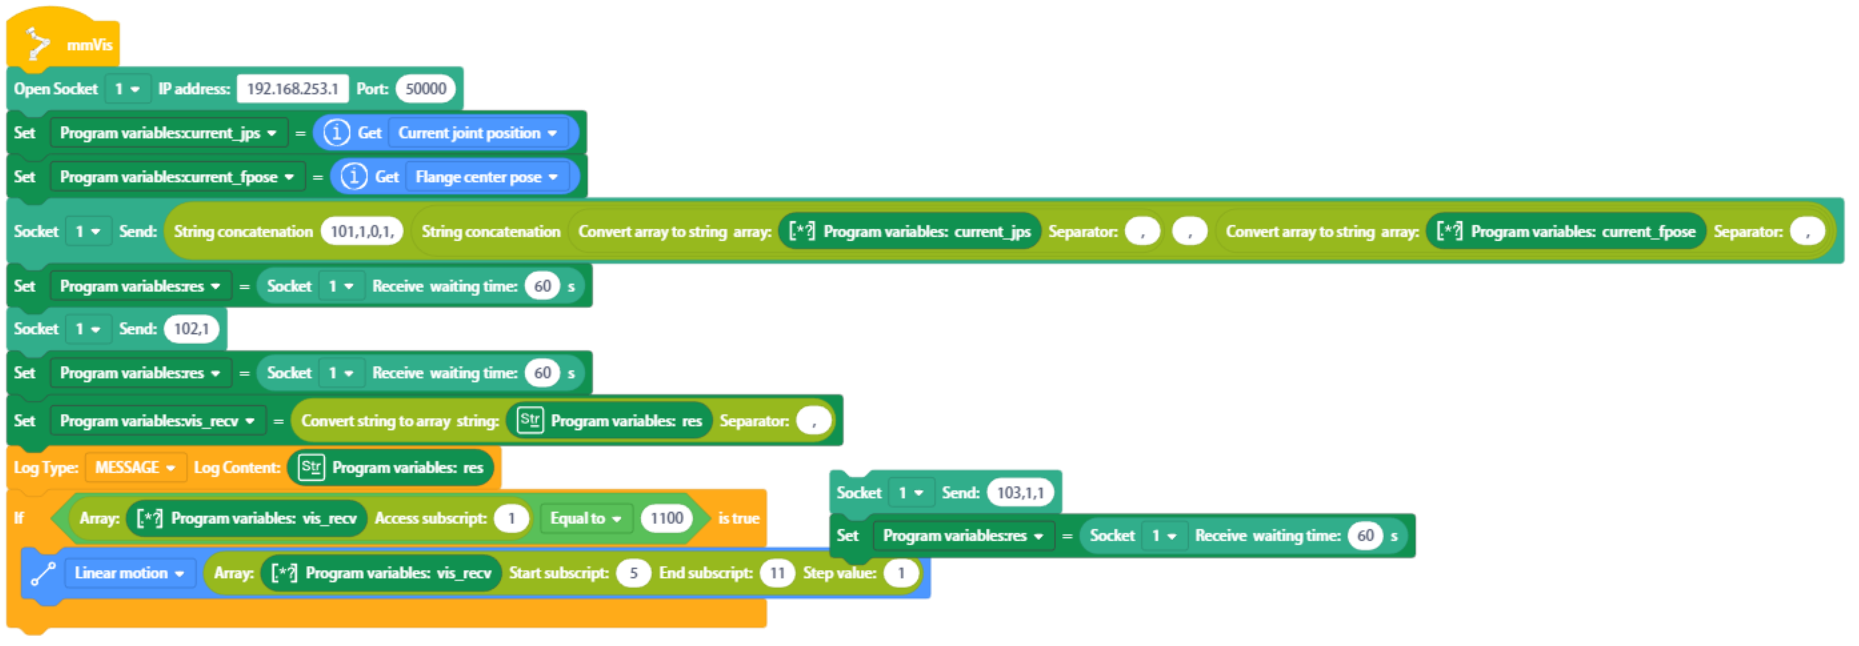
In the Programming control window, open the loaded mmVis program.
Program Description
-
Step 1: Establish TCP/IP Socket connection between the robot and the IPC. The IP address set here is the IP address of the IPC, which should be on the same subnet as that of the robot.
-
Step 2: Obtain the robot’s current joint positions and store them in the current_jps variable.
-
Step 3: Obtain the robot’s current flange pose and store them in the current_fpose variable.
-
Step 4: Send the command to run the Mech-Vision project. Please refer to Command 101 for detailed descriptions of parameter settings.
-
Step 5: Receive the status code returned from Command 101, and store it in the res variable.
-
Step 6: Send the command to obtain the vision result. Please refer to Command 102 for detailed descriptions of parameter settings.
-
Step 7: Receive the data returned from Command 102, and store it in the res variable.
-
Step 8: Convert the data received in Step 7 from strings to array and store the data in the vis_recv variable.
-
Step 9: Print the log.
-
Step 10: Determine whether the value of vis_recv’s Access subscript 1 is 1100. 1100 indicates that the vision result is obtained successfully.
-
Step 11: Move to the first vision point in linear movement.
For JAKA robot’s linear movement, the software should send TCP to the robot; and for joint movement, the software should send joint positions.
Obtain Planned Path from Mech-Viz
In the Programming control window, open the loaded mmViz program.

Program Description
-
Step 1: Establish TCP/IP Socket connection between the robot and the IPC. The IP address set here is the IP address of the IPC, which should be on the same subnet as that of the robot.
-
Step 2: Obtain the robot’s current joint positions and store them in the current_jps variable.
-
Step 3: Obtain the robot’s current flange pose and store them in the current_fpose variable.
-
Step 4: Send the command to run the Mech-Viz project. Please refer to Command 201 for detailed descriptions of parameter settings.
-
Step 5: Receive the status code returned from Command 201, and store it in the res variable.
-
Step 6: Send the command to obtain the planned path from Mech-Viz. Please refer to Command 205 for detailed descriptions of parameter settings.
-
Step 7: Receive the data returned from Command 205, and store it in the res variable.
-
Step 8: Convert the data received in Step 7 from strings to array and store the data in the viz_recv variable.
-
Step 9: Determine whether the value of viz_recv’s Access subscript 1 is 2100. 2100 indicates that the planned path is obtained from Mech-Viz successfully.
-
Step 10: Move to the first waypoint in linear movement.
For JAKA robot’s linear movement, the software should send TCP to the robot; and for joint movement, the software should send joint positions.
Obtain Planned Path from Mech-Vision
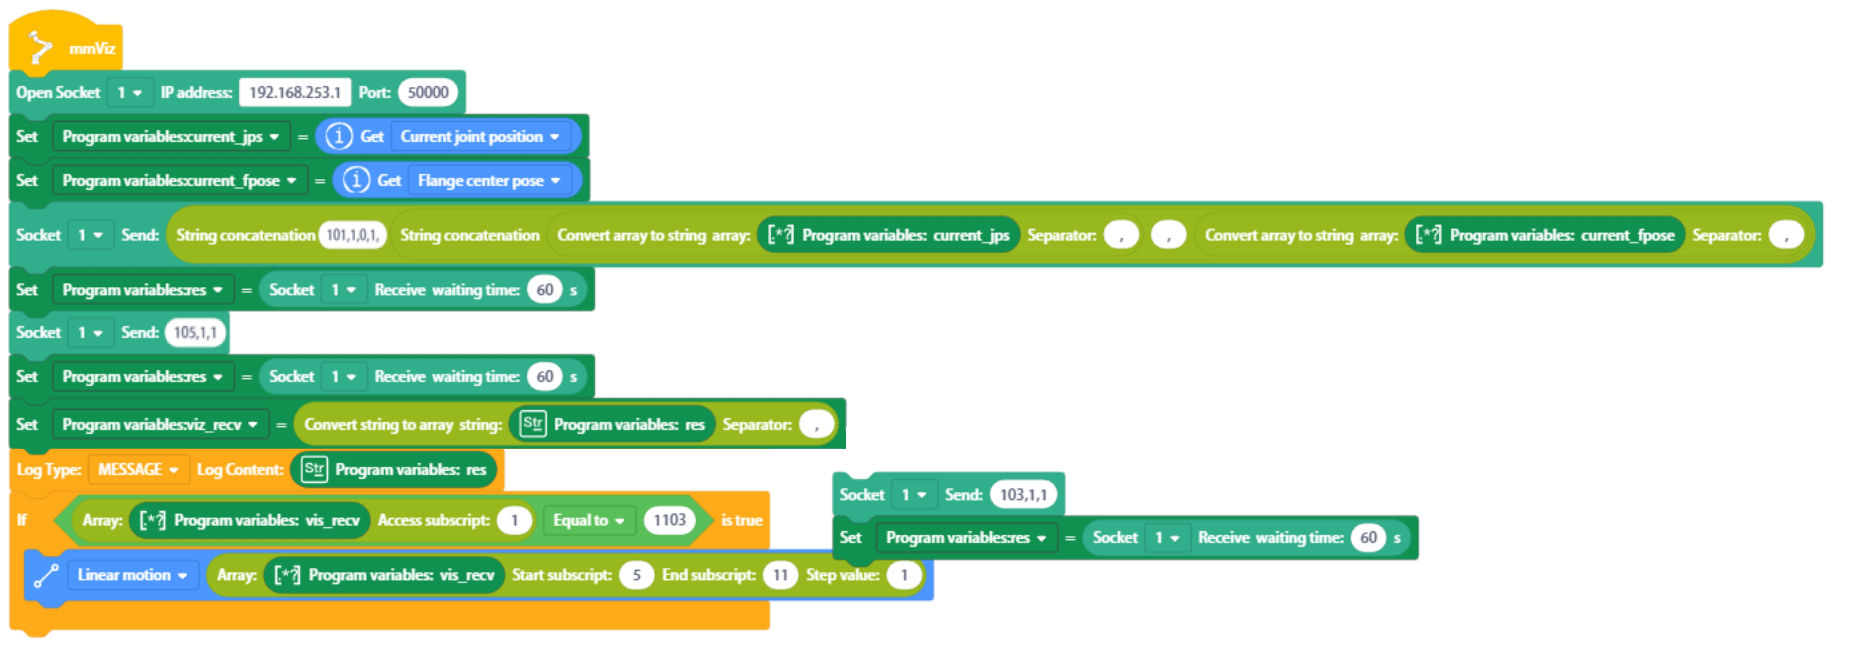
In the Programming control window, open the loaded mmVisPath program.
Program Description
-
Step 1: Establish TCP/IP Socket connection between the robot and the IPC. The IP address set here is the IP address of the IPC, which should be on the same subnet as that of the robot.
-
Step 2: Obtain the robot’s current joint positions and store them in the current_jps variable.
-
Step 3: Obtain the robot’s current flange pose and store them in the current_fpose variable.
-
Step 4: Send the command to run the Mech-Vision project. Please refer to Command 101 for detailed descriptions of parameter settings.
-
Step 5: Receive the status code returned from Command 101, and store it in the res variable.
-
Step 6: Send the command to obtain the planned path from Mech-Vision. Please refer to Command 105 for detailed descriptions of parameter settings.
-
Step 7: Receive the data returned from Command 105, and store it in the res variable.
-
Step 8: Convert the data received in Step 7 from strings to array and store the data in the vis_recv variable.
-
Step 9: Print the log.
-
Step 10: Determine whether the value of vis_recv’s Access subscript 1 is 1103. 1103 indicates that the planned path is obtained from Mech-Vision successfully.
-
Step 11: Move to the first waypoint in linear movement.
For JAKA robot’s linear movement, the software should send TCP to the robot; and for joint movement, the software should send joint positions.