Example Program 5: MM_S5_Viz_SetBranch

You are currently viewing the documentation for the latest version (2.1.0). To access a different version, click the "Switch version" button located in the upper-right corner of the page.

■ If you are not sure which version of the product you are currently using, please feel free to contact Mech-Mind Technical Support.

Program Introduction

Description

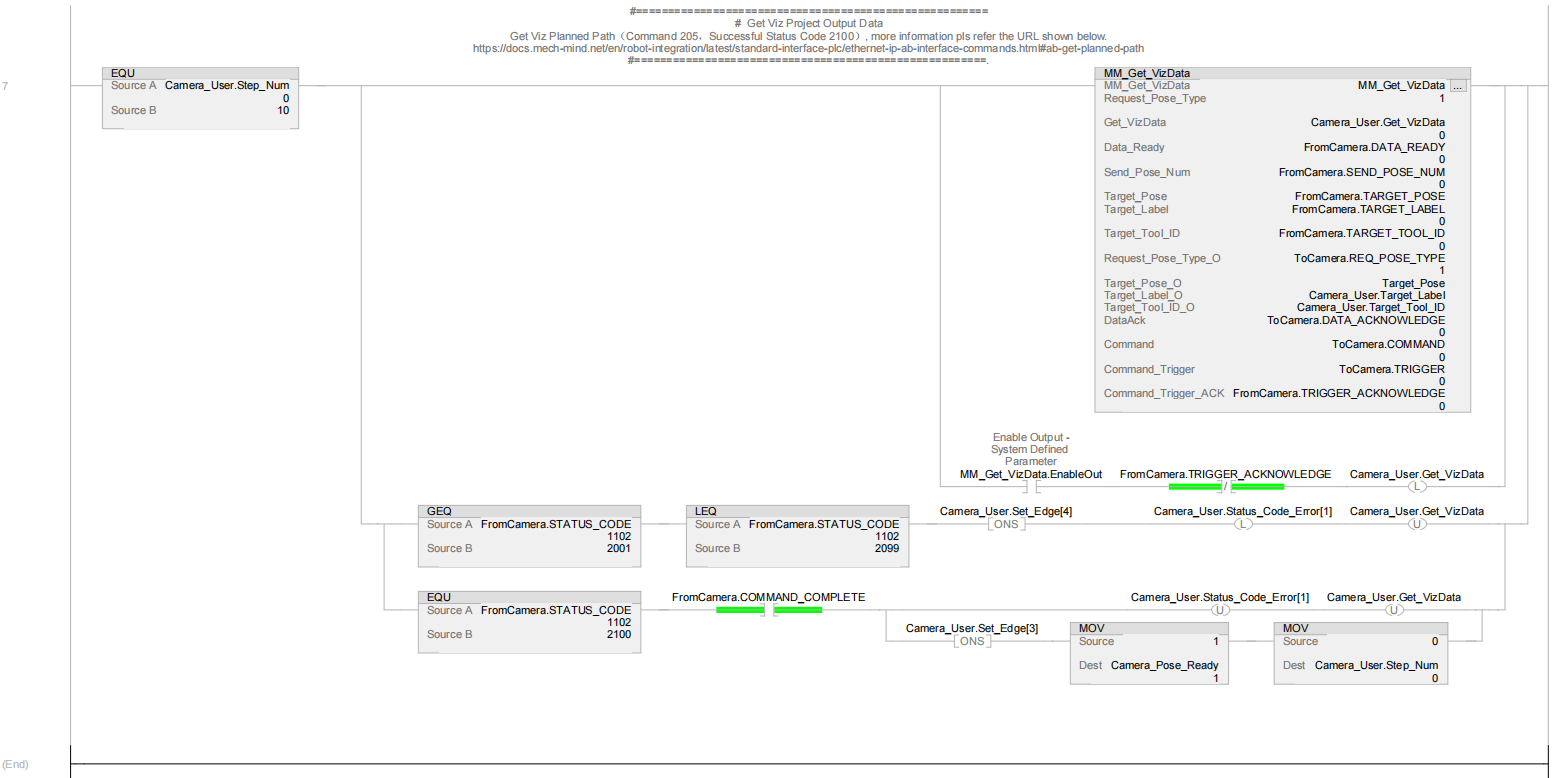
The PLC starts the Mech-Viz project, sets the exit port for the Branch by Msg Step, and then obtains the planned path from the Mech-Viz project.

File path

You can navigate to the installation directory of Mech-Vision and Mech-Viz and find the file by using the Communication Component/Robot_Interface/EthernetIP/Programming Samples/AB PLC EthernetIP/sample applications/ExportedRoutineOfSampleProjects/MM_S5_Viz_SetBranch.L5X path.

Project

Mech-Vision project and Mech-Viz project (The Branch by Msg Step needs to be configured beforehand.)

Prerequisites

This example program is provided for reference only. Before using the program, please modify the program according to the actual scenario.

Program Description

This part describes the MM_S5_Viz_SetBranch example program.

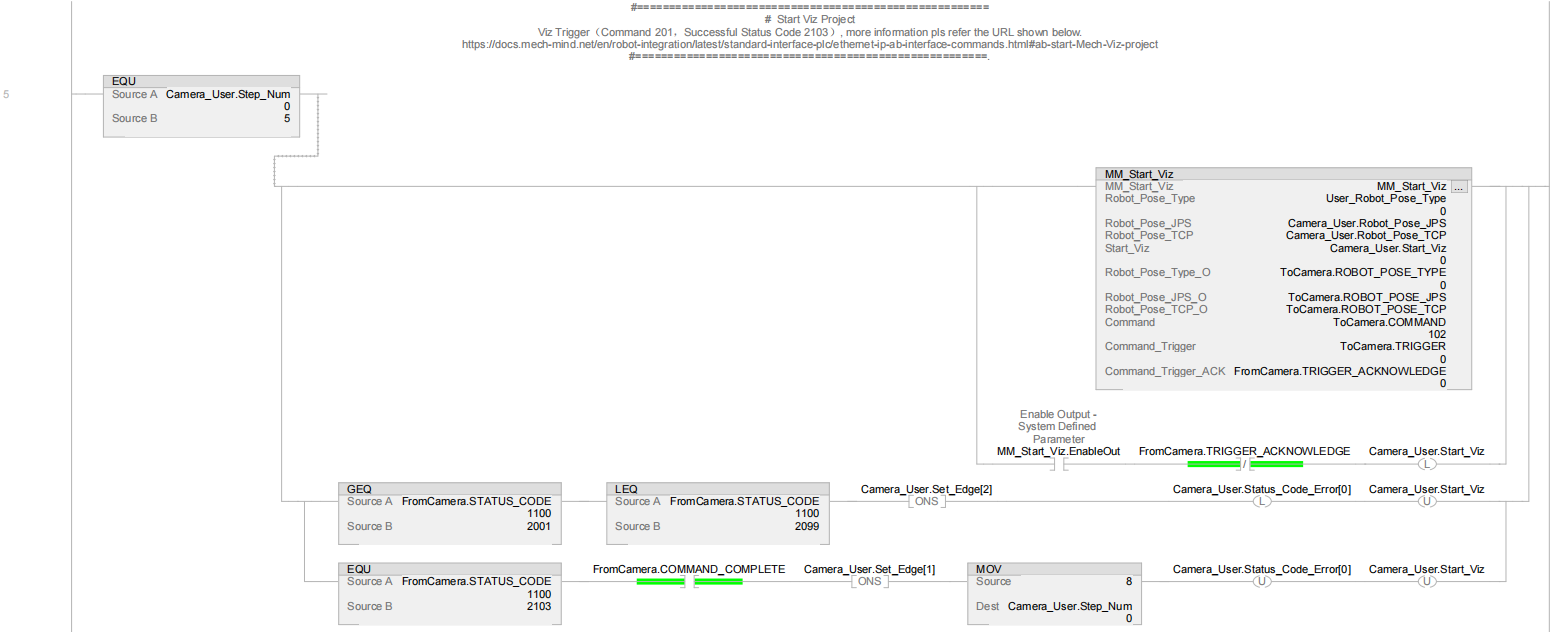
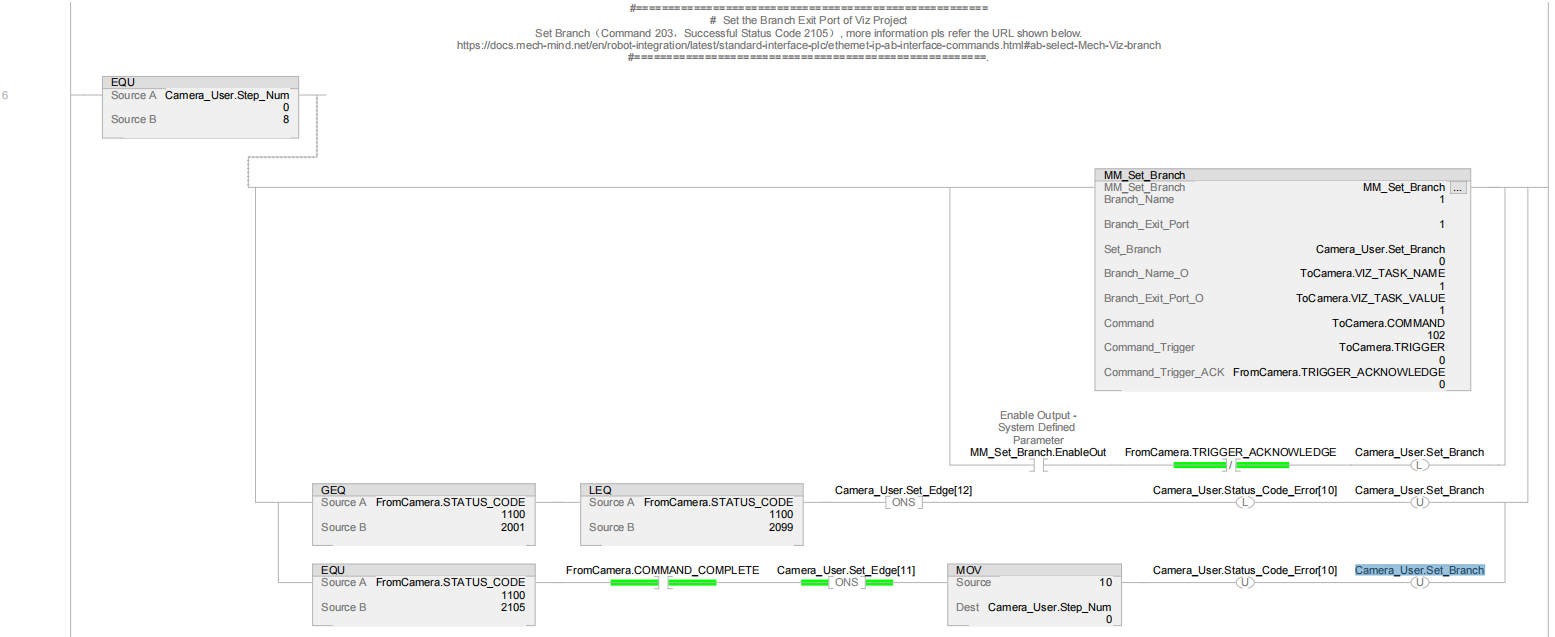
The only difference between the MM_S5_Viz_SetBranch example program and the MM_S2_Viz_Basic example program is that MM_S5_Viz_SetBranch can set the exit port of the Branch by Msg Step in the Mech-Viz project (Rung 6). As such, only the feature of setting the exit port of the Branch by Msg Step is described in the following section. For information about the parts of MM_S5_Viz_SetBranch that are consistent with those of MM_S2_Viz_Basic, see Example Program: MM_S2_Viz_Basic.
sample5 1
sample5 2
sample5 3
sample5 4
sample5 5
sample5 6
sample5 7
sample5 8

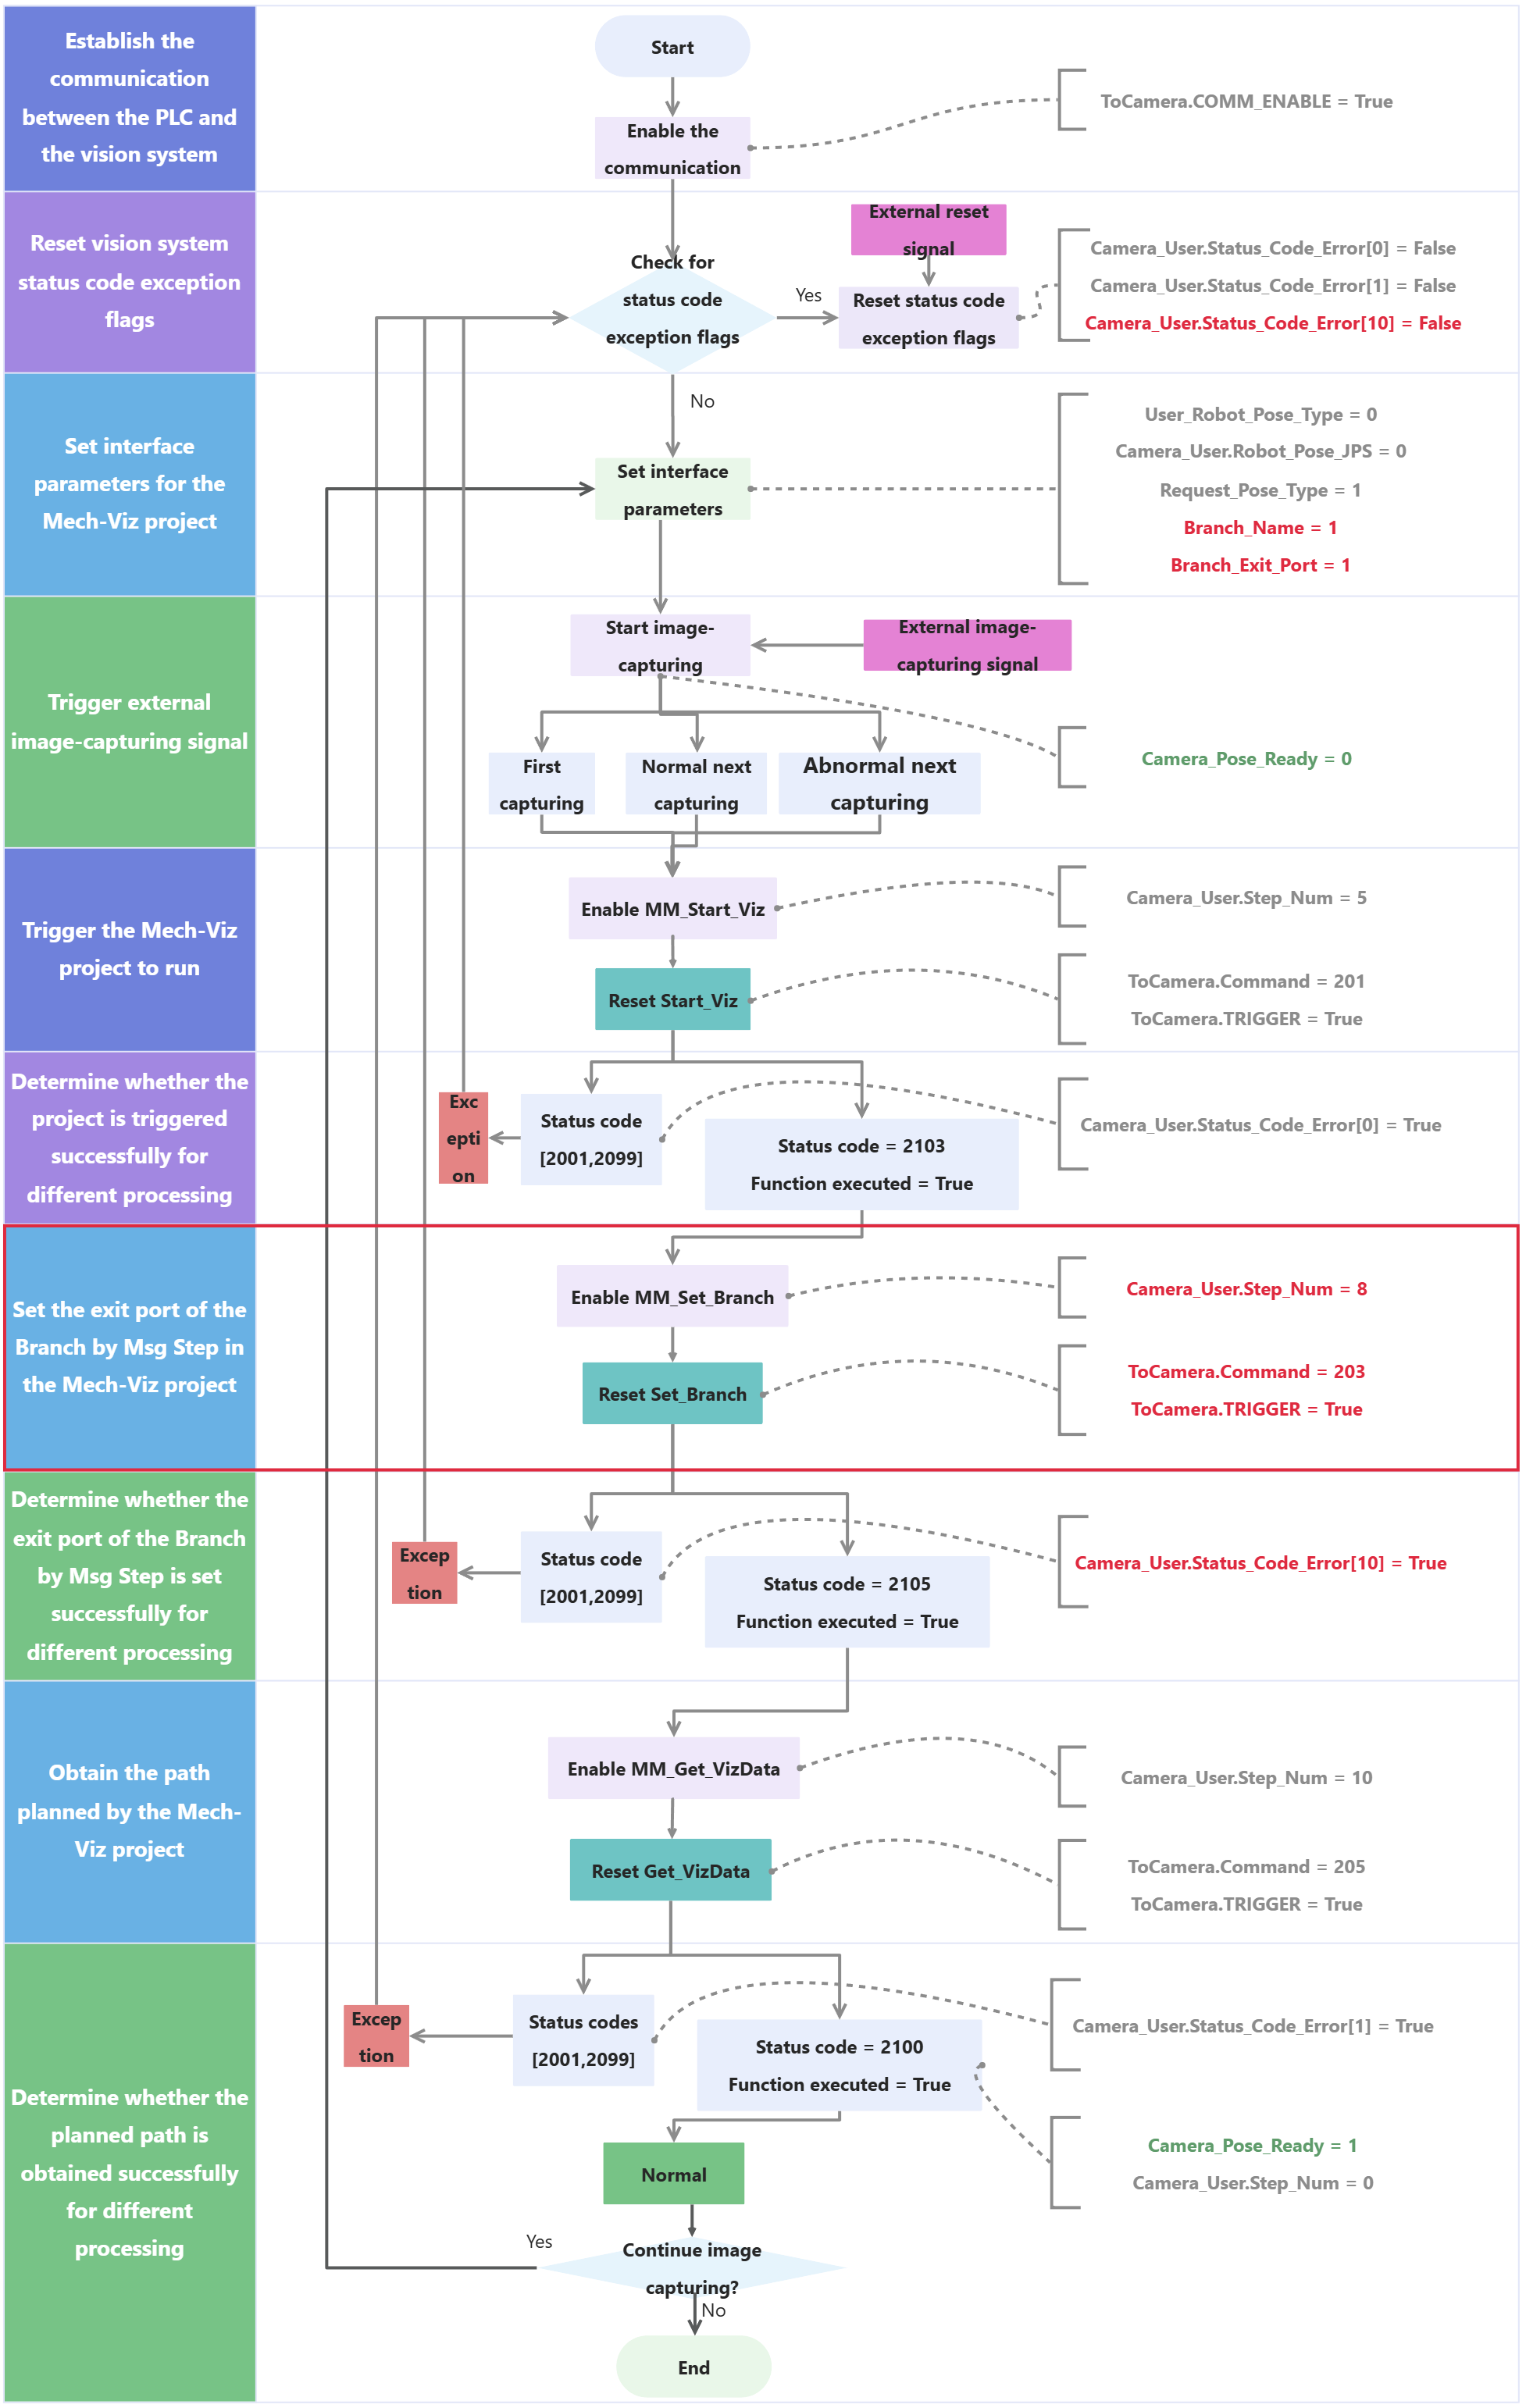
The figure below describes the process of the above example program. The feature of setting the exit port of the Branch by Msg Step in the Mech-Viz project in the above program is shown in the section indicated by the red line in the figure below.
sample5 9

The table below describes the process of setting the exit port of the Branch by Msg Step in the Mech-Viz project.

  • For the Standard Interface functions of AB PLC, you can click the hyperlink to the function name in the following explanation to view the detailed description of the function.

  • For common functions that come with AB PLC, please refer to Common Functions.

Feature Description

Set the exit port for the Branch by Msg Step in the Mech-Viz project and determine the subsequent operations based on whether the exit port is set successfully

sample5 7
  • Camera_User.Set_Branch: The flag that triggers the exit port of the Branch by Msg Step to be set when a rising edge occurs.

  • Camera_User.Status_Code_Error[10]: The flag that indicates the vision system status code is abnormal. True indicates that the exit port of the Branch by Msg Step in the Mech-Viz project failed to be set, which means that the vision system is abnormal.

  • Branch_Name_O: The Step ID of the Branch by Msg Step.

  • Branch_Exit_Port: Set the number of the exit port of the Branch by Msg Step to take. Note that if this parameter is set to N, the exit port is N-1.

For more information about input and output parameters in MM_Set_Branch, see MM_Set_Branch.

Rung 6 indicates that if Camera_User.Step_Num is equal to 8, the following operations are performed.

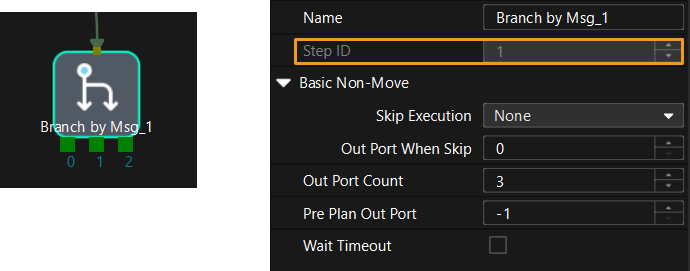
  1. Enable MM_Set_Branch. In this case, the Branch by Msg Step ID and exit port number are 1 by default. You can modify the Step ID and exit port number based on actual scenarios. In other words, the Mech-Viz project will proceed along exit port 0 of the 1 Branch by Msg Step, as shown in the following figure.

    set branch
  2. When MM_Set_Branch.EnableOut is set to True and FromCamera.TRIGGER_ACKNOWLEDGE is set to False, the PLC triggers Mech-Viz to set the exit port of the Branch by Msg Step.

  3. If the value of FromCamera.STATUS_CODE is greater than or equal to 2001 and less than or equal to 2099, an exception occurs in the vision system. In this case, after receiving the rising edge for the logic output by using the ONS function, set Camera_User.Status_Code_Error[10] and reset Camera_User.Set_Branch. For information about the cause of a specific status code, see Standard Interface status codes and error codes.

  4. If the value of FromCamera.STATUS_CODE is 2105 and FromCamera.COMMAND_COMPLETE is set to True, the vision system has successfully executed the function sent by the PLC. In this case, the ONS function receives the rising edge for the logical output, assigns a value of 10 to Camera_User.Step_Num, and then resets Camera_User.Status_Code_Error[10] and Camera_User.Set_Branch.

We Value Your Privacy

We use cookies to provide you with the best possible experience on our website. By continuing to use the site, you acknowledge that you agree to the use of cookies. If you decline, a single cookie will be used to ensure you're not tracked or remembered when you visit this website.