Vision Project Configuration
In this phase, you need to complete configurations on the vision project (that is the Mech-Vision project) to recognize and locate target objects.
| If the project requires a high picking accuracy, ensure a good picking accuracy of the application during deployment according to the guidance in Topic: Improving Picking Accuracy. |
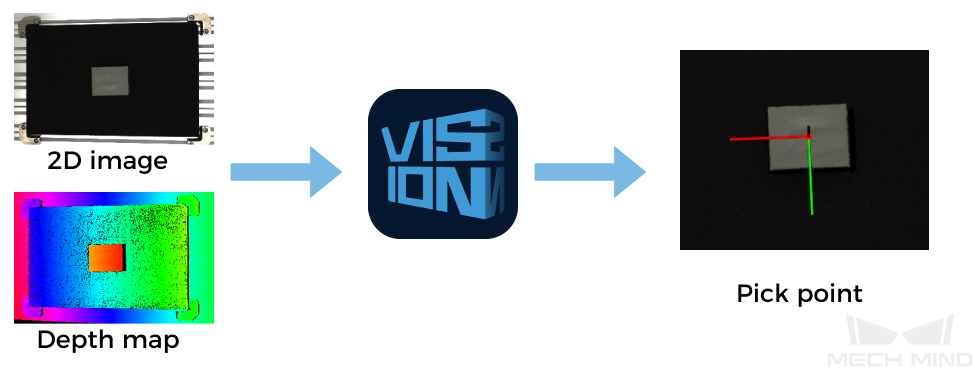
A vision project includes a series of vision processing steps, starting from image collection, followed by a series of algorithmic processes on image data (point cloud preprocessing, point cloud processing, 3D target object recognition, 3D pose adjustment, deep learning inference, etc.), finally outputting the vision results (poses, target object information, etc.) used to guide the robot.
-
Mech-Vision’s Solution Library has provided “hands-on example” projects for key functions in the vision processing process, such as 3D pose adjustment and deep learning. You can learn how to use advanced features and tools in 3D Vision System and commissioning experience.
-
For typical application scenarios in industries such as target object loading, depalletizing and palletizing, locating and assembly, and piece picking, Mech-Vision has already provided typical solution cases in its Solution Library. You can directly use these solution cases as a reference to create, configure, and commission a vision project quickly. The document “Typical Case Practices of 3D Vision System” will provide you with detailed guidance on configuring and tuning a vision project.
The overall process of configuring a vision project is shown in the figure below:

1 Build a project |
This section introduces to you how to create a simple project. |
|
This section introduces to you the basic procedures of a project. |
||
This section introduces to you the basic procedures for using Steps. Steps are the basics of a project. A Step is a minimum algorithm unit for data processing. By connecting different Steps in a project, you can achieve different data processing tasks. |
||
2 Parameter adjustment |
Adjust camera parameters to ensure that the quality of the captured 2D images and depth map meet requirements, thus ensuring the performance of the vision result output by the final vision project. |
|
The 3D matching algorithm recognizes target objects based on their point cloud models. Therefore, when you are configuring a vision project, you usually need to make the point cloud model and set the pick point. |
||
In scenarios with complex recognition requirements, for example, the workpieces are highly reflective or the quality of point clouds is poor, the 3D matching algorithm may not achieve optimal recognition performance. The deep learning algorithm can facilitate a better recognition performance. Please refer to this guide to train and deploy a deep learning model. |
||
You can use the “3D Target Object Recognition” tool to easily recognize the poses of target objects accurately and meet on-site picking requirements. |
||
After target objects are successfully recognized, you need to perform a series of processing on the poses so that the robot can pick them easily. You can quickly adjust the poses with the pose adjustment tool. |
||
Please refer to this guide and adjust the parameters of other Steps in the project. |
||
3 Project tuning |
Run each Step to check the execution result in the Debug Output window, and run the whole project to check the vision results output from your project. |
|
Tackle the common issues encountered when using the 3D Target Object Recognition tool, and adjust the parameters according to the possible causes and solutions to successfully recognize target objects. |
||
In the actual application deployment process,take targeted accuracy improvement measures to reduce possible errors, ensuring that the picking accuracy meets the project requirements. |
||
After deploying a 3D vision–guided robotic application, you should evaluate the current cycle time of the application. If the current application cycle time cannot meet the project’s requirements, you need to improve it. |
||
In scenarios where deep learning is used, if the inference result is not satisfying, you need to iterate your deep learning model. |
||
To facilitate future maintenance, you need to regularly back up project data. |
||
4 Production & maintenance |
Before the vision solution is delivered to the production line for use, you can configure a set of production interface, which will facilitate the on-site operator to get quick knowledge of production status, view the production results, switch workpieces or add new object models and easily perform maintenance and troubleshooting. |
|
The on-site operator can quickly learn how to use the production interface by referring to this document. |