Adjust Poses (Height)
This tutorial first introduces the application scenarios and examples of sorting poses by their Z-values. Then it uses the example project “Adjust Poses (Height)” as an application guide, illustrating how to adjust the parameters in the Adjust Poses V2 Step. It also provides notes for real applications.
Application Scenarios
Sorting by the Z-values of poses is suitable for scenarios where the target objects need to be sorted and picked according to the heights of their poses. Picking objects with higher Z-values first can improve the picking success rate.

Application Examples
This section takes ring loading as an example and uses the “Adjust Poses (Height)” example project to sort target objects by the Z-values of their poses before picking.
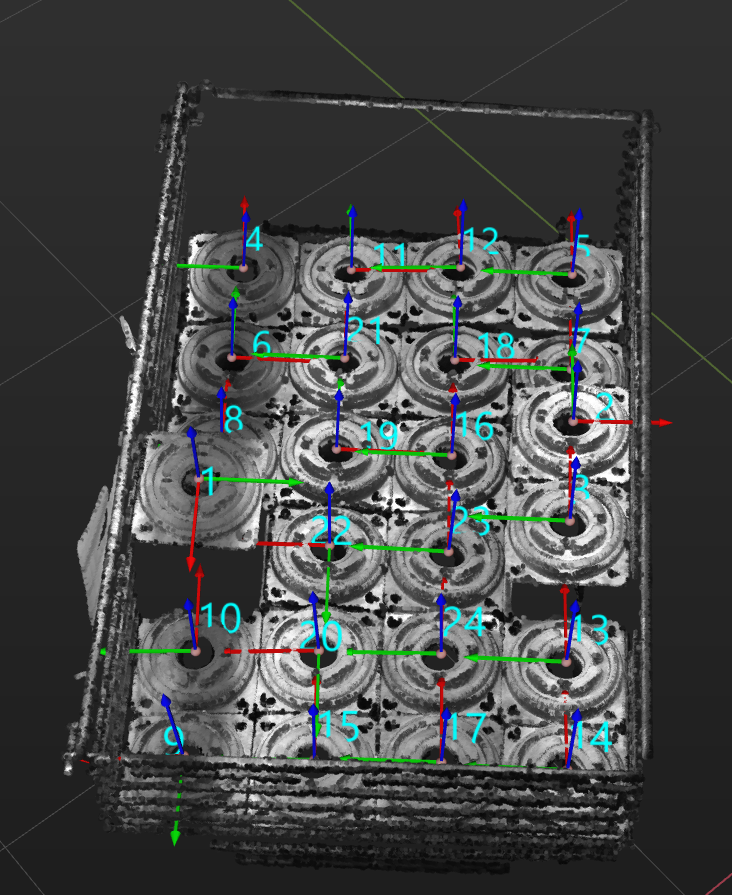
The robot picks rings as shown below.
The following sections introduce the application guidance and notes based on this example.
Application Guide
After understanding the application scenarios of sorting poses by Z values, you can go to the Solution Library to download the relevant project and learn how to adjust parameters according to the following content.
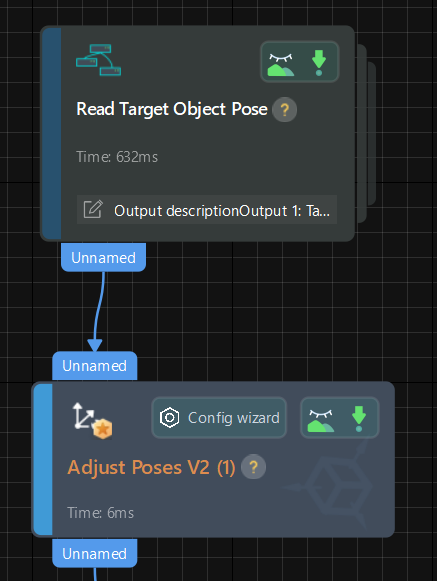
The “Adjust Poses (Heights)” project is located in the Mech-Vision Solution Library. You can go to the hands-on examples category to obtain the resources and create the project. After creating the project, click the Adjust Poses V2 Step, and then click the Config wizard button to open the pose adjustment tool and adjust parameters. This configuration consists of three workflows: pose adjustment, processing rules, and general settings.

-
Pose adjustment: Adjusts the pose orientations.
-
Processing rules: Sorts poses according to the actual requirement and filters out ineligible poses.
-
General settings: Provides settings other than pose processing. Currently, this step only supports sorting other data (such as the carton dimensions) together with the corresponding poses.
The following section introduces the key parameters to be adjusted in each workflow.
Pose adjustment
-
Select the method of adjusting the orientation.
To automatically adjust the object poses to make the Z-axes face upwards, it is recommended to set Orientation to Auto alignment.
For descriptions of orientation options, refer to Adjust Pose Orientation.
-
Select the application scenario.
To ensure that the Z-axis orientations of the poses are as uniform as possible, which facilitates sorting, set the Application scenario to Align Z-axes (Machine tending).
After configuring the pose adjustment workflow, click the Next button to enter the processing rules page.
Processing rules
Sorting type
-
Select the sorting type.
Select Sort by X/Y/Z value of pose.
-
Set the specified value of the pose.
In this example project, the target objects are sorted by the height of their poses and picked, so Z-coordinate is selected.
-
Select the sorting order.
When picking target objects, those with higher pose heights should be picked first, so you need to select Descending.
Filter pose
-
Select the axis to be specified.
Select Z-axis to calculate the angle between it and the target direction.
-
Set the target direction.
Select robot frame to use it as the reference pose.
-
Select the orientation.
Select Positive Z-direction.
-
Set the max angle difference.
In this example project, set the value to 30°. When the angle between the specified axis (i.e., Z-axis) of the pose and the target direction (i.e., the robot frame) is less than 30°, the pose will be retained.
| Adjust the value of the max angle difference according to the actual requirements. When the target objects are neatly arranged in the horizontal plane, set it to a relatively small value; when the target objects are randomly placed, you can slightly increase the value. |
After configuring the processing rules, click the Next button to open the general settings page.
Notes
In actual applications, please understand and follow the following precautions, then add the Adjust Poses V2 Step to your project, and connect the data streams to quickly sort poses according to their heights.
-
The Adjust Poses V2 Step should be preceded by a Step or Procedure, such as the Read Target Object Pose Procedure, that recognizes object poses and correctly outputs the object center poses to be sorted in the camera reference frame. The pose output port of this Step or Procedure connects the pose input port of the Adjust Poses V2 Step for pose sorting.
-
The Adjust Poses V2 Step should be followed by a Step with a pose input port, such as the Path Planning and Output Steps, to output the adjusted poses, so that the robot can pick the rings by their pose heights.