Picking and Placing
In this tutorial, you will first learn about the picking and placing process in this example, and then learn how to configure it.
Picking and Placing Process
The picking and placing logic in this example is shown in the figure below.
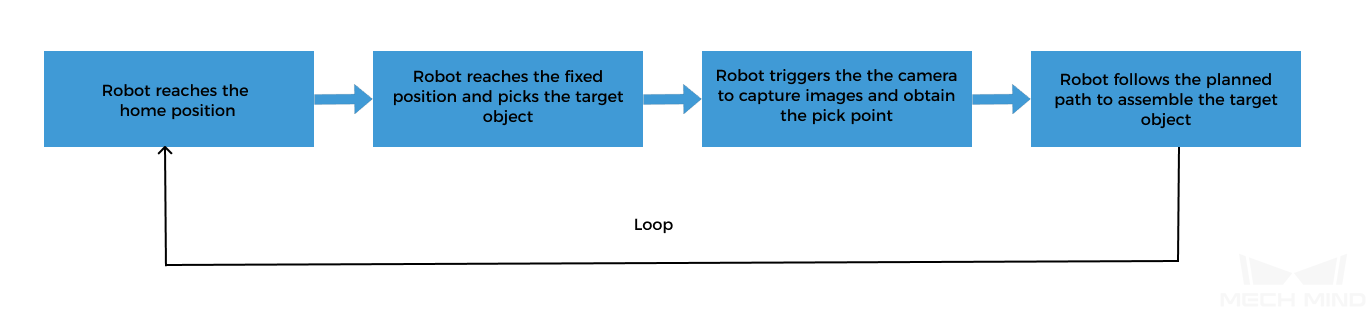
| In this example, the robot picks the bolts from a fixed position, such as a positioning platform, and then uses the pick points output by Mech-Vision as targets for assembly. |
Communication Solution Description
In the above process, the step “robot triggers the camera to capture images and obtain the pick point” requires the robot to use the Standard Interface to communicate with the vision system, and the Standard Interface “uses Mech-Vision to obtain the vision result” from the vision system.
When using this method, you need to write the robot program. Please refer to Configuring the Picking and Placing Process to write the robot program.
Configure the Picking and Placing Process
To realize the logical flow of picking and placing, you need to complete the following configurations:

Configure Robot Parameters and Write the Robot Program
YASKAWA’s Standard Interface example program MM_S1_Vis_Basic can basically satisfy the requirements of this example. You can modify the example program. For a detailed explanation of the MM_S1_Vis_Basic program, please refer to the Example Program Explanation.
Based on the example program, please complete the following steps on the robot side:
-
Teach the home position (initial position).
Move the robot to the initial position in the TEACH mode. The initial position should be away from the objects to be picked and surrounding devices, and should not block the camera’s field of view. Record the current robot pose to variable C00000.
-
Specify the IP address of the IPC. Update the IP address and port of the MM_Init_Socket command to those of the IPC.
Before modification After modification (example) 'initialize communication 'parameters (initialization is 'required only once) CALL JOB:MM_INIT_SOCKET ARGF"192.168.170.22;50000;1"
'initialize communication
'parameters (initialization is
'required only once)
CALL JOB:MM_INIT_SOCKET ARGF"192.168.10.40;50000;1"
-
Set the DO port signal to expand the gripper. Note that the DO command should be set according to the actual DO port number in use on site.
'open gripper
DOUT OT#(14) ON
DOUT OT#(15) OFF
-
Teach the fixed pick point.
Move the robot to the pick point in the TEACH mode. This position is also where the camera captures images. At this position, the robot arm should not block the camera’s FOV. Record the current robot pose to variable C00001.
Before modification After modification (example) 'move to image-capturing position MOVJ C00001 VJ=50.00 PL=0
'move to fixed position of picking
MOVJ C00001 VJ=20.00 PL=0
-
Set the signal for the DO port to close the gripper to pick the bolt on the fixed position. Note that the DO command should be set according to the actual DO port number in use on site.
'close gripper
DOUT OT#(14) OFF
DOUT OT#(15) ON
-
Teach the intermediate point in the assembly process.
Before modification After modification (example) 'move to intermediate waypoint of 'picking MOVJ C00002 VJ=50.00
'move to intermediate waypoint of
'assembly
MOVJ C00002 VJ=50.00
-
Modify the comments of assembly-related commands.
Before modification After modification (example) 'move to approach waypoint of 'picking SFTON P070 MOVL P071 V=166.6 PL=0 SFTOF 'move to picking waypoint MOVL P071 V=50.0 PL=0 ... 'move to departure waypoint of 'picking SFTON P070 MOVL P071 V=166.6 PL=0 SFTOF
'move to approach waypoint of
'assembly
SFTON P070
MOVL P071 V=166.6 PL=0
SFTOF
'move to assembly waypoint
MOVL P071 V=50.0 PL=0

...

'move to departure waypoint of
'assembly
SFTON P070
MOVL P071 V=166.6 PL=0
SFTOF
-
Set the DO port signal to expand the gripper to place the bolt into the pin hole. Note that the DO command should be set according to the actual DO port number in use on site.
Before modification After modification (example) 'add object grasping logic here, 'such as DOUT OT#(1) ON PAUSE
'add object releasing logic here,
'such as DOUT OT#(1) ON
DOUT OT#(15) OFF
DOUT OT#(14) ON
PAUSE
-
Remove the placing-related code in the example program.
'move to intermediate waypoint of
'placing
MOVJ C00003 VJ=50.00
'move to approach waypoint of
'placing
MOVL C00004 V=166.6 PL=0
'move to placing waypoint
MOVL C00005 V=50.0 PL=0
'add object releasing logic here,
'such as DOUT OT#(1) OFF
PAUSE
'move to departure waypoint of
'placing
MOVL C00006 V=166.6 PL=0
-
Teach the home position.
Move the robot to the home position in the TEACH mode and record the robot pose to variable C00003.
Test the Robot Assembly Effect with Single-Step Execution
Follow these steps to test the robot assembly effect:
-
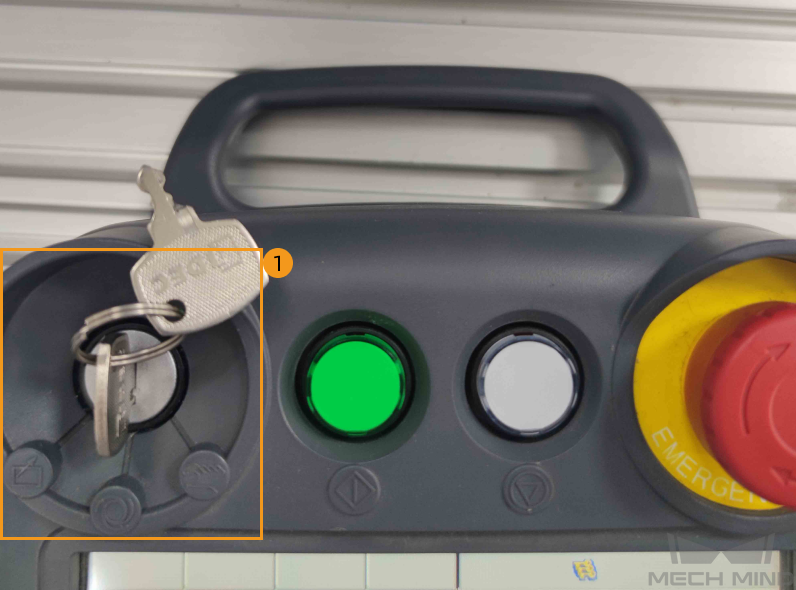
Twist the mode key on the teach pendant to PLAY to enter the REPEAT mode.
-
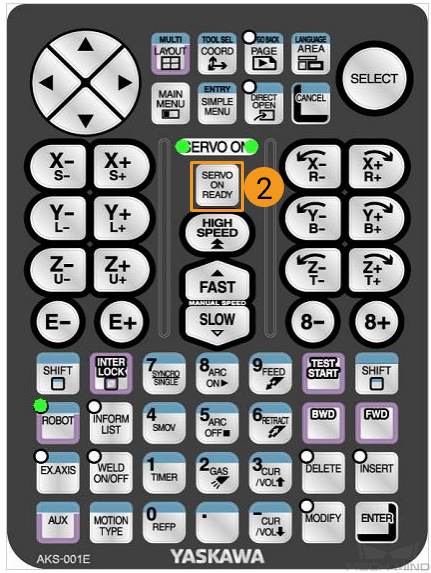
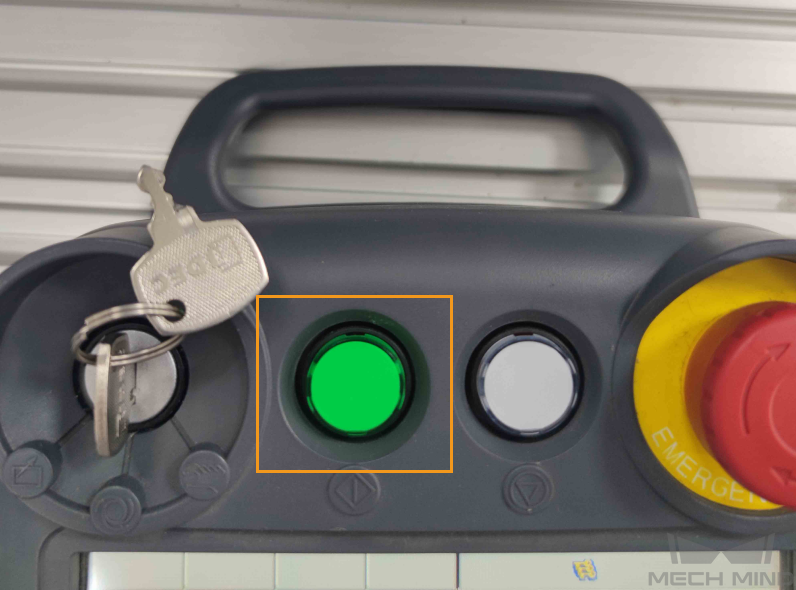
Press the SERVO ON READY key on the teach pendant, and then press the blue Run button.
-
The robot will automatically run the program to pick and place a target object.
Please pay close attention to the robot’s motion trajectory. In an emergency, press the emergency stop key.
If the robot can successfully pick and place target objects, the robot program meets the requirements.
Insert the Loop Statement for the Assembly Cycle
After testing that the robot can successfully assemble once, you can insert a loop statement in the program to loop the robot assembly.
Add the following loop statement:
LOOP
   'move to fixed position of picking
   MOVJ C00001 VJ=20.00 PL=0

   ...

   MOVJ C00003 VJ=50.00
END LOOP
Reference: Modified Example Program
The final example program is as follows:
NOP
'--------------------------------
'FUNCTION: trigger Mech-Vision
'project and get vision result
'Mech-Mind, 2023-12-25
'--------------------------------
'clear I50 to I69
CLEAR I050 20
'initialize p variables
SUB P070 P070
SUB P071 P071
'set 100mm to z of P070
SETE P070 (3) 100000
'move to robot home position
MOVJ C00000 VJ=50.00
'initialize communication
'parameters (initialization is
'required only once)
CALL JOB:MM_INIT_SOCKET ARGF"192.168.10.40;50000;1"
'open gripper
DOUT OT#(14) ON
DOUT OT#(15) OFF
LOOP
   'move to fixed position of picking
   MOVJ C00001 VJ=20.00 PL=0
   'close gripper
   DOUT OT#(14) OFF
   DOUT OT#(15) ON
   'open socket connection
   CALL JOB:MM_OPEN_SOCKET
   MOVL P110 V=25.0
   'trigger NO.1 Mech-Vision project
   CALL JOB:MM_START_VIS ARGF"1;0;2;30"
   'get vision result from NO.1
   'Mech-Vision project
   CALL JOB:MM_GET_VISDATA ARGF"1;51;52"
   'check whether vision result has
   'been got from Mech-Vision
   'successfully
   IFTHENEXP I052<>1100
      'add error handling logic here
      'according to different error
      'codes
      'e.g.: I052=1003 means no point
      'cloud in ROI
      'e.g.: I052=1002 means no
      'vision result
      PAUSE
   ENDIF
   'close socket connection
   CALL JOB:MM_CLOSE_SOCKET
   'save first vision point data to
   'local variables
   CALL JOB:MM_GET_POSE ARGF"1;71;61;62"
   'move to intermediate waypoint of
   'assembly
   MOVJ C00002 VJ=50.00
   'move to approach waypoint of
   'assembly
   SFTON P070
   MOVL P071 V=166.6 PL=0
   SFTOF
   'move to assembly waypoint
   MOVL P071 V=50.0 PL=0
   'add object releasing logic here,
   'such as DOUT OT#(1) ON
   DOUT OT#(15) OFF
   DOUT OT#(14) ON
   PAUSE
   'move to departure waypoint of
   'assembly
   SFTON P070
   MOVL P071 V=166.6 PL=0
   SFTOF
   'move back to robot home position
   MOVJ C00003 VJ=50.00’move to fixed position of picking
   MOVJ C00001 VJ=20.00 PL=0
   'close gripper
   DOUT OT#(14) OFF
   DOUT OT#(15) ON
   'open socket connection
   CALL JOB:MM_OPEN_SOCKET
   MOVL P110 V=25.0
   'trigger NO.1 Mech-Vision project
   CALL JOB:MM_START_VIS ARGF"1;0;2;30"
   'get vision result from NO.1
   'Mech-Vision project
   CALL JOB:MM_GET_VISDATA ARGF"1;51;52"
   'check whether vision result has
   'been got from Mech-Vision
   'successfully
   IFTHENEXP I052<>1100
      'add error handling logic here
      'according to different error
      'codes
      'e.g.: I052=1003 means no point
      'cloud in ROI
      'e.g.: I052=1002 means no
      'vision result
      PAUSE
   ENDIF
   'close socket connection
   CALL JOB:MM_CLOSE_SOCKET
   'save first vision point data to
   'local variables
   CALL JOB:MM_GET_POSE ARGF"1;71;61;62"
   'move to intermediate waypoint of
   'assembly
   MOVJ C00002 VJ=50.00
   'move to approach waypoint of
   'assembly
   SFTON P070
   MOVL P071 V=166.6 PL=0
   SFTOF
   'move to assembly waypoint
   MOVL P071 V=50.0 PL=0
   'add object releasing logic here,
   'such as DOUT OT#(1) ON
   DOUT OT#(15) OFF
   DOUT OT#(14) ON
   PAUSE
   'move to departure waypoint of
   'assembly
   SFTON P070
   MOVL P071 V=166.6 PL=0
   SFTOF
   'move back to robot home position
   MOVJ C00003 VJ=50.00
END LOOP
END
Now you have deployed a 3D vision–guided positioning and assembly application.