Set up Standard Interface Communication with DENSO
This guide shows you how to set up Standard Interface communication with a DENSO robot.
Preparation
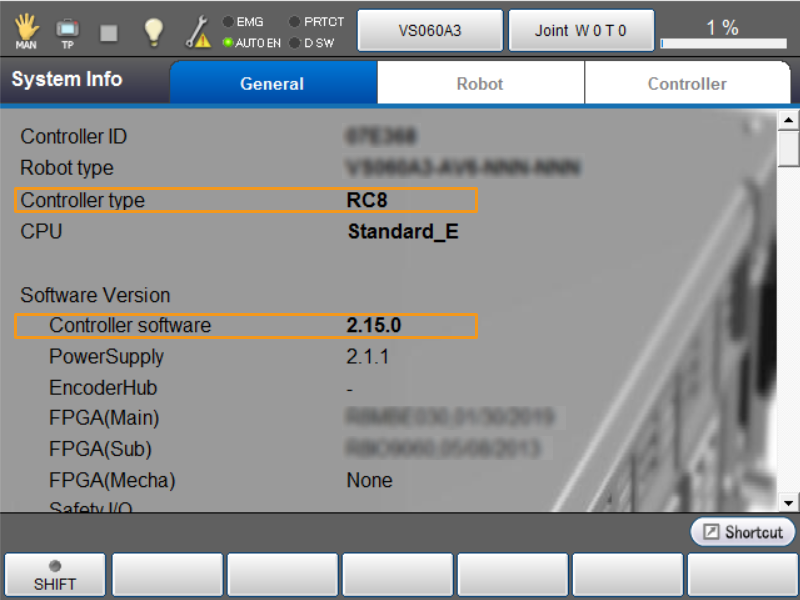
Check Controller and Software Compatibility
-
Robot type: Six-axis robot
-
Controller model: RC8
-
Controller software version: 2.15.0
Click here for instructions
-
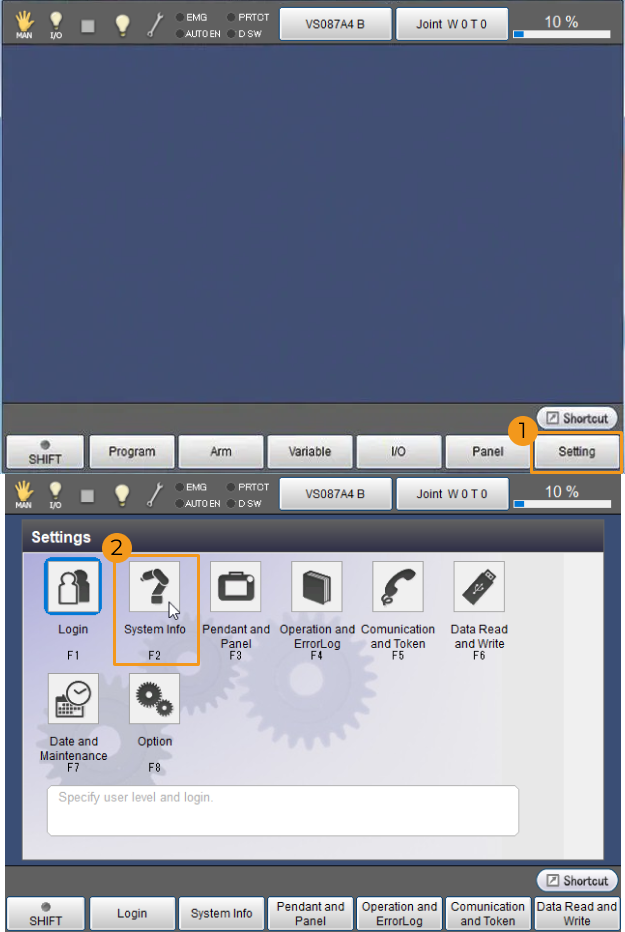
Tab on the teach pendant.
-
Check Controller type and Controller software.
-
Set up Network Connection
-
Plug the other end of the IPC’s Ethernet cable into the Ethernet port of the robot controller.
-
Make sure that the IP addresses of the DENSO robot and the IPC are on the same subnet.
Click here for instructions
-
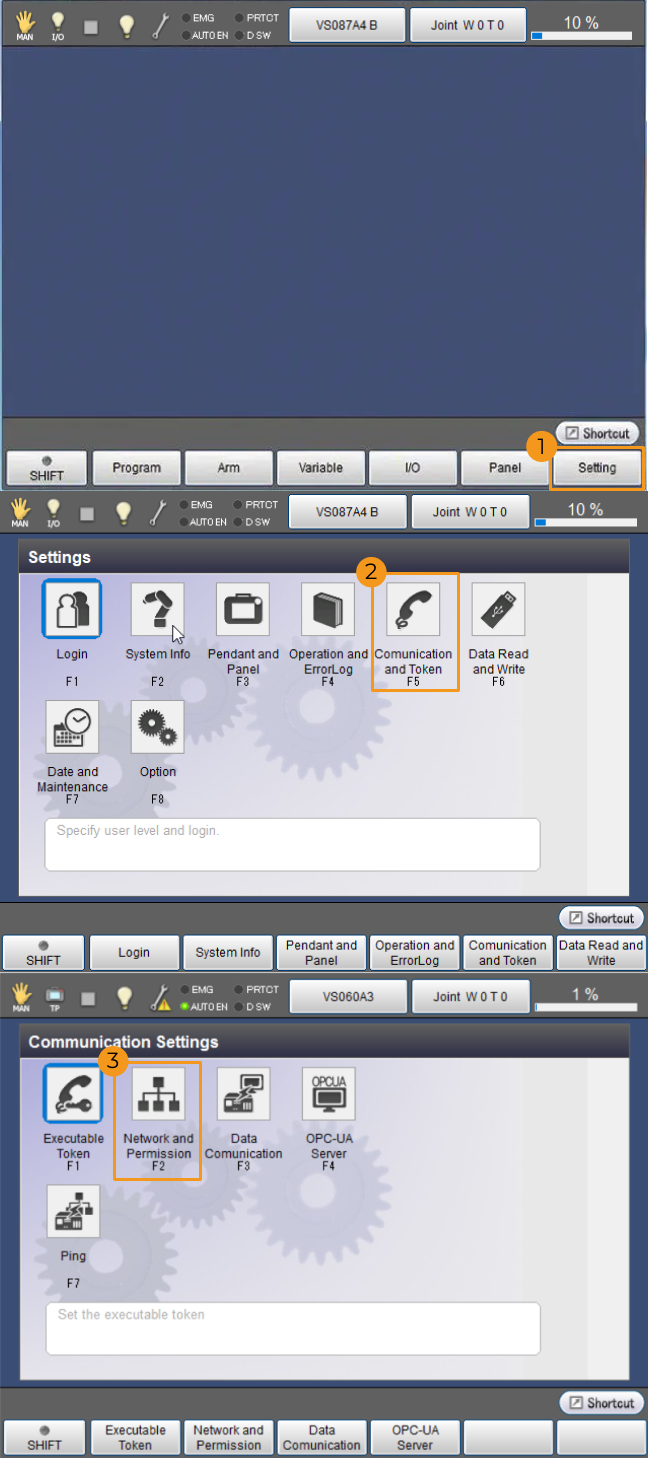
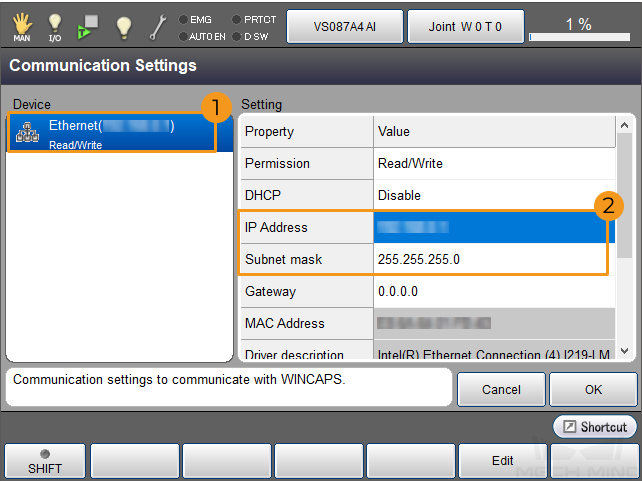
On the teach pendant, tap .
-
In the “Communicate Settings” window, select Ethernet in the “Device” area, and view the IP Address and Subnet mask in the “Setting” area. Check if the robot’s IP address is in the same subnet as the IPC.
-
If the IP address of the robot and that of the IPC are in different subnets, modify the IPC’s IP address.
-
Robot Communication Setup
-
Run Mech-Vision, and you may enter different interfaces. Create a new solution according to the instructions below.
-
If you have entered the Welcome interface, click New blank solution.

-
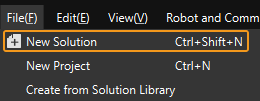
If you have entered the main interface, click on the menu bar.
-
-
Click Robot Communication Configuration on the toolbar of Mech-Vision.
-
In the Robot Communication Configuration window, complete the following configurations.
-
Click the Select robot drop-down menu, and select Listed robot. Click Select robot model, and select the robot model that you use. Then, click Next.
-
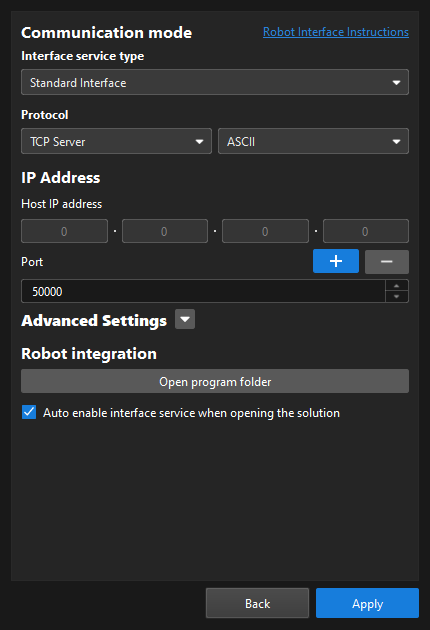
In the Communication mode area, select Standard Interface for Interface service type, TCP Server for Protocol, and ASCII for the protocol format.
-
It is recommended to set the port number to 50000 or above. Ensure that the port number is not occupied by another program.
-
(Optional) Select Auto enable interface service when opening the solution.
-
Click Apply.
-
-
On the main interface of Mech-Vision, make sure that the Robot Communication Configuration switch on the toolbar is flipped and has turned blue.

Input the IPC’s IP Addresses
-
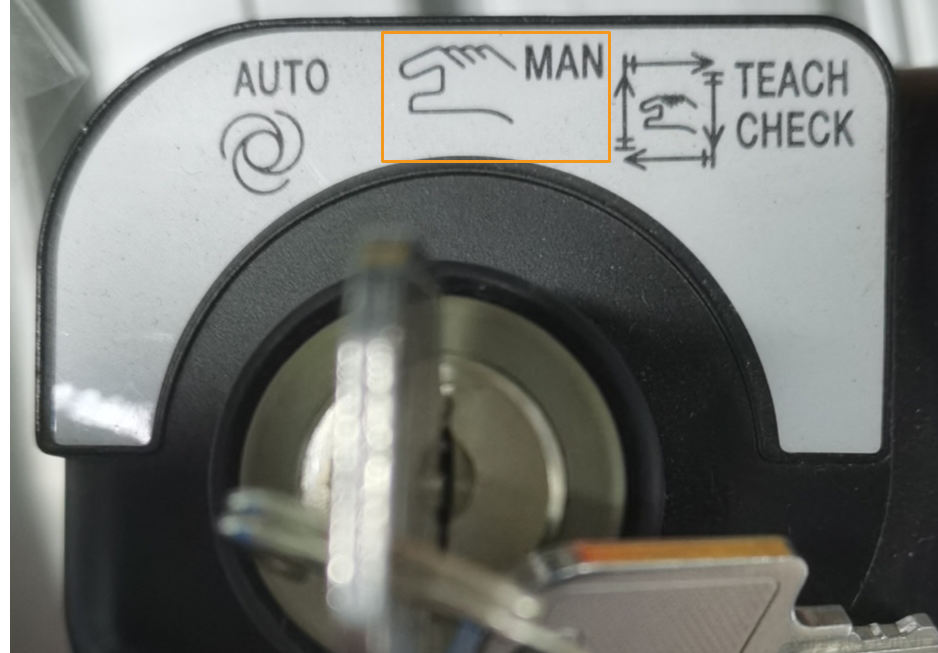
Turn the key of the teach pendant to MAN (the manual mode).
-
On the teach pendant, tap .
-
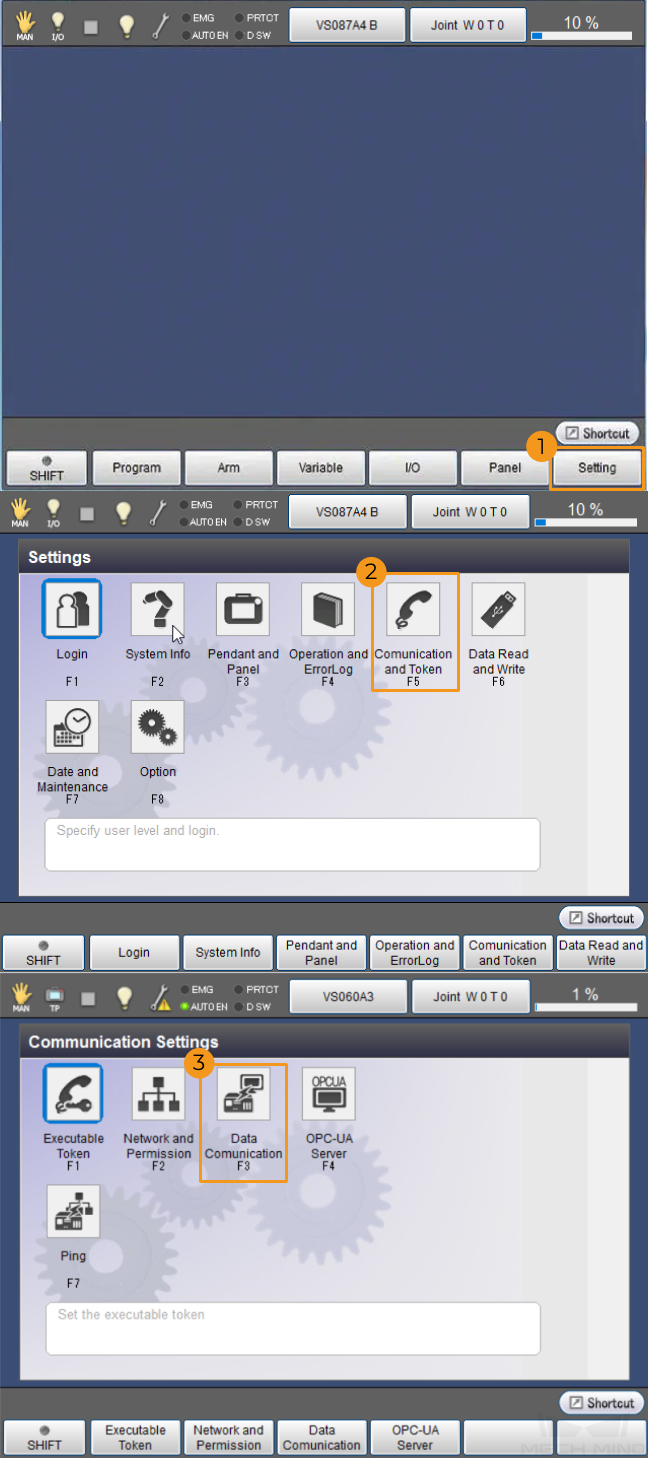
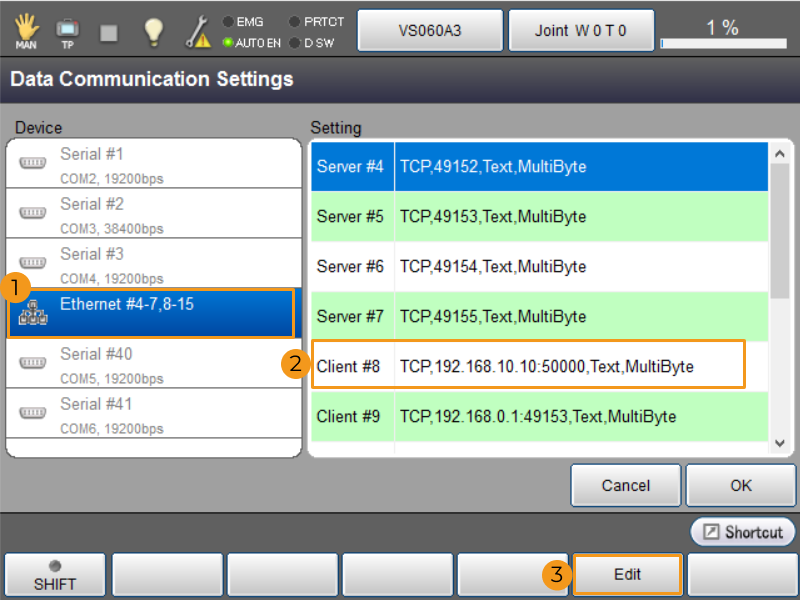
In the “Data Communication Settings” window, select “Ethernet #4-7,8-15” in the “Device” panel, and select “Client #8” in the “Setting” panel. Tap Edit.
-
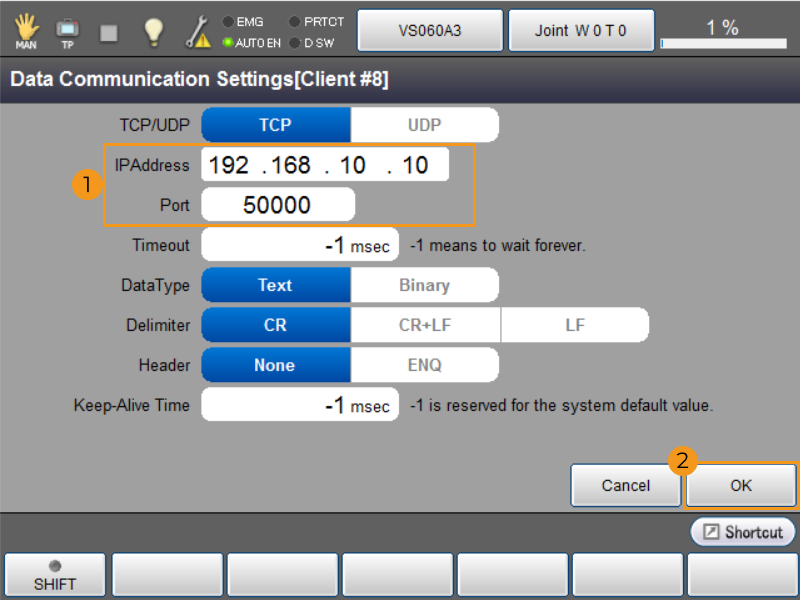
In the pop-up window, set IP Address to that of the IPC, and set Port to the value set in the “Robot Communication Configuration” window in Mech-Vision. Tap OK.
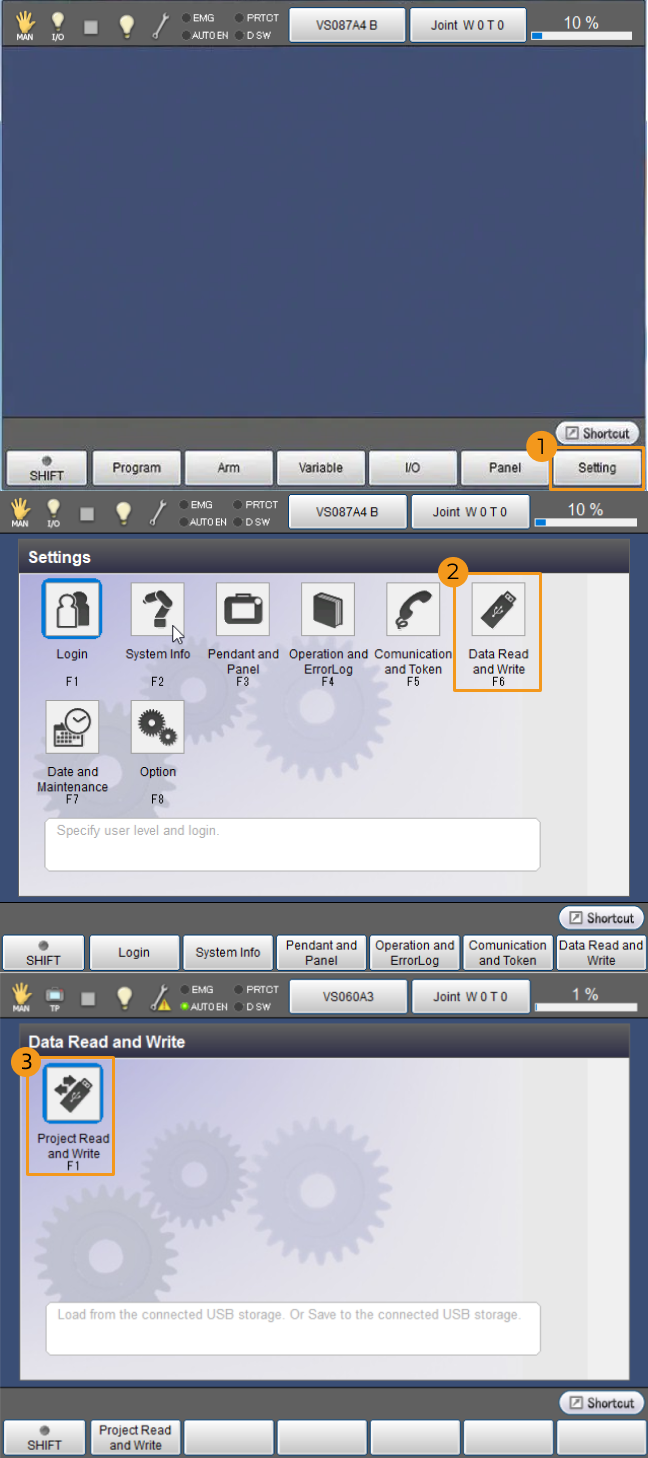
Backup
-
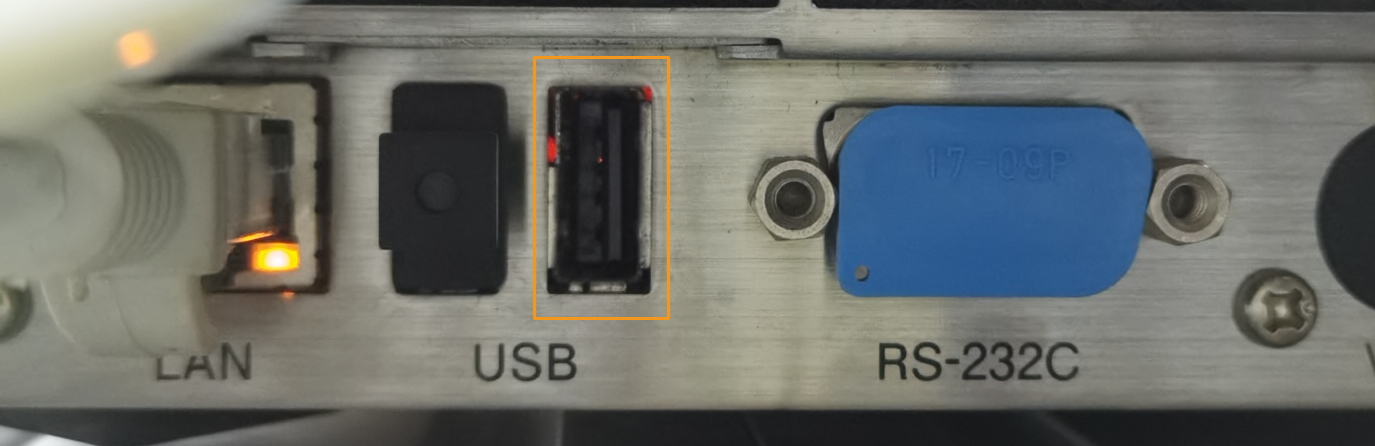
Plug the USB flash drive into the robot controller.
-
On the teach pendant, tab .
-
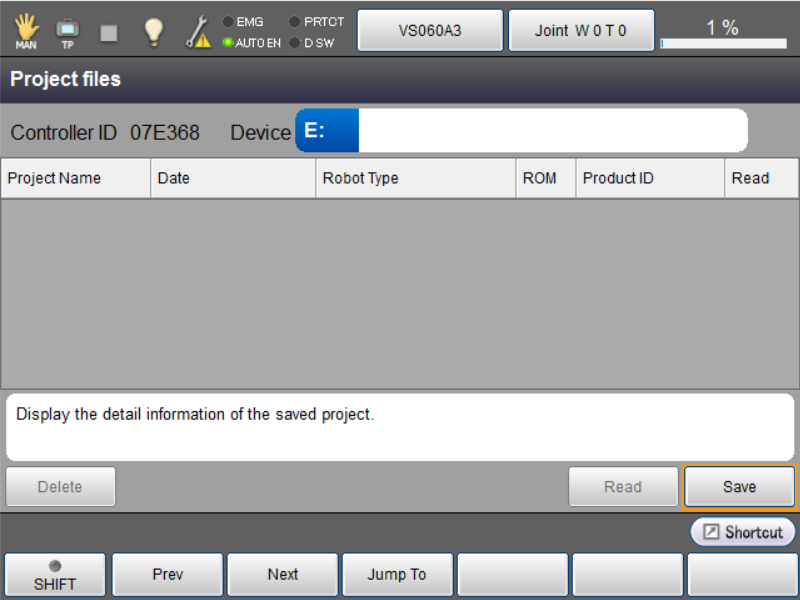
Tab Save in the “Project files” window.
-
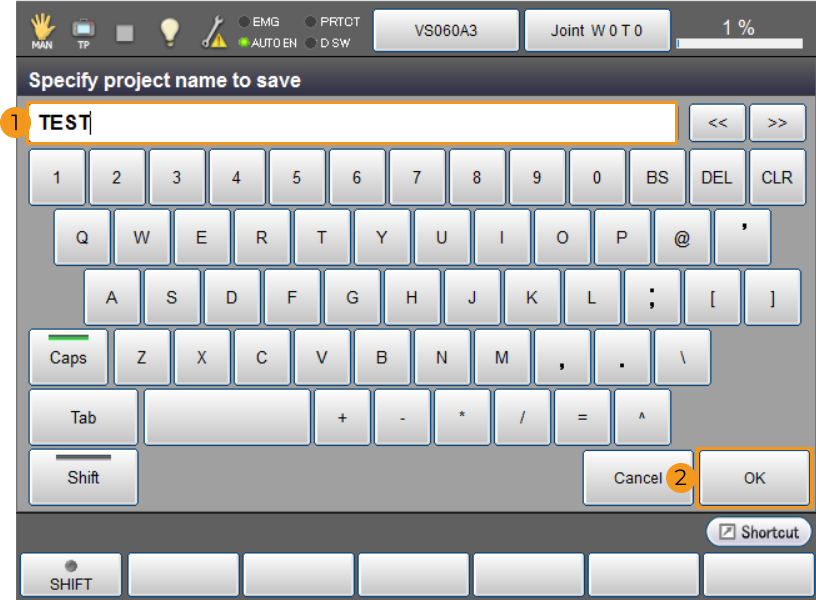
In the window that prompts “Specify project name to save”, enter the backup folder name and tab OK.
-
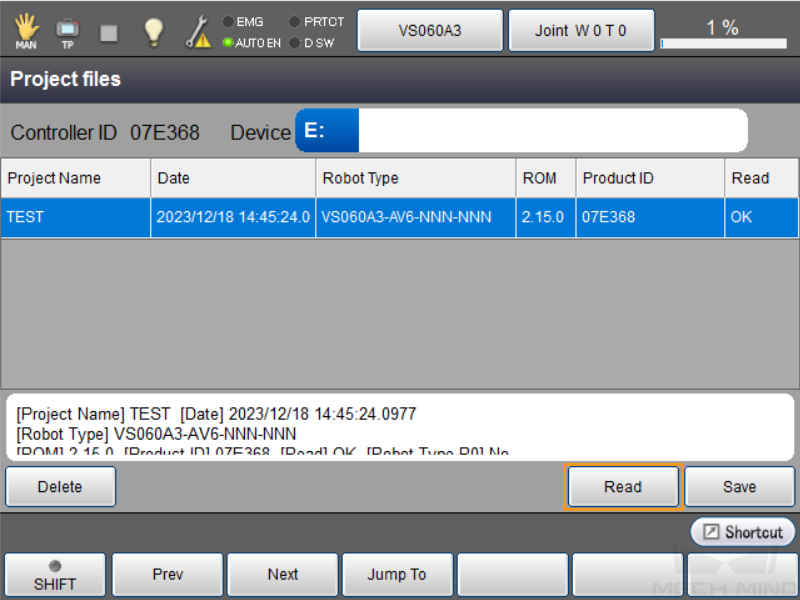
After backing up, the information of the backup files shows up in the “Project files” window. Project Name is the backup folder name that you input at the previous step.

Prepare Program Files
-
Plug the USB flash drive into the IPC.
-
Go to
Mech-Center\Robot_Interface\DENSOfrom the installation directory of Mech-Vision & Mech-Viz, and copy the following files:-
MM.h
-
MM_Auto_Calib.pcs
-
MM_Module.pcs
-
sample.pcs
-
-
Open the USB flash drive and find the folder Source Files in the robot backup folder. Paste the program files into the folder.
Load the Program Files to the Robot
-
Plug the USB flash drive into the robot controller.
-
In the “Project files” window of the teach pendant, tap Read.
-
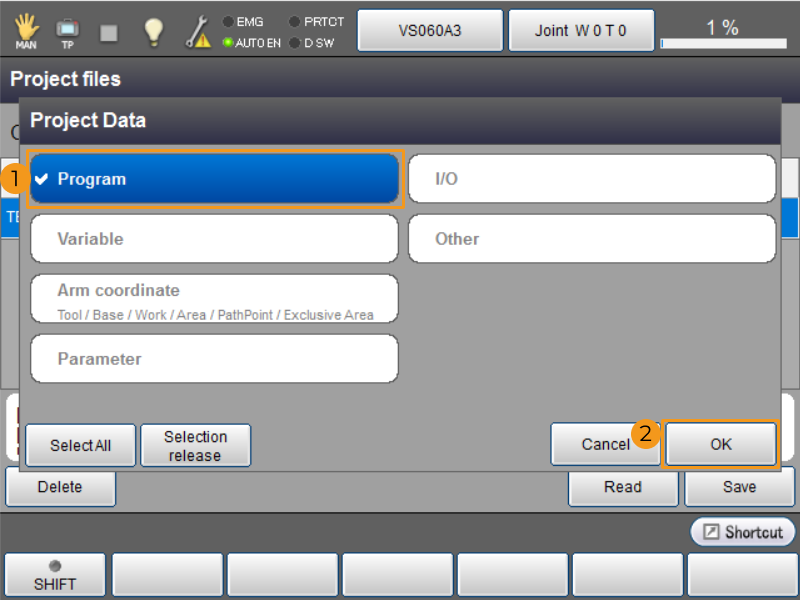
In the pop-up “Project Data” window, select Program and then tap OK.
-
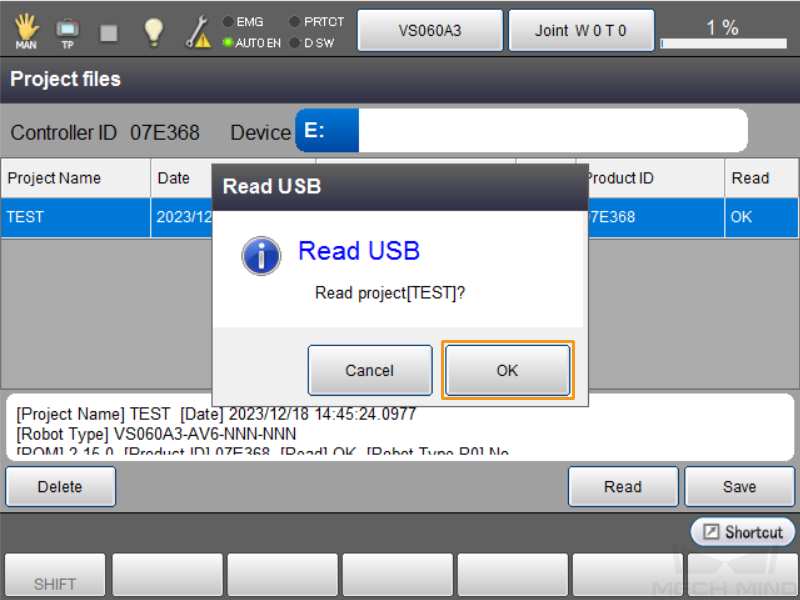
In the pop-up “Read USB” dialogue box, tap OK.
-
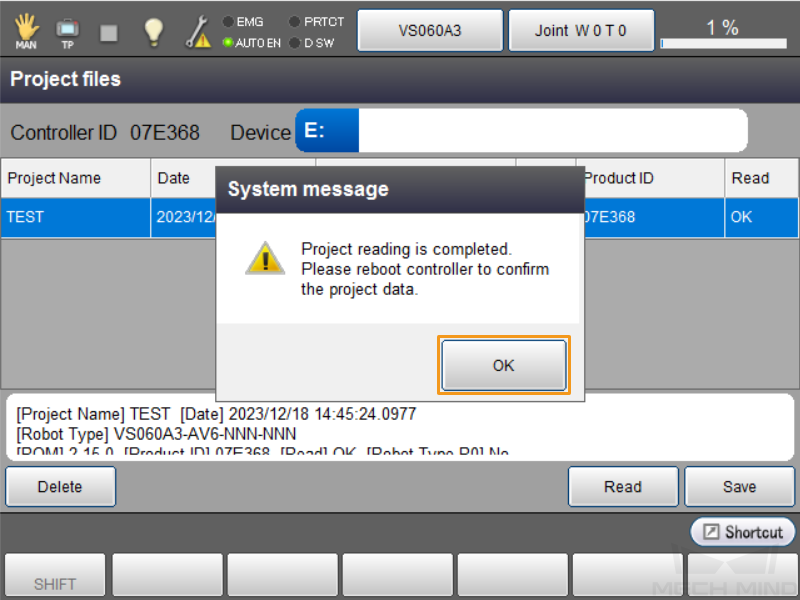
Wait a moment. The “System message” dialogue box will pop up after the system finishes reading. Tap OK.
Test Standard Interface Communication
Before testing the Standard Interface communication between the robot and the vision system, make sure that the interface service is started. Then, run a test program on the teach pendant to test the Standard Interface communication.
-
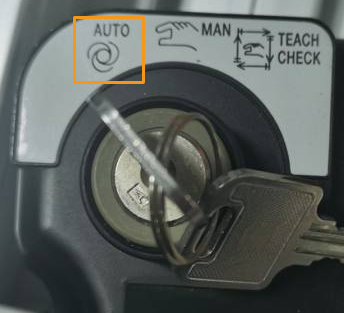
Turn the key of the teach pendant to AUTO (the automatic mode).
-
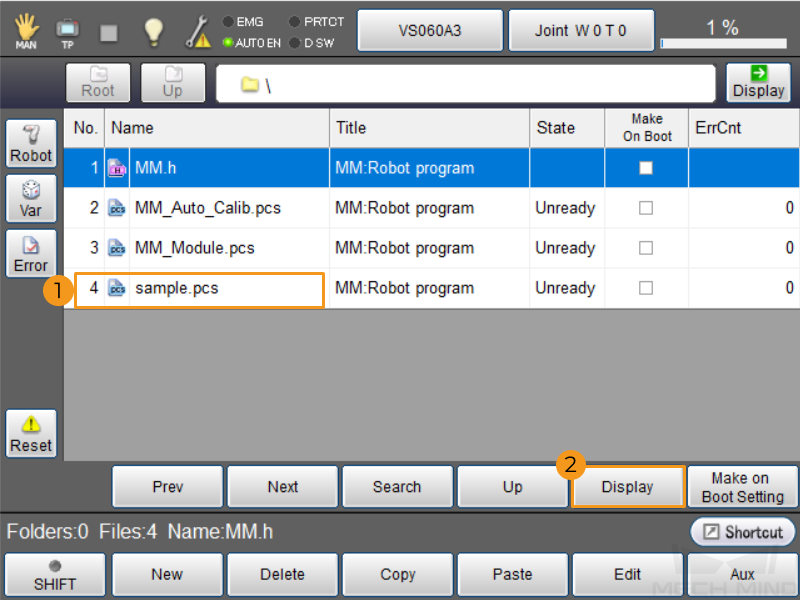
Tab Program on the main interface of the teach pendant.

-
Select sample.pcs on the program list. Then, tab Display.
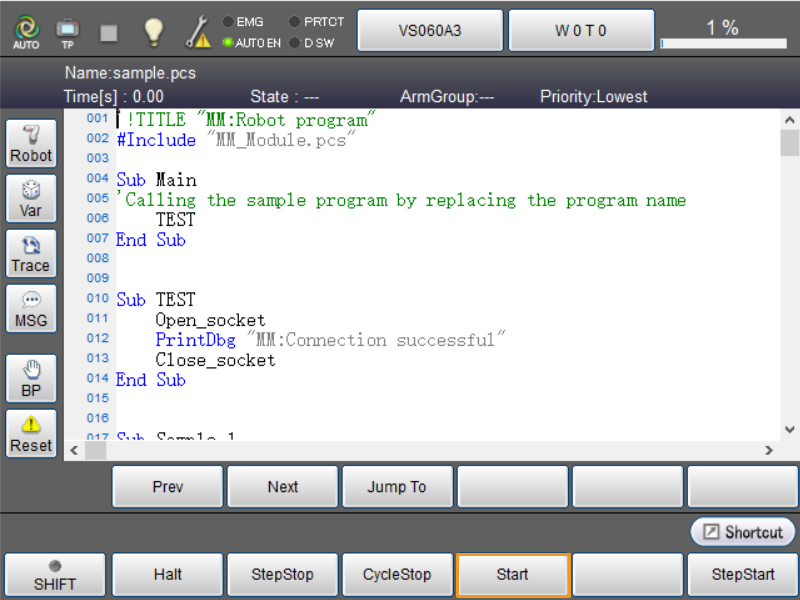
-
Tab Start on the interface.
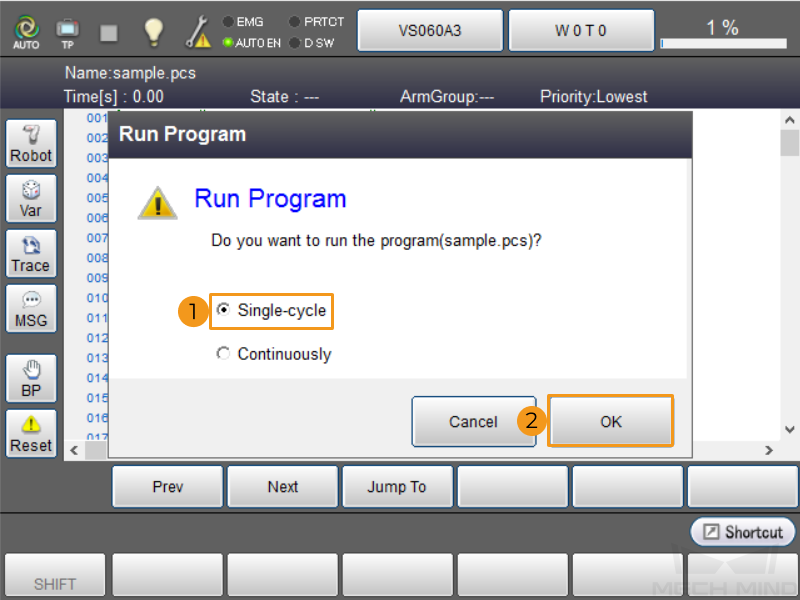
-
In the pop-up “Run Program” dialogue box, select Single-cycle, and then tab OK.
-
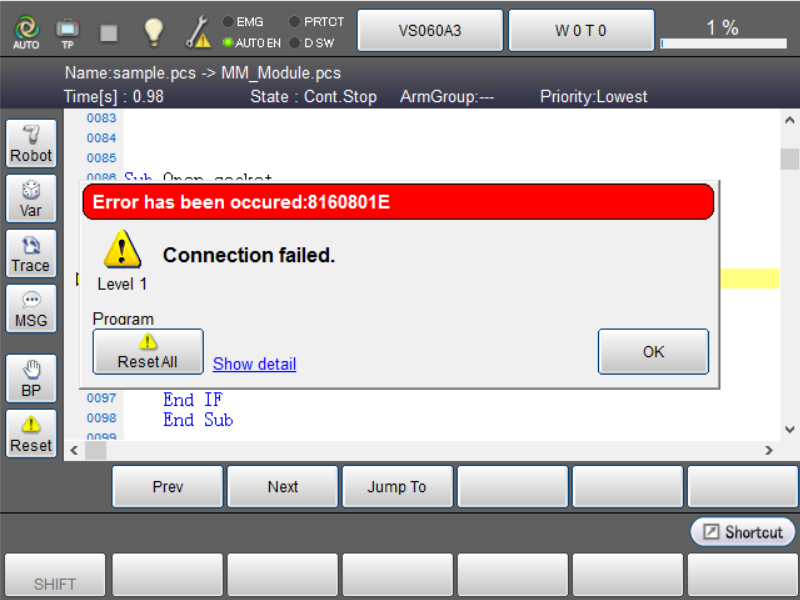
If Standard Interface communication between the robot and Mech-Vision is set up successfully, the arrow will stay at the End Sub line.

-
If the Standard Interface connection fails, the error information Connection failed will pop up in the teach pendant. Please troubleshoot communications problems.