ROKAE Example Program
This topic introduces the example programs that perform an actual pick-and-place task.
Example Programs
The example programs used for simple picking and placing are stored in the main.mod file in the MM_Project folder.
Obtain Vision Result from Mech-Vision
// **********************************************************
// FUNCTION: Eye to Hand simple pick and place with Vision
// **********************************************************
LOCAL PROC Vision_Sample_1()
        AccSet 100,100
        MoveAbsJ home_point,v3000,fine,tool0 //move robot home position
        MoveL camera_capture,v500,fine,tool0
        Pos_Num = 0

        // Set ip address of IPC
        IP_Address = "192.168.2.222"
        Server_Port = 50000
        MM_Timeout = 60
        MM_Init_Socket()
        Wait 0.1

        // Set vision recipe
        Job = 1
        Model_Number = 1
        MM_Switch_Model()

        // Run vision project
        Job = 1
        Pos_Num_Need = 0
        SendPos_Type = 1
        MM_Start_Vis()
        Wait 1
        Job = 1
            MM_Get_VisData()
        IF(MM_Status != 1100)
                EXIT
        ENDIF
        Serial = 1
        MM_Get_Pose()
            robtarget _P = MM_P
        MoveL RelTool(_P,0,0,-100,0,0,0),v1000,fine,tool01
        MoveL MM_P,v300,fine,tool01
        Pause

        // Add object grasping logic here.
        MoveL Offs(_P,0,0,100), v1000, fine, tool01
        MoveL way_point1,v1000,z50,tool01
        MoveL RelTool(drop,0,0,-100,0,0,0),v1000,fine,tool01
        MoveL drop,v300,fine,tool01
        Pause

        // Add object releasing logic here.
        MoveL Offs(drop,0,0,100), v1000, fine, tool01
        MoveAbsJ home_point,v3000,fine,tool0
        RETURN

ENDPROC
Program Logic
-
Line 6: Move the robot to the HOME position.
-
Line 7: Move the robot to the image-capturing pose.
-
Line 11: IP_Address specifies the IP address of the IPC.
-
Line 12: Server_Port specifies the port number of the IPC.
-
Line 13: MM_Timeout specifies the wait time for the communication timeout.
-
Line 14: Initialize communication with MM_Init_Socket.
-
Line 18: Job specifies Mech-Vision project ID.
-
Line 19: Model_Number specifies the number of the parameter recipe used in the Mech-Vision project.
-
Line 20: If parameter recipes are used in the Mech-Vision project, MM_Switch_Model should be called to set the parameter recipe.
-
Line 24: Pos_Num_Need specifies the expected number of vision points received from Mech-Vision. 0 indicates that all vision points will be received.
-
Line 25: SendPos_Type indicates that the robot pose in the form of current joint positions together with current flange pose will be sent to the vision system.
-
Line 26: Run the Mech-Vision project with MM_Start_Vis.
-
Line 27: Wait for one second. Under Eye-In-Hand, this Wait instruction is required to make sure the robot stays still until image acquisition is completed. Under Eye-To-Hand, this Wait instruction can be replaced with MoveL or MoveJ.
-
Line 29: Obtain the vision result from Mech-Vision.
-
Line 30: Check if the returned status code indicates any error. If an error code is returned, the program is stopped.
-
Line 34: Obtain picking waypoint with MM_Get_Pose. Since custom functions in ROKAE syntax do not support passing parameters, the global variable MM_P is specified to store the result from MM_Get_Pose. The local variable _P = MM_P is used to store the obtained pose data to the user-defined position variable.
-
Line 37: Move the robot to the picking waypoint and perform picking.
-
Line 42: Move the robot to an intermediate point between the picking waypoint and placing waypoint.
-
Line 44: Move the robot to the set placing waypoint and perform placing.
Customization Required
-
Define the TCP
tool01: modify the value of tool01 in the calibration window on the teach pendant to adjust the TCP.
-
Teach the HOME position
MoveAbsJ home_point: record the HOME position in home_point.
-
Teach the image-capturing Pose
MoveL camera_capture: Record the image-capturing pose in camera_capture.
-
Teach the intermediate point(s)
MoveL way_point1: Intermediate points are between the picking waypoint and placing waypoint and are used to ensure that the robot doesn’t collide with the surrounding when moving between the picking and placing waypoints. You can add one or more intermediate points to way_point.
-
Teach the placing waypoint
MoveL drop: Record the placing waypoint in drop.
-
Add the object picking and releasing logics for the tool
When the robot moves to the picking and placing waypoints, you need to add the tool control logics for picking or releasing the object respectively.
-
Define Z-offset from the picking/placing waypoint
-
Z-offset when approaching the picking waypoint
MoveL RelTool(_P,0,0,-100,0,0,0),v1000,fine,tool01
In this example, the Z-offset when approaching the picking waypoint is set to 100 mm. The setting moves the robot 100 mm along the Z-direction of the tool reference frame from the picking waypoint. Adjust the Z-offset value according to your actual needs.
-
Z-offset when departing the picking waypoint
MoveL Offs(_P,0,0,100), v1000, fine, tool01
In this example, the Z-offset when departing the picking waypoint is set to 100 mm. The setting moves the robot 100 mm along the Z-direction of the object reference frame from the picking waypoint. Adjust the Z-offset value according to your actual needs.
-
Z-offset when approaching the placing waypoint
MoveL RelTool(drop,0,0,-100,0,0,0),v1000,fine,tool01
In this example, the Z-offset when approaching the placing waypoint is set to 100 mm. The setting moves the robot 100 mm along the Z-direction of the tool reference frame from the picking waypoint. Adjust the Z-offset value according to your actual needs.
-
Z-offset when departing the placing waypoint
MoveL Offs(drop,0,0,100), v1000, fine, tool01
In this example, the Z-offset when departing the placing waypoint is set to 100 mm. The setting moves the robot 100 mm along the Z-direction of the object reference frame from the picking waypoint. Adjust the Z-offset value according to your actual needs.
-
Obtain Planned Path from Mech-Viz
// **********************************************************
// FUNCTION: Eye to Hand simple pick and place with Viz
// **********************************************************
    LOCAL PROC Vision_Sample_2()
            AccSet 100, 100
            MoveAbsJ home_point,v3000,fine,tool0    //move robot home position
            MoveL camera_capture,v500,fine,tool0
            Pos_Num = 0

            // Set ip address of IPC
            IP_Address = "192.168.2.222"
            Server_Port = 50000
            MM_Timeout = 60
            MM_Init_Socket()
            Wait 0.1

            // Set vision recipe
            Job = 1
            Model_Number = 1
            MM_Switch_Model()

            // Run Viz project
            SendPos_Type = 1
            MM_Start_Viz()
            Wait 0.1

            // set branch exitport
            Branch_Num = 1
            Export_Num = 1
            MM_Set_Branch()

            // get planned path
            Jps_Pos = 2
            MM_Get_VizData()
            IF(MM_Status != 2100)
                    EXIT
            ENDIF
            robtarget _P[20]
            int _Label[20]
            int _Speed[20]
            Serial = 0
            while(Serial < Pos_Num)
                    Serial += 1
                    MM_Get_Pose()
                    _P[Serial] = MM_P
                    _Label[Serial] = MM_Label
                    _Speed[Serial] = MM_Speed
            endwhile

            // follow the planned path to pick
            int count = 0
            while(count < Pos_Num)
                    count += 1
                    MoveL _P[count],v1000,fine,tool01
                    IF(count == VisPos_Num)
                            Pause
                            // add object grasping logic here
                    ENDIF
            endwhile

            // go to drop location
            MoveL RelTool(drop,0,0,-100,0,0,0),v1000,z50,tool01
            MoveL drop,v500,fine,tool01     // drop point
            Pause

            // add object releasing logic here
            MoveL Offs(drop,0,0,100), v1000, fine, tool01
            MoveAbsJ home_point,v3000,fine,tool0
            RETURN

    ENDPROC
Program Logic
-
Line 6: Move the robot to the HOME position.
-
Line 7: Move the robot to the image-capturing pose.
-
Line 11: IP_Address specifies the IP address of the IPC.
-
Line 12: Server_Port specifies the port number of the IPC.
-
Line 13: MM_Timeout specifies the wait time for the communication timeout.
-
Line 14: Initialize communication with MM_Init_Socket.
-
Line 18: Job specifies Mech-Vision project ID.
-
Line 19: Model_Number specifies the number of the parameter recipe used in the Mech-Vision project.
-
Line 20: If parameter recipes are used in the Mech-Vision project, MM_Switch_Model should be called to set the parameter recipe.
-
Line 23: SendPos_Type indicates that the robot pose in the form of current joint positions together with current flange pose will be sent to Mech-Viz.
-
Line 24: Trigger the Mech-Viz project to run.
-
Line 28: Branch_Num specifies the Step ID of the Branch by Msg Step.
-
Line 29: Export_Num specifies the number of the exit port to take.
-
Line 30: If you need set the branch in the Mech-Viz project, you can call MM_Set_Branch() to set the exit port for the “Branch by Msg” Step.
-
Line 33: Jps_Pos indicates that waypoints will be returned in the form of TCP.
-
Line 34: Obtain the planned path from Mech-Viz.
-
Line 35: Check if the returned status code indicates any error. If an error code is returned, the program is stopped.
-
Line 42-48: Store waypoints that are obtained from MM_Get_Pose with a loop to corresponding _P[20], _Label[20], and _Speed[20] variables. Since custom functions in ROKAE syntax do not support passing parameters, the global variables MM_P, MM_Label, and MM_Speed are specified to store the result from MM_Get_Pose.
-
Lines 52-59: Move the robot along the path planned by Mech-Viz with a FOR loop to the picking waypoint.
-
Line 63: Move the robot to the set placing waypoint and perform placing.
Customization Required
-
Define the TCP
tool01: modify the value of tool01 in the calibration window on the teach pendant to adjust the TCP.
-
Teach the HOME position
MoveAbsJ home_point: record the HOME position in home_point.
-
Teach the image-capturing Pose
MoveL camera_capture: Record the image-capturing pose in camera_capture.
-
Teach the placing waypoint
MoveL drop: Record the placing waypoint in drop.
-
Add the object picking and releasing logics for the tool
When the robot moves to the picking and placing waypoints, you need to add the tool control logics for picking or releasing the object respectively.
-
Define Z-offset from the placing waypoint
-
Z-offset when approaching the placing waypoint
MoveL RelTool(drop,0,0,-100,0,0,0),v1000,fine,tool01
In this example, the Z-offset when approaching the placing waypoint is set to 100 mm. The setting moves the robot 100 mm along the Z-direction of the tool reference frame from the picking waypoint. Adjust the Z-offset value according to your actual needs.
-
Z-offset when departing the placing waypoint
MoveL Offs(drop,0,0,100), v1000, fine, tool01
In this example, the Z-offset when departing the placing waypoint is set to 100 mm. The setting moves the robot 100 mm along the Z-direction of the object reference frame from the picking waypoint. Adjust the Z-offset value according to your actual needs.
-
Obtain Planned Path from Mech-Vision
// ****************************************************************************
// FUNCTION: Eye to Hand simple pick and place with Vision Path Planning Step
// ****************************************************************************
    LOCAL PROC Vision_Sample_3()
            AccSet 100, 100
            MoveAbsJ home_point,v3000,fine,tool0    //move robot home position
            MoveL camera_capture,v500,fine,tool0
            Pos_Num = 0

            // Set ip address of IPC
            IP_Address = "192.168.2.222"
            Server_Port = 50000
            MM_Timeout = 60
            MM_Init_Socket()
            Wait 0.1

            // Set vision recipe
            Job = 1
            Model_Number = 1
            MM_Switch_Model()

            // Run vision project
            Job = 1
            Pos_Num_Need = 0
            SendPos_Type = 1
            MM_Start_Vis()
            Wait 1

            // get planned path from {product-vis} Path Planning Step
            Job = 1
            Jps_Pos = 2
            MM_Get_VisPath()
            IF(MM_Status != 1103)
                    EXIT
            ENDIF
            robtarget _P[20]
            int _Label[20]
            int _Speed[20]
            Serial = 0
            while(Serial < Pos_Num)
                    Serial += 1
                    MM_Get_Pose()
                    _P[Serial] = MM_P
                    _Label[Serial] = MM_Label
                    _Speed[Serial] = MM_Speed
            endwhile

            // follow the planned path to pick
            int count = 0
            while(count < Pos_Num)
                    count += 1
                    MoveL _P[count],v1000,fine,tool01
                    IF(count == VisPos_Num)
                            Pause
                            // add object grasping logic here
                    ENDIF
            endwhile

            // go to drop location
            MoveL RelTool(drop,0,0,-100,0,0,0),v1000,z50,tool01
            MoveL drop,v500,fine,tool01     // drop point
            Pause

            // add object releasing logic here
            MoveL Offs(drop,0,0,100), v1000, fine, tool01
            MoveAbsJ home_point,v3000,fine,tool0
            RETURN

    ENDPROC
Program Logic
-
Line 6: Move the robot to the HOME position.
-
Line 7: Move the robot to the image-capturing pose.
-
Line 11: IP_Address specifies the IP address of the IPC.
-
Line 12: Server_Port specifies the port number of the IPC.
-
Line 13: MM_Timeout specifies the wait time for the communication timeout.
-
Line 14: Initialize communication with MM_Init_Socket.
-
Line 18: Job specifies Mech-Vision project ID.
-
Line 19: Model_Number specifies the number of the parameter recipe used in the Mech-Vision project.
-
Line 20: If parameter recipes are used in the Mech-Vision project, MM_Switch_Model should be called to set the parameter recipe.
-
Line 24: Pos_Num_Need specifies the expected number of vision points received from Mech-Vision. 0 indicates that all vision points will be received.
-
Line 25: SendPos_Type indicates that the robot pose in the form of current joint positions together with current flange pose will be sent to the vision system.
-
Line 26: Run the Mech-Vision project with MM_Start_Vis.
-
Line 27: Wait for one second. Under Eye-In-Hand, this Wait instruction is required to make sure the robot stays still until image acquisition is completed. Under Eye-To-Hand, this Wait instruction can be replaced with MoveL or MoveJ.
-
Line 31: Jps_Pos indicates that waypoints will be returned in the form of TCP.
-
Line 32: Obtain the planned path from the “Path Planning” Step of Mech-Vision with MM_Get_VisPath.
-
Line 33: Check if the returned status code indicates any error. If an error code is returned, the program is stopped.
-
Line 40-46: Store waypoints that are obtained from MM_Get_Pose with a loop to corresponding _P[20], _Label[20], and _Speed[20] variables. Since custom functions in ROKAE syntax do not support passing parameters, the global variables MM_P, MM_Label, and MM_Speed are specified to store the result from MM_Get_Pose.
-
Lines 50 -57: Move the robot along the planned path with a FOR loop to the picking waypoint and perform picking.
-
Line 61: Move the robot to the set placing waypoint and perform placing.
Customization Required
-
Define the TCP
tool01: modify the value of tool01 in the calibration window on the teach pendant to adjust the TCP.
-
Teach the HOME position
MoveAbsJ home_point: record the HOME position in home_point.
-
Teach the image-capturing Pose
MoveL camera_capture: Record the image-capturing pose in camera_capture.
-
Teach the placing waypoint
MoveL drop: Record the placing waypoint in drop.
-
Add the object picking and releasing logics for the tool
When the robot moves to the picking and placing waypoints, you need to add the tool control logics for picking or releasing the object respectively.
-
Define Z-offset from the placing waypoint
-
Z-offset when approaching the placing waypoint
MoveL RelTool(drop,0,0,-100,0,0,0),v1000,fine,tool01
In this example, the Z-offset when approaching the placing waypoint is set to 100 mm. The setting moves the robot 100 mm along the Z-direction of the tool reference frame from the picking waypoint. Adjust the Z-offset value according to your actual needs.
-
Z-offset when departing the placing waypoint
MoveL Offs(drop,0,0,100), v1000, fine, tool01
In this example, the Z-offset when departing the placing waypoint is set to 100 mm. The setting moves the robot 100 mm along the Z-direction of the object reference frame from the picking waypoint. Adjust the Z-offset value according to your actual needs.
-
Run the Example Program
Before running the example program, please make sure that:
-
You have set up Standard Interface communication with the robot.
-
You have completed the hand-eye calibration with the calibration program.
-
You have created a Mech-Vision solution and project, and selected Autoload Project.
-
You have created a Mech-Viz project if the “Obtain Planned Path from Mech-Viz” example program is used, and right-clicked the project name in the Resources panel in Mech-Viz and selected Autoload Project in the context menu.
-
The HOME position, image-capturing pose, TCP, and intermediate waypoints have been taught.
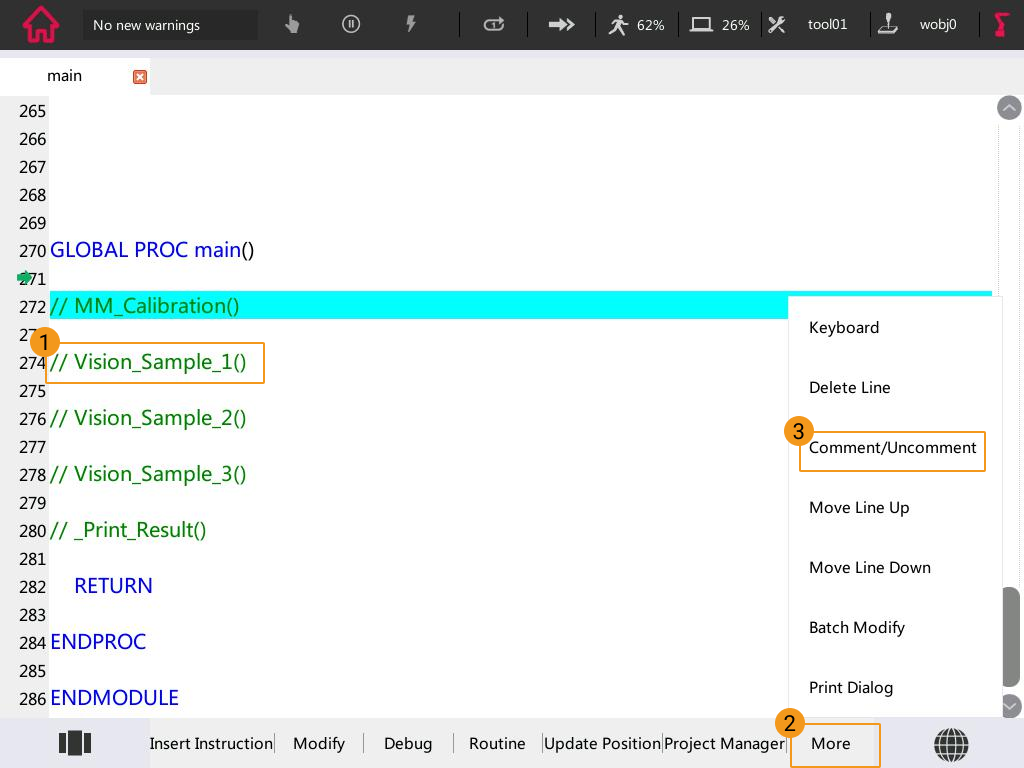
When all the prerequisites are met, run the example program by referring to the section Run the Robot Program.
When proceeding to the step below, open the Comment in the specific example program. For example, to run the first example program, select “// Vision_Sample_1()”, and then select .