Measurement Group Editor
This section describes how to use the Measurement Group Editor. The Measurement Group Editor is used to assign features to different measurement groups. The robot program can specify the measurement groups participating in the current measurement through the measurement group ID in command 801.
Measurement groups are divided into the following two types:
-
Fixed group: The features in this group participate in every measurement.
-
Rotating group: Each rotating group contains multiple alternative features. Only one rotating group participates in each measurement, achieving a “round-robin use” effect.
|
In the menu bar of the software, select to open the Measurement Group Editor dialog box.
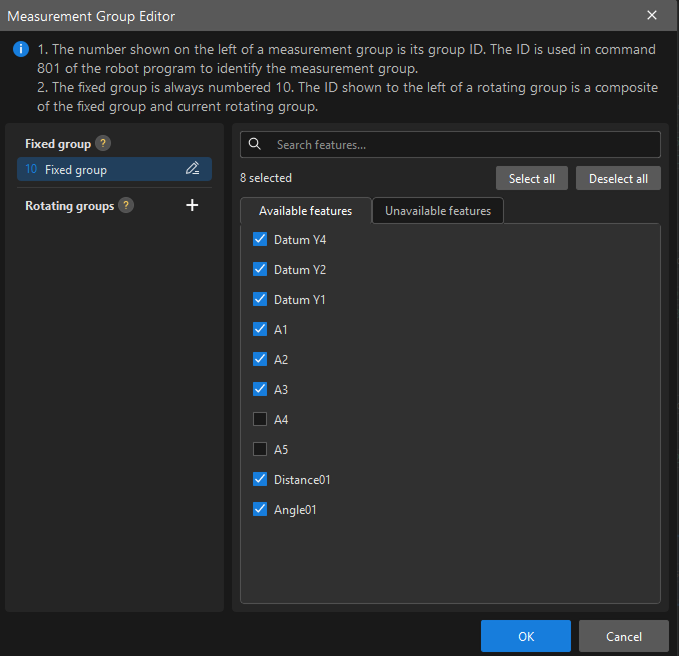
This section covers the following content:
Creating a Rotating Group
-
In the Rotating group area of the measurement group list on the left, click New Rotating Group to create a rotating group. Its default name is “Rotating group N”.
-
Click Modify on the right of the rotating group, set the group name and group ID, and then click OK.
For details, see Editing a Measurement Group.
|
The available ID range for rotating groups is 11 to 99. If no ID is available in this range, you cannot create more rotating groups. |
Assigning Features
Features can be assigned to both fixed groups and rotating groups, and the assigned features can be edited again.
-
In the measurement group list on the left, click the target measurement group.
-
In the Available features list on the right, select the features to be assigned to the measurement group.
Features that have been assigned to other measurement groups are displayed in the Unavailable features list and cannot be selected. If there are many features, you can enter a feature name in the Search features box to search for features, or click Select all or Deselect all to select features in batches. The number of selected features is displayed above the list.
| If no feature has been created in the current project, the feature list will display “No features yet. Please create features first”. |
Editing a Measurement Group
-
Click Modify on the right of the measurement group.
-
In the pop-up dialog box, set Group name and Group ID, and then click OK.
|
Deleting a Rotating Group
-
Click Delete on the right of the rotating group.
-
In the pop-up confirmation prompt, click Confirm Deletion.
| The fixed group cannot be deleted. |
Saving and Closing
-
OK: Saves the measurement group configuration and closes the dialog box.
If any feature is not assigned to a measurement group, a confirmation prompt will pop up after you click OK. Click Save to continue saving. After saving, the unassigned features will not appear in any measurement group.
-
Cancel: Closes the dialog box without saving the changes.
If unsaved changes exist, the software will prompt that the unsaved changes will be discarded before the dialog box is closed.