C++ (Windows)
This topic introduces how to configure the Mech-Eye API C++ samples with CMake and then build the samples with Visual Studio on Windows.
Sample List
Samples are divided into the following categories: Basic, Advanced, Util, Calibration and Pcl.
-
Basic samples: Connect to the camera and acquire data.
-
Advanced samples: Acquire data in more complicated manners and set model-specific parameters.
-
Calibration samples: perform hand-eye calibration through Mech-Eye API.
-
Util samples: Obtain camera information and set common parameters.
-
Pcl samples: Use the PCL library to convert data structure and visualize data.
The samples in each category and their descriptions are provided below.
Basic
-
TriggerWithSoftwareAndFixedRate: Trigger data acquisition with the software + fixed rate method, and then retrieve and save the acquired data.
-
TriggerWithExternalDeviceAndFixedRate: Trigger data acquisition with the external + fixed rate method, and then retrieve and save the acquired data.
-
TriggerWithSoftwareAndEncoder: Trigger data acquisition with the software + encoder method, and then retrieve and save the acquired data.
-
TriggerWithExternalDeviceAndEncoder: Trigger data acquisition with the external + encoder method, and then retrieve and save the acquired data.
-
TriggerNonStopAcquisition: Trigger a continuous scan of the target object, and then retrieve and save the acquired data.
Advanced
-
BlindSpotFiltering: Detect and remove the false data caused by blind spots and obtain the filtered profile data.
-
NoiseRemoval: Remove the noise in the depth data and obtain the filtered profile data.
-
ProfileAlignment: Correct the X-axis and Z-axis vibrations in the profiles (aligning the profiles) and obtain the corrected profile data.
-
RegisterProfilerEvent: Define and Register the callback function for monitoring laser profiler events.
-
TransformPointCloud: Obtain and save the point clouds in the custom reference frame.
-
TriggerMultipleProfilersSimultaneously: Trigger multiple laser profilers to acquire data asynchronously, and then retrieve and save the acquired data.
-
UseVirtualDevice: Acquire the profile data stored in a virtual device, generate the intensity image and depth map, and save the images.
-
WarmUp: Warm up the device.
Calibration
-
MultipleProfilersCalibration: Calibrate multiple laser profilers that simultaneously scan the same target object, and output the calibration results and errors, stitching results, as well as the stitched depth map and point cloud.
-
MoveDirVecCalibration: Calibrate the movement direction vector for a single laser profiler, and output calibration results and alignment parameters for subsequent stitching.
-
WidthExpansionCalibration: Perform width-expansion calibration and stitching for a single laser profiler, and output corrected calibration parameters and stitching results.
Util
-
HandleNanAndNegativeInDepth: Detect and process NaN and negative values in the depth data, and then generate and save the intensity image and depth map.
-
ManageUserSets: Manage parameter groups, such as obtaining the names of all parameter groups, adding a parameter group, switching the parameter group, and saving parameter settings to the parameter group.
-
PrintProfilerStatus: Obtain and print the laser profiler’s information, such as model, serial number, firmware version, and temperatures.
-
RenderDepthMap: Obtain and save the depth map rendered with the jet color scheme.
Pcl
-
ConvertPointCloudToPcl: Obtain data and convert it to the PCL data structure.
|
For different methods of triggering the laser profiler to acquire data, refer to Methods for Triggering Data Acquisition. |
Prerequisites
In order to use the C++ samples of Mech-Eye API, the following prerequisites must be satisfied:
-
Obtain the samples.
-
Install the required software.
-
(Optional) Install the software libraries on which samples depend and add relevant environment variables.
Obtain Samples
C++ samples are included in the installation path of Mech-Eye SDK or can be obtained from GitHub by cloning. The samples in the installation path are the version at the time of Mech-Eye SDK release. The version on GitHub may contain the latest changes.
-
The samples in the installation path are located in xxx/Mech-Eye SDK-2.6.0/API/samples/cpp/profiler.
-
The samples cloned from GitHub are located in xxx/mecheye_cpp_samples/profiler.
Install Required Software
In order to use the C++ samples of Mech-Eye API, Mech-Eye SDK, CMake and Visual Studio must be installed.
Install the Latest Version of Mech-Eye SDK
Please install or upgrade Mech-Eye SDK according to Mech-Eye SDK Installation Guide.
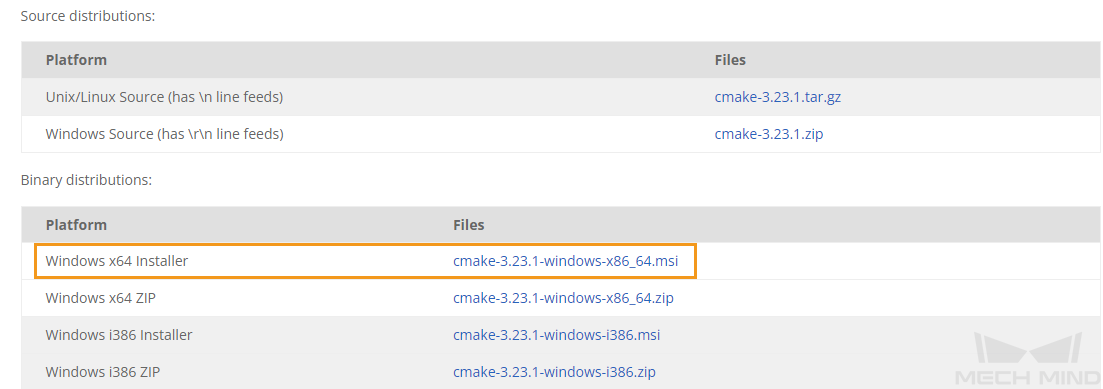
Install CMake (Version 3.2 or Above)
-
Download CMake: download the installer to the right of Windows x64 Installer.
-
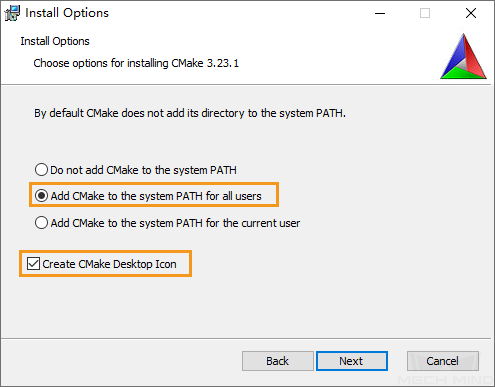
When installing, select the following two options to add CMake to environment variables and create a desktop shortcut for CMake.
-
Add CMake to the system PATH for all users
-
Create Cmake Desktop Icon
-
Install Visual Studio (Version 2017 or Above)
-
Download the Visual Studio installer.
-
When installing, select the following two workloads in the Desktop & Mobile category, and then click Install.
-
Desktop development with C++
-
Universal Windows Platform development
-
| Please restart your computer after installing Visual Studio. If you still need to install the optional software, you can restart your computer after all installations have been completed. |
(Optional) Install Dependent Software Libraries
Some samples contain functions that depend on the following third-party software libraries. If you need to use the samples listed in the table below, you must install the software libraries on which the samples depend.
-
OpenCV: version 3.4.5 or above
| If any of the optional software libraries is not installed, then you must complete the steps in Disable Unneeded Samples (Optional) before configuring the samples. |
Refer to the following table for the samples that depend on third-party software libraries.
| Sample |
|---|
BlindSpotFiltering |
NoiseRemoval |
ProfileAlignment |
RenderDepthMap |
TriggerWithSoftwareAndFixedRate |
TriggerWithExternalDeviceAndFixedRate |
TriggerNonStopAcquisition |
TriggerWithSoftwareAndEncoder |
TriggerWithExternalDeviceAndEncoder |
TriggerMultipleProfilersSimultaneously |
UseVirtualDevice |
WarmUp |
HandleNanAndNegativeInDepth |
MoveDirVecCalibration |
MultipleProfilersCalibration |
WidthExpansionCalibration |
Install OpenCV
-
Download and install OpenCV. Note down the installation path of OpenCV.
-
Add OpenCV to environment variables:
-
Right-click This PC on the desktop and select Properties.
-
Click Advanced system settings, and in the pop-up System Properties window, click Environment Variables to open the Environment Variables window.
-
Double-click Path in the user variables to enter the Edit environment variable page. Click New in the upper-right and add the following paths one by one. Then, click OK to exit the window.
-
xxx/OpenCV/build/x64/vc14/bin
-
xxx/OpenCV/build/x64/vc14/lib
-
-
| It is recommended to restart your computer after adding the environmental variables. If not restarted, the environmental variables added may not be effective. |
Build and Run Samples
You can build all samples at once or build a single sample individually.
| The paths provided in this section correspond to the samples included in the installation path. If you are using the samples cloned from GitHub, please modify the paths correspondingly. |
Disable Unneeded Samples (Optional)
| If you did not install some of the optional software libraries and still want to build all samples at once, then you must complete the steps in this section. Otherwise, an error will occur during the configuration of samples using CMake. |
If you do not need the samples that depend on OpenCV, please edit the CMakeLists file to disable these samples before building all samples at a time.
-
Open CMakeLists.txt in xxx/Mech-Eye SDK-2.6.0/API/samples/cpp/profiler.
-
Edit the line containing
options: find the line ofoption(USE_OPENCV…), changeONat the end of the line toOFFto disable the samples that depend on OpenCV. -
Save the changes and close CMakeLists.txt.
Configure Samples in CMake
-
Right-click CMake and select Run as administrator.
-
Enter the paths of source code and binaries.
-
To build all samples at once, enter the following paths.
Where is the source code
xxx/Mech-Eye SDK-2.6.0/API/samples/cpp/profiler
Where to build the binaries
xxx/Mech-Eye SDK-2.6.0/API/samples/cpp/profiler/build
-
To build one sample individually, enter the following paths. Replace SampleName with the name of the sample.
Where is the source code
xxx/Mech-Eye SDK-2.6.0/API/samples/cpp/profiler/SampleName
Where to build the binaries
xxx/Mech-Eye SDK-2.6.0/API/samples/cpp/profiler/SampleName/build
-
-
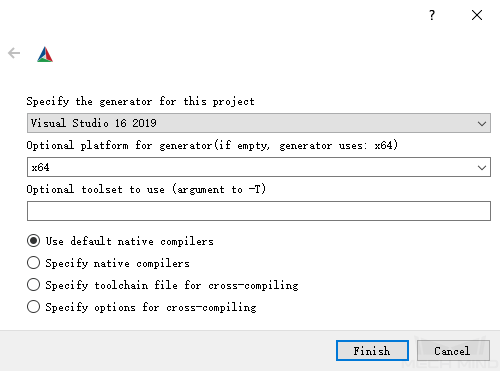
Click Configure in the bottom to open the configuration page. Select Visual Studio version, and set the platform to x64. Then, click Finish. When the configuration completes, the log will display Configuring done.
-
Click Generate to generate Visual Studio solution. When the generation completes, the log will display Generating done. Then, click Open Project to open the solution in Visual Studio.
Build Samples in Visual Studio
-
In Visual Studio toolbar, change the solution configuration from Debug to Release.
-
In the menu bar, select . An executable file (.exe) is generated for each sample. The executable files are saved to the Release folder, located in the Where to build the binaries directory that you entered in CMake.
Run Samples
You can run the samples in Visual Studio after building them, or run the samples by double-clicking the executable files.
Run a Sample in Visual Studio
-
In the Solution Explorer panel, right-click a sample, and select Set as Startup Project.
-
Click Local Windows Debugger in the toolbar to run the sample.
While the sample is running, input the index of the laser profiler to which you want to connect according to the instruction, and press Enter to connect to the laser profiler.
-
If image and/or point cloud files are saved by the sample, you can find the files in the build folder (the Where to build the binaries directory that you entered in CMake).
Run the Executable File of a Sample
-
Navigate to the Where to build the binaries directory that you entered in CMake, and open the Release folder.
-
Run the executable file with the same name as the sample.
While the sample is running, input the index of the laser profiler to which you want to connect according to the instruction, and press Enter to connect to the laser profiler.
-
If image and/or point cloud files are saved by the sample, you can find the files in the Release folder.