Use a Camera to Acquire Point Cloud, Generate Point Cloud Model, and Configure the Trajectory
In this workflow, you can use the point cloud acquired by the camera to generate a point cloud model and create a target object.
|
Before selecting this workflow, ensure that the current project contains the “Capture Images from Camera” Step, and that the camera is connected or the virtual mode is enabled. |
Under the Get point cloud by camera workflow in the target object editor, click Select, and set the target object name to enter the configuration process. The overall configuration process is shown in the figure below.

-
Acquire the point cloud: Use the current project to acquire the point cloud. Then adjust the parameters and set the 3D ROI to generate a point cloud model.
-
Edit model: Edit the generated point cloud model, including the calibration of the object center point and configuration of the point cloud model, to ensure better performance of the subsequent 3D matching.
-
Set trajectory: Create and adjust trajectories on the edited point cloud model.
-
Set collision model (optional): Generate the collision model for collision detection during trajectory planning.
The following sections provide detailed instructions on the configuration.
Acquire Point Cloud
After entering the configuration process, the point cloud should be acquired first to generate the point cloud model.
Set Project Information
Select the “Capture Images from Camera” Step in the current project to acquire the point cloud. If the solution contains multiple projects, there may be multiple “Capture Image from Camera” steps. Please select the appropriate one based on your actual needs. Then click Acquire point cloud, and then the result can be viewed in the visualization area.
Note that when the camera’s field of view cannot cover the entire target object, priority should be given to ensuring that the key areas of the object are within the camera’s field of view.
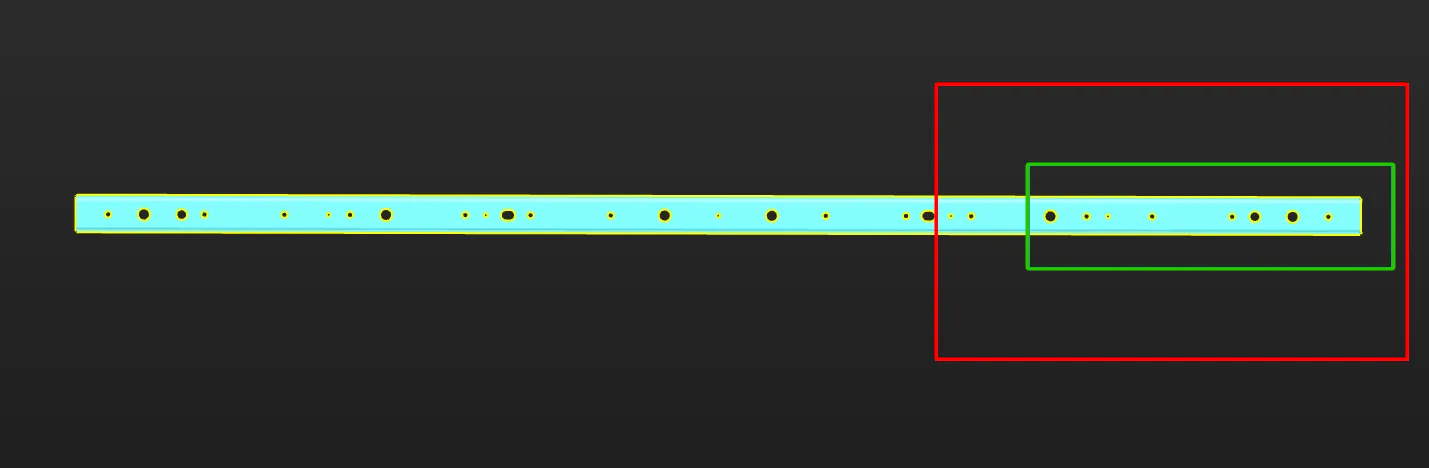
The figure below shows an example of a long sheet metal part. Assuming that the region marked by the red frame on the right is the camera’s FOV, it is recommended to select the point cloud within the region marked by the green frame as the point cloud model for matching stability. Make sure that the region marked by the green frame is within the camera’s FOV when acquiring data. Specifically, the right edge part should be within the camera’s FOV.
Record Robot Flange Pose at Image-Capturing Point
If the camera is mounted in the EIH mode, you can click the Obtain current pose button to obtain the robot flange pose when capturing the point cloud. Please note:
-
The pose refers to the robot flange pose, not the TCP.
-
The pose corresponds to the robot flange pose at the image-capturing point.
-
Carefully check the values to avoid errors.
Preprocess Parameters
To remove interference points and speed up processing in subsequent Steps, you can perform preprocessing on the point cloud. For detailed explanations of the parameters, refer to Preprocessing Parameters.
|
If the “3D Trajectory Recognition” Step is used in the project, you can enable Use parameters of Step “3D Trajectory Recognition”, and then the parameter values in the “3D Trajectory Recognition” Step will be synchronized. This improves the accuracy of 3D matching. |
Set ROI and Background
To quickly remove irrelevant point clouds in the scene and extract the target object point cloud, you can set an ROI and remove the background.
If you need to remove the background by capturing the image of the background, you must move the target object out of the camera’s view after acquiring the point cloud. Then click Acquire and remove background, and the tool will automatically acquire an image of the background and remove the point cloud of the background.
Now the point cloud acquisition is completed. You can click Next to start editing the generated point cloud model.
Edit Point Cloud Model
The generated point cloud model should be edited for better performance in the subsequent 3D matching.
Edit Point Cloud
When generating a point cloud model by acquiring the point cloud of a target object with the camera, make sure that the point cloud acquired by the camera accurately reproduces the features of the target object and removes any interfering parts from the point cloud. Refer to Edit Point Cloud for detailed instructions on removing the interference points.
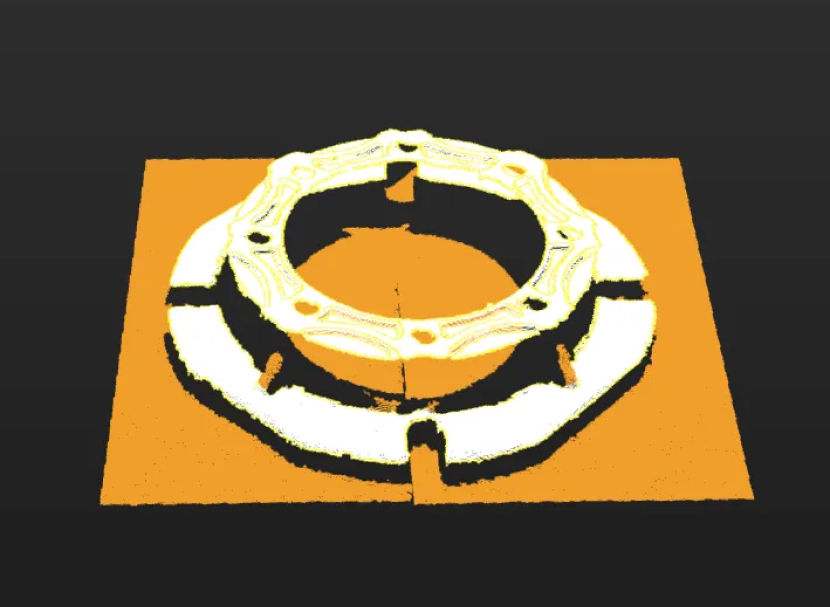
The figure below shows the point cloud model of a gearbox housing. The background point cloud below the housing and the cohesive point cloud (in orange) on the side should be removed.
Calibrate Object Center Point
After an object center point is automatically calculated, you can calibrate it based on the actual target object in use. Select a calculation method under Calibrate center point by application, and click Start calculating to calibrate the object center point.
| Method | Description | Operation | Application Scenario |
|---|---|---|---|
Re-calculate by using original center point |
The default calculation method. Calculate the object center point according to the features of the target object and the original object center point. |
Select Re-calculate by using original center point, and click the Start calculating button. |
In general, this method can be used to calculate the center point of all target objects. |
Calibrate to center of symmetry |
Calculate the object center point according to the target object’s symmetry.
|
Select Calibrate to center of symmetry and click the Start calculating button. |
This method can be used to calculate the object center point when filtering matching results by target object symmetry. |
Calibrate to center of feature |
Calculate the object center point according to the selected Feature type and the set 3D ROI. |
|
Target objects with obvious geometric features
|
Reset to Original Point Cloud
During editing, if the current point cloud result is unsatisfactory, click the [Reset button to undo all editing operations and restore the point cloud to its initial state when entering the "Edit model" step.
|
After resetting the point cloud, you need to recalculate the object center point and update the point cloud model configuration. |
Configure Point Cloud Model
To better use the point cloud model in the subsequent 3D matching and enhance matching accuracy, the tool provides the following two options for configuring the point cloud model. You can enable the Configure point cloud model feature as needed.
Calculate Poses to Filter Matching Result
Once Calculate poses to filter matching result is enabled, more matching attempts will be made based on the settings to obtain matching results with higher confidence. However, more matching attempts will lead to longer processing time.
Two methods are available: Auto-calculate unlikely poses and Configure symmetry manually. In general, Auto-calculate unlikely poses is recommended. See the following for details.
| Method | Description | Operation |
|---|---|---|
Auto-calculate unlikely poses |
Poses that may cause false matches will be calculated automatically. During the calculation process, a set of candidate poses is automatically generated based on equivalent or ambiguous poses that may arise due to the target object’s rotational symmetry about the Z-axis. In subsequent matches, poses that successfully match these poses will be considered unqualified and filtered out. |
Note that the calculation results will not be automatically updated when the point cloud model is modified. If there are any modifications, please click "Calculate unlikely poses" again to update the results. |
Configure symmetry manually |
Calculate potentially mismatched poses based on the manually set parameters such as the Order of symmetry and Angle range. In subsequent matches, poses that successfully match these poses will be considered unqualified and filtered out. |
Select the symmetry axis by referring to Rotational Symmetry of Target Objects, and then set the Order of symmetry and Angle range. |
|
After the symmetry is set manually, the symmetry setting of the target object takes effect in the Coarse Matching, Fine Matching, and Extra Fine Matching (if enabled) processes in the 3D Matching Step. |
|
When this feature is enabled, you should configure the relevant parameters in the subsequent matching Steps to activate the feature. See the following for details.
|
Set Weight Template
During target object recognition, setting a weight template highlights key features of the target object, improving the accuracy of matching results. The weight template is typically used to distinguish target object orientation. The procedures to set a weight template are as follows.
|
A weight template can only be set when the Point cloud display settings is set to Display surface point cloud only. |
-
Click Edit template.
-
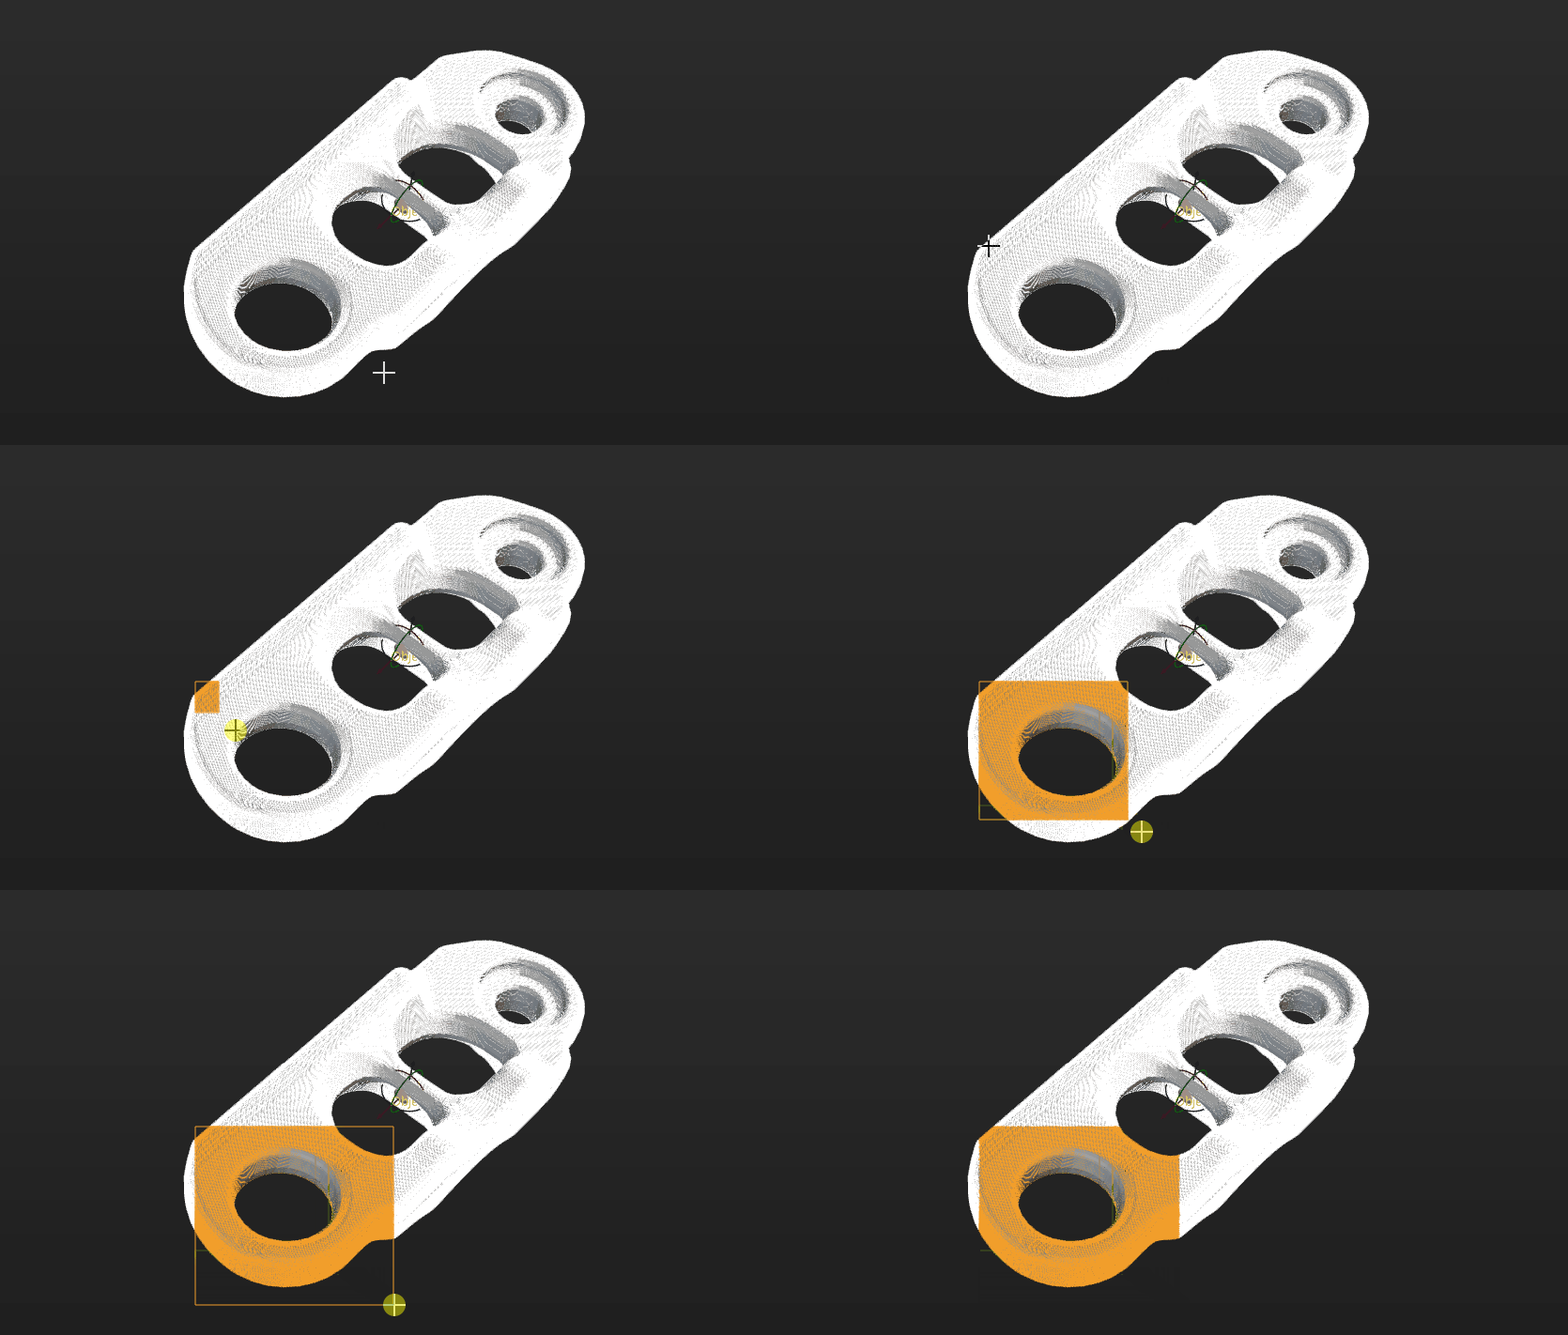
In the visualization area, hold and press the right mouse button to select a part of the features on the target object. The selected part, i.e., the weight template, will be assigned more weight in the matching process.
By holding Shift and the right mouse button together, you can set multiple weighted areas in a single point cloud model.
-
Click Apply to complete setting the weight template.
|
For the configured weight template to take effect in the subsequent matching, go to the “Model Settings” parameter of the “3D Matching” Step, and select the model with properly set weight template. Then, go to “Pose Filtering” and enable Consider Weight in Result Verification. The “Consider Weight in Result Verification” parameter will appear after the “Parameter Tuning Level” is set to Expert. |
Now the editing of the point cloud model is completed. You can click Next to set the trajectory for the point cloud model.
Set Trajectory
Create Trajectory
The tool provides three methods to create trajectories: Create trajectory manually, Create edge trajectory, and Create surface trajectory.
In this workflow, Manual create is recommended to create trajectories on the point cloud model.
Create Trajectory Manually
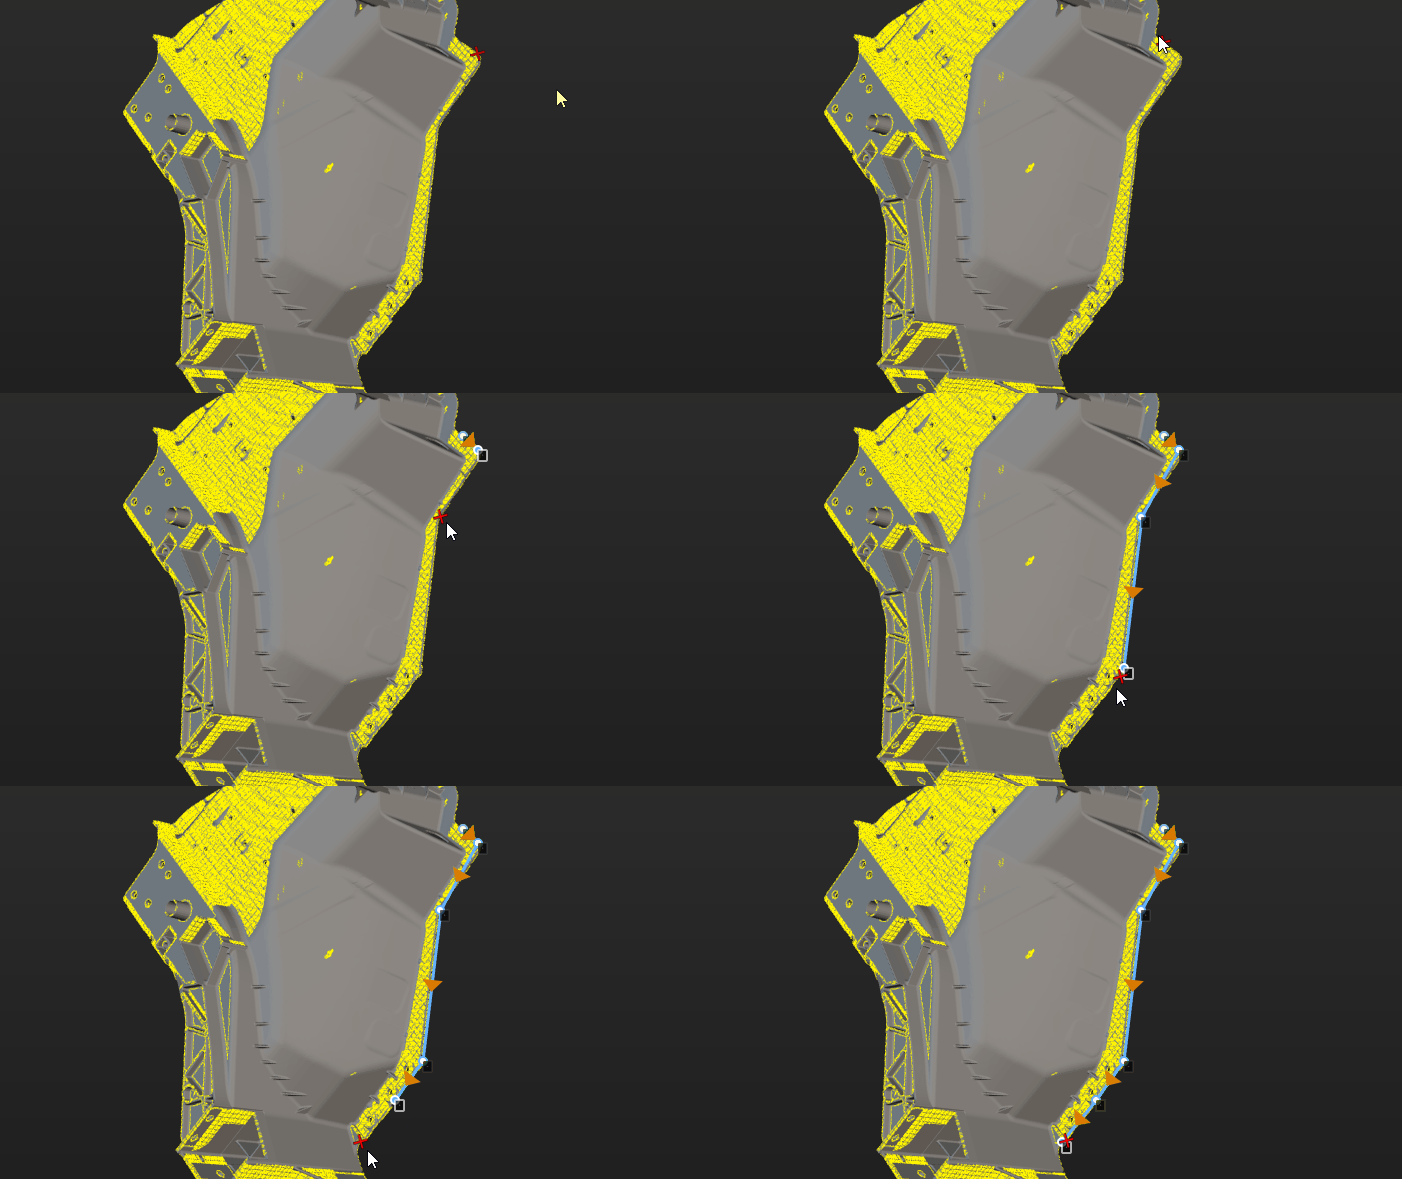
After clicking Manual create in the "Set trajectory" workflow, you can enter its page. The detailed operation steps are as follows.
-
Pick trajectory points.
Hold Shift and right-click on the object to pick trajectory points. The tool automatically connects trajectory points into a trajectory.
-
Adjust trajectory points.
The list on the right side of the visualization area shows created trajectory points. If trajectory points do not meet requirements, adjust them as follows.
Operation Description Adjust trajectory point position and orientation
Select the trajectory point, then adjust corresponding values in "Trajectory point settings" to adjust its position and orientation.
Adjust trajectory point order
Drag in the list to adjust trajectory point order.
Add trajectory point
ClickAdd button, and the tool adds a new trajectory point after the last trajectory point.
Align trajectory points
Select at least three trajectory points in the list, then click Auto-align. The Z-axis of selected points becomes perpendicular to the fitted plane of these points, and the X-axis points to the next trajectory point.
Interpolate trajectory points
If picked trajectory points are unevenly distributed, interpolate trajectory points to make the distribution more uniform.
Select two trajectory points, set the "Max distance" parameter, and click Interpolate points. When the distance between the two points exceeds this value, the tool automatically inserts trajectory points between them, replacing other trajectory points between the selected points. -
Save trajectory.
After creating trajectories, click Save and apply to save trajectories.
Create Edge Trajectory
After clicking Edge trajectory in the "Set trajectory" workflow, you can enter the "Automatic create" page. The detailed operation steps are as follows.
-
Set the ROI.
Click in sequence, and set the target area in the visualization area by selecting points where the trajectory is to be generated.
-
Generate trajectories automatically.
Click Generate trajectory, and the tool automatically generates trajectories.
-
Adjust trajectory points.
The trajectory line list shows generated trajectories. If needed, you can simplify and smooth trajectories by adjusting the following parameters.
-
Trajectory simplification
You can simplify trajectories by adjusting the following parameters. By reducing the number of trajectory points, the trajectory shape is simplified while preserving the overall shape as much as possible. This is suitable for scenarios that require reduced trajectory complexity, such as reducing subsequent processing time and improving robot motion efficiency.
Parameter Description Max deviation
Maximum allowed deviation (H) when simplifying trajectories. The larger the value, the more points are reduced, but the trajectory shape may be distorted.
Min distance to retain
If the distance (Dis) between two trajectory points in the original trajectory is greater than this value, both points will be retained.
-
Trajectory smoothing
You can smooth trajectories by adjusting the following parameters. Smoothing trajectory points reduces noise effects in the trajectory and generates a smoother trajectory. This is suitable for scenarios where trajectory points contain noise, improving trajectory smoothness and continuity.
Parameter Description Gaussian sigma
Controls smoothing intensity. The larger the value, the smoother the trajectory, but details may be lost.
Smoothing radius
The window size used for smoothing, determining the range of trajectory points participating in smoothing computation.
Distance threshold
Used to determine whether surrounding points of the point to be smoothed participate in smoothing computation. If the distance between the point to be smoothed and surrounding points exceeds this value, surrounding points do not participate in smoothing computation. It is recommended to use the default value.
-
-
Save trajectory.
After creating trajectories, click Save and apply to save trajectories.
Create Surface Trajectory
Click Surface trajectory in the "Set trajectory" workflow to enter the surface trajectory configuration page. The detailed operation steps are as follows.
-
Acquire the point cloud.
Select the project and click Acquire point cloud to acquire the point cloud of the target object for trajectory generation. Ensure that the point cloud covers the area where trajectories are to be generated.
-
Preprocess the point cloud.
Set the noise suppression level as needed. Adjust this parameter if there are many noise points or burr-like artifacts along the edges of the target object point cloud. A stronger suppression level filters out more noise.
-
Set the point cloud ROI.
-
Click Add, then hold the right mouse button and draw a region of interest in the visualization area to limit the area for subsequent trajectory generation.
-
Set the Trajectory direction start point and Trajectory direction end point, then click Done.
-
-
Set trajectory generation parameters.
Parameter Description Max distance between adjacent points during clustering
Sets the maximum allowed distance between adjacent points during clustering. Increasing this value makes it easier to group points farther apart into the same cluster; decreasing it makes it easier to separate nearby points into different clusters. To prevent lag during clustering, the system limits the maximum distance actually used based on an estimated value. Increasing the setting beyond this limit has no further effect.
Trajectory connection method
Sets how trajectories are connected between adjacent trajectory rows. This parameter determines the generation direction of each trajectory row and how the robot enters the next trajectory row after completing one row.
-
Z shape: Each trajectory row is generated in the same direction. After one trajectory row is generated, the next trajectory row starts from the end closer to the starting point of the previous trajectory row, forming an overall Z-shaped trajectory. This method is suitable for scenarios where a consistent processing direction is required for each row.
-
S shape: Adjacent trajectory rows are generated in opposite directions. After one trajectory row is generated, the next trajectory row starts from the end closer to the endpoint of the previous trajectory row, forming a continuous back-and-forth S-shaped trajectory. This method is suitable for scenarios where reduced idle movement between rows and improved trajectory continuity are desired.
Direction of each trajectory row
Sets how the direction of each trajectory row is calculated. When "Custom" is selected, manually set the start and end points of trajectory direction in the "ROI list". When "Auto" is selected, the system automatically calculates the trajectory direction based on the ROI.
Point spacing
Sets the distance between adjacent trajectory points on the same trajectory line. Smaller point spacing produces denser trajectory points and a more detailed trajectory.
Row spacing
Sets the distance between adjacent trajectory rows. Smaller row spacing produces denser trajectories and more trajectory points.
First row offset distance
Sets the inward offset distance of the first trajectory row from the ROI edge. The larger the value, the farther the first row is from the ROI edge. Offsetting the trajectory outside the ROI edge is not supported.
End extension distance
Sets the extension distance at the start and end of each trajectory row. A negative value retracts both ends of the trajectory row.
Gap handling strategy
Sets how detected gaps are handled.
-
Lift at all gaps: Lifts the trajectory at all detected gaps by the specified Gap lift height.
-
Lift at large gaps only: Lifts the trajectory by the specified Gap lift height only when a gap exceeds the Gap width threshold. Gaps that do not exceed the threshold are not lifted.
-
Ignore all gaps: Does not lift the trajectory at any gap.
-
-
Generate and adjust the trajectory.
Click Generate trajectory to generate the trajectory. After generation, adjust the trajectory parameters in the Parameter settings area.
Parameter Description Lift height between rows
Sets the lift height of the robot end tool when moving from one trajectory row to the next. This parameter is used to reduce the risk of collision between the end tool and the target object surface during cross-row movement.
Gap lift height
Sets the lift height of the trajectory at large gaps. When traversing a gap that requires processing, the trajectory is lifted by the specified height.
Trajectory points X-axis direction
Sets the X-axis direction of trajectory points.
-
Along trajectory direction: The X-axis points in the direction of trajectory travel.
-
Custom: Hold Ctrl and left-drag the trajectory point X-axis direction manipulator in the visualization area to adjust its direction. Then click Apply reference direction to apply the direction to all trajectory points.
-
-
Save the trajectory.
After confirming the trajectory, click Save and apply to save the generated trajectory to the trajectory list.
Adjust Trajectory
After trajectories are created, you can adjust trajectories.
-
Adjust trajectory line
After creating trajectories, if you need to offset a trajectory line by a certain distance along the Z-axis to better meet actual trajectory operation requirements, select a trajectory line in the trajectory list and set the Z-axis offset distance parameter.
-
Adjust trajectory point individually
After selecting a trajectory point in the trajectory list, adjust corresponding values in the parameter settings area to adjust its position and orientation.
|
For other operations on trajectory adjustment, refer to Adjust Trajectory. |
Preview Trajectory Effect
After trajectories are created, you can preview the positional relationship between the end tool and trajectories by following these steps.
-
Ensure the Mech-Viz project is within the current solution.
To ensure that the end tool information in Mech-Viz can be updated in the target object editor, refer to Export Project to Solution to move the project to the current solution.
-
Add an end tool.
Add an end tool and set the TCP in Mech-Viz.
-
Preview and enable the tool.
Once the end tool is added, the tool information will be automatically updated in the tool list within the target object editor. You can select a tool in the tool list according to actual needs, preview the positional relationship between trajectories and tools in actual trajectory operations in the visualization area (as shown below), or enable the end tool for actual trajectory operations.
If you have modified the tool configurations in Mech-Viz, save the changes in Mech-Viz to update the tool list in the target object editor. In addition, enabling the corresponding tool for the trajectory in the target object editor is a prerequisite for successful simulation in Mech-Viz. 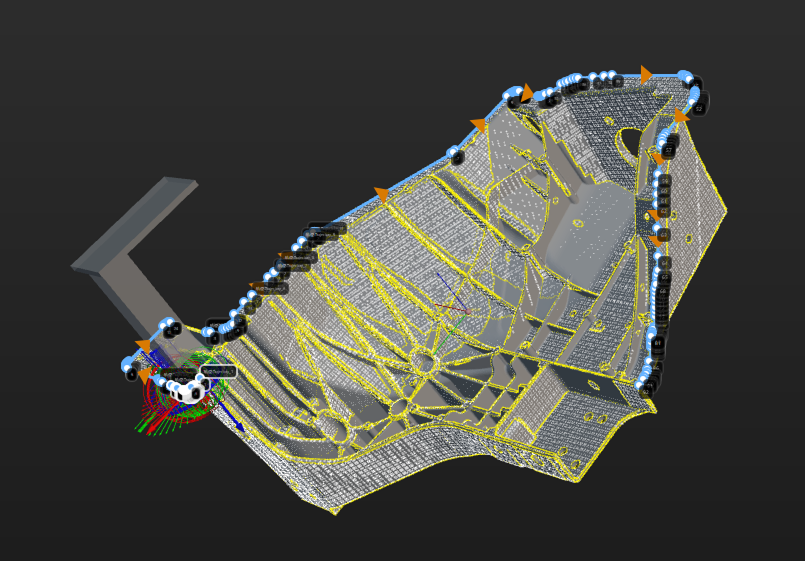
Set Collision Model (Optional)
The collision model is a 3D virtual object used in collision detection for path planning. You can configure the following settings on the collision model according to the actual situation.
Set Collision Model
The current workflow supports two collision model generating modes. You can select the appropriate mode based on actual requirements. After selection, the tool automatically generates point cloud cubes for collision detection.
| Generating mode | Description | Operation |
|---|---|---|
Use STL model to generate point cloud cube |
Low model accuracy, fast collision detection. |
|
Use point cloud model to generate point cloud cube |
High model accuracy, slow collision detection. |
After selecting this mode, the tool automatically generates a collision model from the current target object’s point cloud model. You can use the "Display collision model" feature to preview the generated collision model. |
|
For more precise control over the side length of the point cloud cubes, contact Mech-Mind Technical Support. The cube side length affects the level of detail of the collision model, generation time, and collision detection speed. Do not adjust it without first understanding the potential risks. |
Configure Symmetry of Held Target Object
Rotational symmetry is the property of the target object that allows it to coincide with itself after rotating a certain angle around its axis of symmetry. When the “Waypoint type” is “Target object pose”, configuring the rotational symmetry can prevent the robot’s tool from unnecessary rotations while handling the target object. This increases the success rate of path planning and reduces the time required for path planning, allowing the robot to move more smoothly and swiftly.
Select the symmetry axis by referring to Rotational Symmetry of Target Objects, and then set the Order of symmetry and Angle range.
Now, the collision model settings are completed. Click Save to save the target object to Solution folder\resource\workobject_library. Then the target object can be used in subsequent 3D matching Steps.