Information Reading (1D/2D Barcode Recognition)
This section introduces the target object recognition configuration workflow for the 1D/2D barcode recognition scenario. This method is used to read 1D or 2D barcode information on target objects to obtain identification data such as material codes and serial numbers.
Click Config wizard, select the Information Reading scenario, and select the 1D/2D barcode recognition method to enter this configuration workflow.
Usage Workflow
The overall recognition workflow includes four steps:

-
Image preprocessing: Perform color conversion, enhancement, denoising, morphological transformations, and other preprocessing on the input image to improve image quality, highlight target object features, and reduce background interference, providing a reliable data foundation for subsequent 1D/2D barcode recognition.
-
Pose correction: Set the recognition region and align the recognition target with the template through alignment operations. Select an appropriate correction method based on recognition target features, flexibly configure parameters, eliminate position and angle deviations, and improve recognition accuracy and result reliability.
-
Information reading: Set the target and mask regions in the aligned image. Configure parameters such as 1D/2D code recognition, quantity determination, and timeout determination, then run the Step to view the recognition results.
-
General settings: Configure output ports to output recognition results and key information, meeting production line automated detection and data traceability requirements.
Image Preprocessing
Before recognizing target objects, you can choose to enable Convert color space or Image preprocessing based on the input image quality, and adjust the corresponding parameters to make image features clearer, thereby improving recognition accuracy and efficiency.
Convert Color Space
Converting the image color space can transform the input image from one color space to another, for example, from BGR to grayscale, BGR to HSV, etc. Through color space conversion, image features can be better highlighted to facilitate subsequent image processing.
For detailed parameter description and tuning examples, please read Convert Color Space.
Image Preprocessing
In image preprocessing, you can perform enhancement, denoising, morphological transformations, grayscale inversion, edge extraction, and other preprocessing operations on the input image.
For detailed parameter description and tuning examples, please read Image Preprocessing.
Pose Correction
After completing image preprocessing, configure the pose correction settings. By setting the recognition region and correction parameters, the pose of the recognition target in the current image is corrected to align with the template, ensuring the accuracy and reliability of subsequent recognition.
Add Correction Settings
After entering the pose correction workflow, you need to create a new correction parameter group. The system supports creating multiple parameter groups, each of which can independently set recognition regions and parameters without affecting each other.
Click the Add button to enter the new parameter group window. When creating a parameter group, select an appropriate correction method based on image features and configure the corresponding parameters.
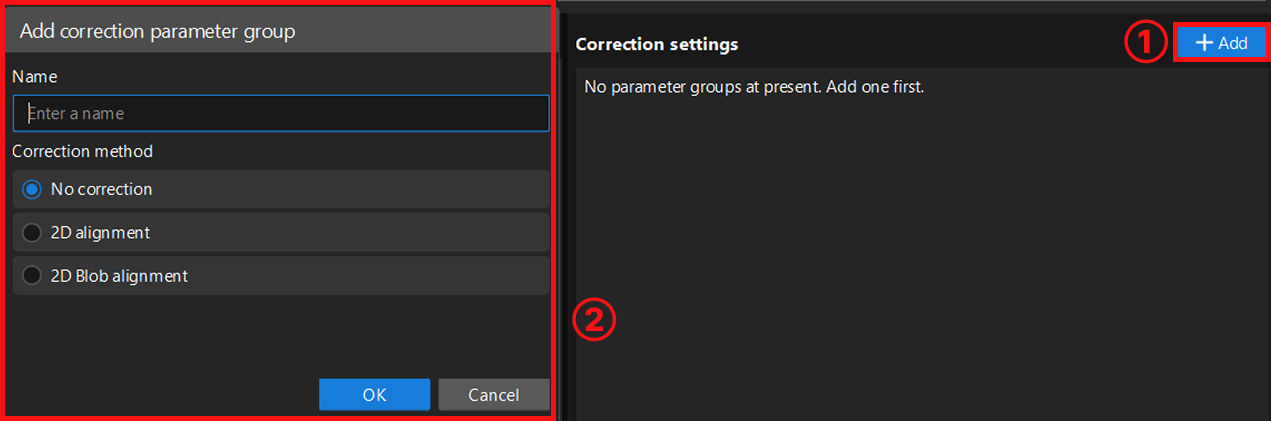
Currently, the following three correction methods are supported:
-
No correction: Uses the original input image directly for recognition without any pose correction processing. Suitable for scenarios where the recognition target position is relatively fixed in the image and the correction accuracy requirement is not high.
-
2D alignment: Aligns the recognition target’s pose with the template through translation and rotation operations. This method can extract the edge contour of the recognition target and uses an edge matching algorithm for precise alignment. Suitable for scenarios where the recognition target position is not fixed but has distinct fixed contours. For detailed configuration, read 2D Alignment.
-
2D Blob alignment: Used to detect bright and dark regions (i.e., Blobs) in the image. Filters target Blobs based on geometric features of the Blob (such as area, centroid, etc.) and calculates its minimum bounding rotated rectangle. Then adjusts the image pose so that the target Blob’s centroid aligns with the image center point, and the principal axis of its minimum bounding rotated rectangle aligns with the image coordinate axes. For detailed configuration, read 2D Blob Alignment.
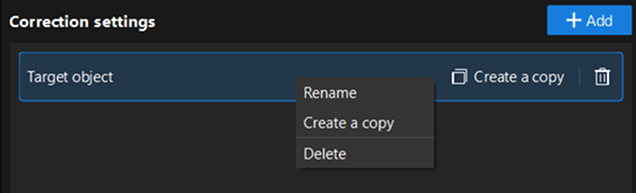
After creating the parameter group, right-click the parameter group name, or directly click the function buttons on its right side to perform operations such as rename, delete, or create a copy.
2D Alignment
2D alignment is a correction method that aligns the recognition target in the input image with the template through translation and rotation operations. It can eliminate recognition errors caused by inconsistent recognition target positions, improving recognition stability. After selecting this method, you need to complete recognition region settings, template settings, and recognition parameter tuning in sequence.
Set Target Region
Used to set the effective range for alignment. When selecting, the recognition target must be fully covered with appropriate margins on all sides to ensure the stability of alignment operations and the accuracy of subsequent recognition. You can select Set all as target region or Customize target region based on actual requirements. After selecting customize, click the "Select" button to manually select the recognition region.
-
Set all as target region: Recognizes the entire image, typically suitable for scenarios where recognition targets are widely distributed.
-
Customize target region: Recognizes only the selected area, typically suitable for scenarios where you only need to focus on a specific part of the image, or want to exclude irrelevant areas (such as background, fixtures, and other interferences), helping to improve recognition efficiency and accuracy.
Recognize Target Object
Set Target Object Template
After setting the recognition region, select or edit the template for subsequent positioning and matching of the recognition target. Click the Edit button to enter the 2D Matching Template Editor.
Select representative and stable edge features from the image to generate the template, so that the system can subsequently search the image automatically and accurately locate target objects that match the template features, while ensuring the uniqueness and stability of matching results. For detailed instructions, please refer to 2D Matching Template Editor.
| After each template editing, click Update to apply the latest configuration. |
Adjust Recognition Parameters
After selecting the template, click Run Step to view the template matching results and recognition performance.
If the recognition performance is not satisfactory, you can adjust other parameters based on the features and requirements of the recognition target for optimization.
For detailed parameter description, please refer to 2D Alignment.
Then, click Next to proceed to the error-proofing check workflow.
2D Blob Alignment
2D Blob alignment is a Blob-based correction method. This method detects all Blobs in the image and filters out the Blob with the most prominent geometric features. It then adjusts the image pose so that the target Blob’s centroid aligns with the image center point, and the principal axis of its minimum bounding rotated rectangle aligns with the image coordinate axes. After selecting 2D Blob alignment, you need to complete recognition region settings and recognition parameter tuning in sequence.
Set Target Region
Used to set the effective range for alignment. When selecting, the recognition target must be fully covered with appropriate margins on all sides to ensure the stability of alignment operations and the accuracy of subsequent recognition. You can customize the settings based on actual requirements.
The system supports rectangle and circle selection modes, and allows mixed addition of multiple regions. That is, on the same image, multiple rectangle or circle recognition regions can exist simultaneously to meet recognition requirements in complex scenarios.
Recognize Target Object
After setting the recognition region, you can adjust other parameters based on the features and requirements of the recognition target for optimization.
For detailed parameter description and tuning suggestions, please refer to 2D Blob Alignment.
You can also learn more about the usage of each parameter through tuning examples.
Information Reading
After aligning the image, recognize 1D or 2D codes in the specified image region. This process reuses the recognition parameters from the AI 1D/2D Code Recognition Step.
The correction settings selected in the previous step are displayed here. To switch to a different correction parameter group, return to the previous step.
Set Target Region
Under Set Target Region, click the rectangle or circle drawing button, then drag in the data visualization area to draw the target region. The target region should cover the 1D or 2D code to be recognized.
To exclude irrelevant background or interference within the target region, click the polygon drawing button under Set Mask Region, then draw the mask region in the data visualization area. To remove the mask region, click Clear.
1D Code Settings
| Parameter | Description |
|---|---|
Barcode Types |
Select the types of 1D barcodes to recognize. Only the selected types of 1D barcodes will be recognized, which helps reduce misrecognition and improve recognition efficiency. Value List: Select All, Code 128, Code 39, Code 93, EAN, UPC |
Barcode Polarity |
Sets the polarity of the barcode image to be recognized. Select the polarity based on the color relationship between the barcode and its background to reduce misrecognition and improve recognition stability. Value List:
|
Enable Deformation Correction |
When enabled, the Step corrects barcode deformation during recognition to improve the recognition success rate of 1D/2D barcodes. The correction is used for recognition only and does not modify the original image. Enabling this option increases Step processing time. |
2D Code Settings
| Parameter | Description |
|---|---|
Code |
Select the types of 2D barcodes to recognize. Only the selected types of 2D barcodes will be recognized, which helps reduce misrecognition and improve recognition efficiency. Value List: Select All, DM Code, QR Code |
Barcode Polarity |
Sets the polarity of the barcode image to be recognized. Select the polarity based on the color relationship between the barcode and its background to reduce misrecognition and improve recognition stability. Value List:
|
Enable Deformation Correction |
When enabled, the Step corrects barcode deformation during recognition to improve the recognition success rate of 1D/2D barcodes. The correction is used for recognition only and does not modify the original image. Enabling this option increases Step processing time. |
DM Code Size |
Sets the size of the DM Codes to be recognized. When a specific size is selected, the Step recognizes only codes of that size, improving recognition speed and reducing misrecognition. If you are unsure of the actual code size, select Auto, and the Step will determine the DM Code size automatically. Value List: Auto, 10*10, 12*12, 14*14, 16*16, 18*18, 20*20, 22*22, 24*24, 26*26, 32*32, 36*36 |
QR Code Size |
Sets the size of the QR Codes to be recognized. When a specific size is selected, the Step recognizes only codes of that size, improving recognition speed and reducing misrecognition. If you are unsure of the actual code size, select Auto, and the Step will determine the QR Code size automatically. Value List: Auto, 21*21, 25*25, 29*29, 33*33, 37*37, 41*41 |
General Settings
| Parameter | Description | ||
|---|---|---|---|
Sorting Method |
Sets how multiple 1D/2D barcode recognition results are sorted. The Step sorts the results based on barcode center coordinates. The output ports for barcode content, barcode type, barcode center poses, barcode contours, and single barcode judgment results follow this sorting method. Value List:
|
||
Verification Method |
Sets how barcode recognition results are verified to determine whether they comply with the corresponding standards or rules. Verification results are output through the Single Barcode Judgment Results and All Barcodes Judgment Result ports. |
||
Enable Count Judgment |
When enabled, the Step checks whether the actual number of recognized 1D/2D barcodes equals the expected count and uses this result as one of the judgment conditions for All Barcodes Judgment Result. |
||
Expected Count |
Sets the expected number of 1D/2D barcodes to be recognized. Adjustment: Set this parameter when Enable Count Judgment is selected. |
||
Enable Timeout Judgment |
When enabled, you can set a recognition timeout. If the Step runtime exceeds the specified time before recognition is completed, the All Barcodes Judgment Result port outputs false. If barcodes are recognized within the specified time, the other ports output the recognition results. If no barcodes are recognized within that time, the other ports produce no output. |
||
Timeout |
Sets the maximum duration for a single recognition, in milliseconds (ms). Adjustment: Set this parameter when Enable Timeout Judgment is selected.
|
Visualization Settings
| Parameter | Description |
|---|---|
Font Scaling Ratio |
Sets the text font scaling ratio for the visualization image. |
View Running Results
After completing the above settings, click Run Step or Run Project to view the recognition results in the data visualization area. In the Result Details, you can view the Number of Recognition Results and the Running Cycle.
After confirming the recognition results, click Next to proceed to the general settings workflow.
General Settings
In this workflow, you can configure auxiliary functions beyond visual recognition. Currently, output port configuration is supported.
Configure Output Port
Here, you can select the output ports based on actual requirements. By default, the 1D/2D barcode content is output.
-
1D/2D barcode location: Outputs the location of the 1D/2D barcode in the image.
-
1D/2D barcode verification result: Indicates whether 1D/2D barcode verification is passed. Outputs true if verification passes, false otherwise. This port is only displayed when Judgment logic is enabled.
After checking the port, the 2D Target Object Recognition Step will add the corresponding output port in real time.