Custom Reference Frame
The custom reference frame can display the depth map and point cloud in Mech-Eye Viewer. The point cloud in the custom reference frame can be saved through the Save Data function.
Suitable Scenarios
Suitable applications of the custom reference frame include:
-
camera is not mounted directly above the target object. However, you need to adjust the Z-axis of the reference frame for the depth map and point cloud so that the Z-axis is perpendicular to the surface of the target object or the plane where the target object locates.
-
You need to output the point cloud in the custom reference frame to reduce the amount of data to be processed.
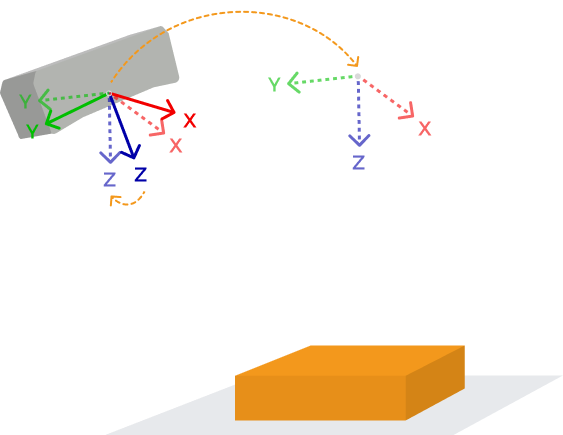
Adjust the Custom Reference Frame
Click Tools in the menu bar and select Custom Reference Frame to open the Custom Reference Frame tool.
| Before opening the Custom Reference Frame tool, you need to trigger one round of data acquisition to acquire the point cloud. |
When the tool is opened for the first time, the custom reference frame is displayed at the initial position, where it completely overlaps with the camera reference frame. With this tool, you can adjust the position and direction of the custom reference frame and apply the settings.
The custom reference frame can be adjusted through the following two methods:
-
Drag the custom reference frame to directly adjust its position and direction. After the settings are applied, you can display or save data in the custom reference frame.
-
Create a guide reference frame and adjust the custom reference frame based on it. See the following section for detailed instructions.
Adjust the Custom Reference Frame Based on the Guide Reference Frame
You can translate or rotate the custom reference frame based on the guide reference frame using the options for Align reference frames.
Generally, the guide reference frame is created based on the surface of the target object. You can then drag it to modify its position and direction.
Follow these steps to create a guide reference frame, and adjust the custom reference frame based on it:
-
Click Create guide reference frame in the right panel.
-
Adjust the position of the point cloud and find the surface to be used as the XY-plane of the custom reference frame.
-
Hold the Shift key and click on the point cloud to select three points. The three points serve the following functions:
-
The first point is the origin of the reference frame.
-
The second point determines the positive direction of the X-axis.
-
The third point determines the positive direction of the Y-axis.
After the three points are selected, a guide reference frame is generated according to the right-hand rule.
-
-
Rotate and zoom the point cloud to check if the reference frame meets your needs:
-
Check if the three points are located on the same surface.
-
Check if the orientation of the Z-axis is correct.
If not, you can drag the guide reference frame to adjust its position and direction, or repeat step 3 to create a new guide reference frame.
-
-
After creating the guide reference frame, click Complete in the right panel.
-
If you need to adjust the guide reference frame after creating it, click Edit guide reference frame in the right panel.
-
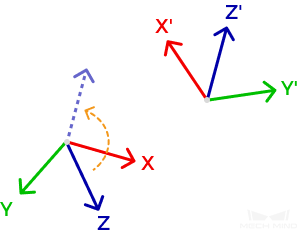
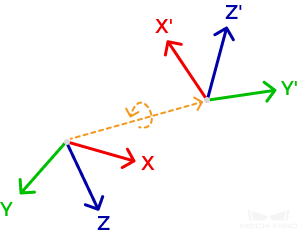
The reference frame marked with XYZ is the reference frame, and that marked with X’Y’Z' is the guide reference frame.
-
-
Select the needed option in the drop-down menu of Align reference frames in the right panel. Then, click Confirm.
For detailed explanations of the options for Align reference frames, refer to the section Options for Align Reference Frames. -
After adjusting the custom reference frame, click Apply at the bottom right. After the settings are applied, you can display or save data in the custom reference frame.
-
Clicking Reset will reset the custom reference frame to the initial position, where it completely overlaps with the camera reference frame.
-
After the settings of the custom reference frame are applied, the guide reference frame will not be saved.
-
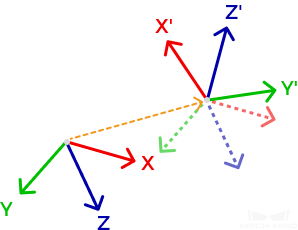
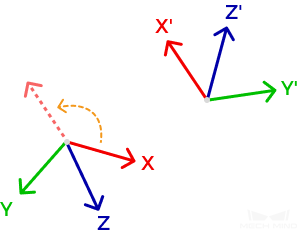
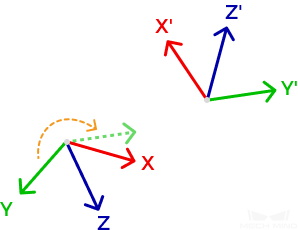
Options for Align Reference Frames
The table below explains the options for Align reference frames and their suitable applications:
| Option | Description | Suitable Scenarios |
|---|---|---|
Overlap origins |
Translates the custom reference frame so that its origin overlaps with the origin of the guide reference frame (no rotation).
|
camera is not mounted directly above the target object, but the output depth map and point cloud should be as if camera were directly above the target object. |
Parallel X-axes |
Rotates the custom reference frame so that its X-axis has the same positive direction as the X-axis of the guide reference frame (no translation).
|
camera is not mounted directly above the target object and is tilted at an angle. However, the output data has specific angle requirements for one of the axes. For example, the Z-axis needs to be perpendicular to the surface of the target object. |
Parallel Y-axes |
Rotates the custom reference frame so that its Y-axis has the same positive direction as the Y-axis of the guide reference frame (no translation).
|
|
Parallel Z-axes |
Rotates the custom reference frame so that its Z-axis has the same positive direction as the Z-axis of the guide reference frame (no translation).
|
|
Overlap reference frames |
Translates and rotates the custom reference frame so that it overlaps with the guide reference frame.
|
In the output depth map and point cloud, the origin of the reference frame should be on the surface of the target object, and the Z-axis should be perpendicular to the surface. |
Drag and Adjust the Reference Frame
You can adjust the position and direction of the custom reference frame and guide reference frame by dragging.
-
Hold the Ctrl key and select an axis of the reference frame to translate the reference frame along the axis.
-
Hold the Ctrl key and select a circle manipulator on the reference frame to rotate the reference frame around the manipulator.
| The selected axis or manipulator turns yellow. |
| You can use the icons at the upper right of the data display area to adjust the display of the point cloud and reference frame. |
Adjust Point Cloud and Reference Frame Display
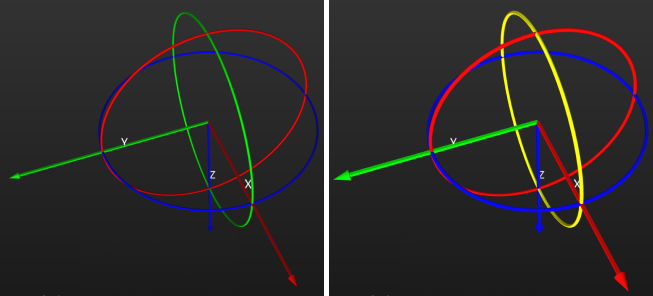
Use the icons at the upper right of the data display area to conveniently adjust the display of the point cloud and reference frame:
| Icon | Feature |
|---|---|
|
Hold and drag the icon to rotate the view. Click one of the circles to rotate the view so that the coordinate axis on the custom reference frame represented by the circle points forward.
|
|
Hold and drag the icon to pan the view. |
|
Hold and drag the icon to zoom the point cloud. |
|
Click the icon to adjust the point cloud and reference frame to fit the window size. |
|
Click the icon to switch between the perspective and orthographic view for the point cloud. |
|
After clicking the icon, the window prompts the key or mouse button that you press. Click the icon again to stop the prompts. |
|
Click the icon to display the reference frame grid. Click the icon again to hide the grid. |
Use the Custom Reference Frame
The custom reference frame can display the depth map and point cloud in Mech-Eye Viewer. The point cloud in the custom reference frame can be saved through the Save Data function.
-
To display the depth map and point cloud in the custom reference frame, follow these steps:
-
In the data display area, switch to Depth Map or Point Cloud.
-
At the top of the left panel, click the Reference Frame drop-down menu and select Custom. The depth map and point cloud will be displayed in the custom reference frame.
The reference frame setting is simultaneously applied to both depth map and point cloud. -
-
To save the point cloud in the custom reference frame, select Point cloud in the Save Data window, and select Custom in the drop-down menu of Reference frame.