Set Camera IP Address and Connect to Camera
To ensure that Mech-Eye Viewer can connect to the camera successfully, it is recommended to set the IP addresses first. Please make sure that the following IP addresses are in the same subnet and are unique.
After setting the IP addresses, you can connect to the camera. Once the camera is connected, you can set a name for the camera for easy recognition of different cameras.
|
If the camera to be connected is not displayed in Mech-Eye Viewer, please refer to Camera Not Found in Mech-Eye SDK. |
Set Camera IP Address
You can set a static IP address for the camera, or set it to dynamic IP address, which is automatically assigned.
Set Static IP address
| Record the set camera IP address for future reference. |
Follow these steps to set a static camera IP address with Mech-Eye Viewer:
-
Open Mech-Eye Viewer, select the info card of the camera to be connected, and click
 in the upper right of the card to open the Config Camera Network window.
 -
Select Set as Static IP.
-
Based on the IP address and subnet mask displayed in Computer IP Configuration, select IP Address Class, and enter the camera IP address and subnet mask. Then, click Apply to apply the changes.
|
Set Dynamic IP address
Follow these steps to set a dynamic camera IP address with Mech-Eye Viewer:
-
Open Mech-Eye Viewer, select the info card of the camera to be connected, and click
in the upper right of the card to open the Config Camera Network window. -
Select Set via DHCP and click Apply.
| If you want to set the IP address of the computer Ethernet port connected to the camera, please refer to Set IP Address on Computer. |
Check Camera Status
Before connecting to the camera, please check if the camera is in a connectable status.
The camera status can be check in the camera info card, to the right of the IP address, as shown below.
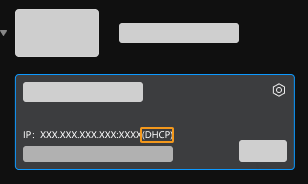
The camera can be in any of the following four statuses:
| Status | Connectable? | Description |
|---|---|---|
Static |
Yes |
camera is using a static IP address |
DHCP |
Yes |
camera is using a dynamic IP address |
Unreachable |
No |
Please refer to Camera Cannot Be Connected in Mech-Eye SDK (Unreachable) and troubleshoot. |
Connected |
No |
Connected by a GenICam client. Please disconnect the camera from the GenICam client first. |
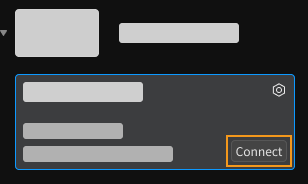
Connect to Camera
After confirming that the camera can be connected, select this camera and click Connect.
|
Customize Camera Name
The camera name can be used to distinguish different cameras, clarifying the usages and locations of the cameras, and more. Please set the name according to your actual needs. The camera name will be displayed in the camera list.
After connecting to the camera, on the left of the data acquisition area, click ![]() or Set camera name to set a camera name.
or Set camera name to set a camera name.
|
Once the camera is connected, you can start acquiring data. The next topic introduces the actions for acquiring data and viewing the obtained data.