Python (Windows)
This topic introduces how to run the Python samples on Windows.
Sample List
Samples are divided into 5 categories, Basic, Advanced, Util, Laser and UHP.
-
Basic: camera connection and basic capturing functions.
-
Advanced: advanced capturing functions.
-
Util: obtain information from a camera and set camera parameters.
-
Laser: for the Laser, DEEP and LSR series cameras only.
-
UHP: for the UHP series cameras only.
The samples in each category and their descriptions are provided below.
Basic
-
ConnectToCamera: Connects to a camera.
-
ConnectAndCaptureImage: Connects to a camera and obtains the 2D image, depth map and point cloud data.
-
CaptureColorMap: Obtains and saves the 2D image from a camera.
-
CaptureDepthMap: Obtains and saves the depth map from a camera.
-
CapturePointCloud: Obtains and save untextured and textured point clouds generated from images captured with a single exposure time.
-
CaptureHDRPointCloud: Obtains and save untextured and textured point clouds generated from images captured with multiple exposure times.
-
CapturePointCloudROI: Obtains and save untextured and textured point clouds of the objects in the ROI from a camera.
-
CapturePointCloudFromTextureMask: Constructs and saves untextured and textured point clouds generated from a depth map and masked 2D image.
Advanced
-
CaptureCloudFromDepth: Constructs and saves point clouds from the depth map and 2D image obtained from a camera.
-
CaptureSequentiallyMultiCamera: Obtains and saves 2D images, depth maps and point clouds sequentially from multiple cameras.
-
CaptureSimultaneouslyMultiCamera: Obtains and saves 2D images, depth maps and point clouds simultaneously from multiple cameras.
-
CaptureTimedAndPeriodically: Obtains and saves 2D images, depth maps and point clouds periodically for the specified duration from a camera.
Util
-
GetCameraIntri: Gets and prints a camera’s intrinsic parameters.
-
PrintDeviceInfo: Gets and prints a camera’s information such as model, serial number, firmware version and temperatures.
-
SetDepthRange: Sets the range of depth values to be retained by a camera.
-
SetParameters: Sets specified parameters to a camera.
-
SetUserSets: Performs functions related to parameter groups, such as obtaining the names of all available parameter groups, selecting a parameter group, and saving the parameter values to the current parameter group. The parameter group feature allows user to save and quickly apply a set of parameter values.
Laser
-
SetLaserFramePartitionCount: Divides the projector FOV into partitions and project structured light in one partition at a time. The output of the entire FOV is composed from images of all partitions.
-
SetLaserFrameRange: Sets the projection range of the structured light. The entire projector FOV is from 0 to 100.
-
SetLaserFringeCodingMode: Sets the coding mode of the structured light pattern.
-
SetLaserPowerLevel: Sets the output power of the laser projector in percentage of max power. This affects the intensity of the laser light.
UHP
-
SetUHPCaptureMode: Sets the capture mode (capture images with 2D camera 1, with 2D camera 2, or with both 2D cameras and compose the outputs).
-
SetUHPFringeCodingMode: Sets the coding mode of the structured light pattern.
Requirements
-
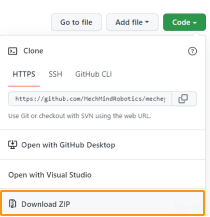
Download samples from GitHub. select .
-
Make sure that the version of Python installed is between 3.6.5 and 3.10.
If Add Python to PATH was not selected during installation, please add the following two directories to the Path environment variable: -
xxx/AppData/LocalProgramsPython/Python36/
-
xxx/AppData/LocalProgramsPython/Python36/Scripts/
-
Instructions
Setting up Python
Press Win + R on the keyboard to open Run box. Type “PowerShell” and then press Ctrl+Shift+Enter to run PowerShell as Administrator.
-
Required: Mech-Eye API.
pip install MechEyeAPIIf an error occurs, please enter the command as below:
pip install MechEyeAPI -i http://pypi.douban.com/simple/ --trusted-host pypi.douban.com -
Optional: Open3D and OpenCV.
| Sample | Open3D | OpenCV |
|---|---|---|
CaptureColorMap |
√ |
|
CaptureDepthMap |
√ |
|
CapturePointCloud |
√ |
|
CaptureHDRPointCloud |
√ |
|
CapturePointCloudROI |
√ |
|
CaptureCloudFromDepth |
√ |
Installation command:
pip install opencv-pythonRun Samples
The example below shows how to run CaptureColorMap.exe:
-
Navigate to the directory where CaptureColorMap.py is located.
cd xxx/mecheye_python_samples/source/Basic -
Run the sample.
python CaptureColorMap.py -
After running the program, you will get the 2D image (named ColorMap) in the Build directory.