Target Object Recognition in Specific Scenarios
This section introduces how to recognize target objects in specific scenarios.
Target Object Recognition in Machine Tending Scenarios
Application Scenario
Only 3D matching is used for target object recognition. Partitions, bins, etc., do not need to be recognized by non-3D matching or other methods.
Operation Guide
-
Use the target object editor to configure the target object.
Based on the type of target object, select a configuration workflow other than “No point cloud model required” on the homepage of the target object editor to make the target object point cloud model.
-
Configure the vision project.
-
Use the 3D Matching or 3D Target Object Recognition Step to recognize target objects.
During parameter adjustment, the output of the Step should be set according to the symmetry of the target object or the number of pick points.
-
If the target object has multiple pick points, the pick points need to be filtered, and the Step should output the valid pick points after filtering.
-
If the target object is symmetrical, the orientation of the object center point should be adjusted and the Step should output the object center point.
-
-
Use the pose adjustment tool to adjust the target object poses.
-
Set the parameters of the Output Step.
Parameter Parameter value Port Type
Predefined (vision result)
Select Scenario
Matching
Method to Convert Data
This parameter value should correspond to the output in step b above.
-
If pick points of the target object are output in step b, the “Method to Convert Data” parameter in the “Output” Step should be set to “Generate picking strategy based on pick points.”
-
If object center points are output in step b, the “Method to Convert Data” parameter in the “Output” Step should be set to “Generate picking strategy based on object center point.”
-
-
-
Run the project and output the target object poses.
Target Object Recognition in Machine Tending Scenarios (with Partitions or Bins)
Application Scenario
The target objects should be recognized by 3D matching, and the partitions or bins should be recognized by the Calc Poses and Dimensions from Planar Point Clouds Step.
Operation Guide
-
Use the target object editor to configure the target object.
-
Select a configuration workflow other than “No point cloud model required” on the homepage of the target object editor to make the target object point cloud model.
-
Select the “No point cloud model required” configuration workflow to configure the target object information needed for partition picking.
-
-
Configure the vision project.
-
Multiple project scenarios:
If the solution contains two projects, used for target object recognition and partition recognition separately, please configure the partition recognition project as follows.
Step Parameter Parameter value Output
Select Scenario
Others
Target Object without Point Cloud Model
Target object name for the partition
-
Single project scenarios:
If a single project is used for both target object recognition and partition recognition, please build the project as shown in the figure below.
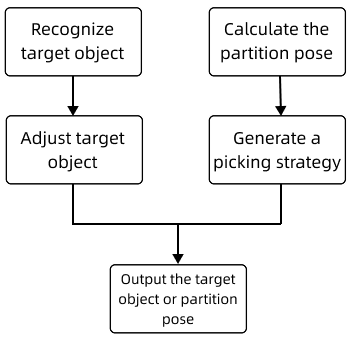
The built project is shown below.
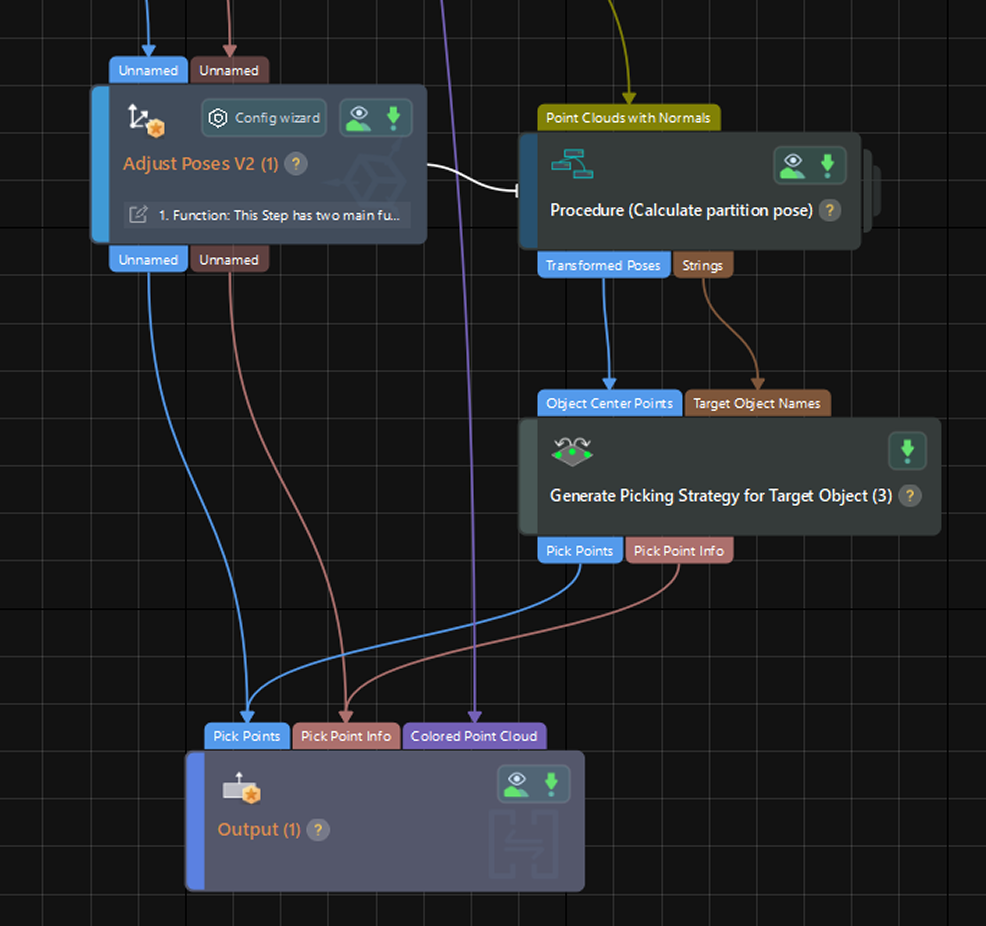
Since the target object name input to the “Generate Picking Strategy for Target Object” Step belongs to a target object saved by using the “No point cloud model required” process in the target object editor, the pick point should be input to this Step directly, and the output pick point will be the same as the input pick point.
After building the project, please configure the project as follows.
Step Parameter Instruction “3D Matching” Step or “3D Target Object Recognition” tool
Confidence Threshold
To avoid false recognition and false negative, an appropriate Confidence Threshold should be set.
It is recommended to set this parameter to the default value and check the running result first. If false recognition occurs, it is recommended to increase this parameter; if a false negative occurs, it is recommended to decrease this parameter.Adjust Poses V2
Trigger Control Flow Given No Output
Selected
Continue Given No Output
Unselect
Output
Port Type
Predefined (vision result)
Select Scenario
Matching
-
-
Run the project and output the target object poses.
Target Object Recognition in Depalletizing Scenarios
Application Scenario
In the depalletizing scenario, the Calc Poses and Dimensions from Planar Point Clouds Step is used to recognize target objects, while 3D matching was not used.
Operation Guide
-
Use the target object editor to configure the target object.
Based on the type of target object, select a configuration workflow other than “No point cloud model required” on the homepage of the target object editor to configure the target object information needed for carton or sack depalletizing.
-
Configure the vision project.
-
Use non-3D matching method to recognize target objects.
-
Set the parameters of the Output Step.
Parameter Parameter value Port Type
Predefined (vision result)
Select Scenario
Depalletizing
Other Inputs
Select this parameter if you need to output other information such as the dimensions of the target object. Once this option is selected, new input ports such as “Target Object Dimensions” will be added to the “Output” Step.
-
-
Run the project and output the target object poses.
Target Object Recognition in “Pick Anything” Scenarios
Application Scenario
In scenarios where versatile objects need to be picked, the Predict Pick Points Step is used to recognize the target object instead of 3D Matching.
Operation Guide
-
Use the target object editor to configure the target object.
Based on the type of target object, select “No point cloud model required” on the homepage of the target object editor to configure the target object information for picking.
-
Configure the vision project.
-
Use the “Predict Pick Points” Step to recognize target objects.
-
Set the parameters of the Output Step.
Parameter Parameter value Port Type
Predefined (vision result)
Select Scenario
Others
Other Inputs
Select this parameter if you need to output the dimensions of the target object. Once this option is selected, new input ports such as “Target Object Dimensions” will be added to the “Output” Step.
-
-
Run the project and output the target object poses.
Recognize Target Objects with External Point Cloud Models
Application Scenario
Suitable for scenarios where point cloud models need to be generated dynamically. In this scenario, there are different types of target objects, and not every point cloud model can be created in the target object editor. Moreover, the target objects are common 3D shapes. For example, a point cloud model can be generated from a Step or an STL model.
Operation Guide
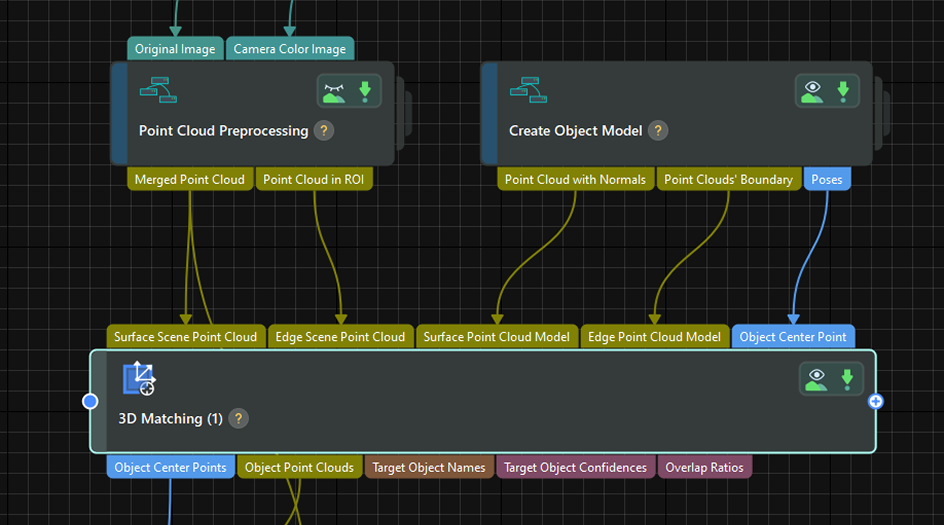
In this scenario, you need to select “External model” as the Input Type in the “3D Matching” Step to read the point cloud model generated by the “Create Object Model” Step, and then use the target object editor to generate other target object information besides the point cloud model. The detailed instructions are as follows.
-
Configure the vision project.
-
Add a 3D matching Step and set parameters.
Parameter Parameter value Parameter Tuning Level
“Advanced” or “Expert”
Input Type
External model
-
Add and connect the Step used to generate the point cloud model.
Add and connect the Step used to generate the point cloud model to the project. For example, to generate a point cloud model of brake discs, you can use the “Create Object Model” Step to dynamically generate a point cloud model based on the dimensions of the brake discs.
-
Input the external point cloud model to the “3D Matching” Step.
-
Input the preprocessed surface point cloud and edge point cloud of the scene to the 1st and 2nd input ports of the “3D Matching” Step respectively.
-
Input the generated surface point cloud model, edge point cloud model, and object center point of the target object to the 3rd, 4th, and 5th input ports of the “3D Matching” Step respectively.
-
-
Set the parameters of the Output Step.
Parameter Parameter value Port Type
Predefined (vision result)
Select Scenario
Others
-
-
Use the target object editor to generate additional target object information.
Based on the type of target object, select “No point cloud model required” on the homepage of the target object editor to configure the target object and obtain target object information other than point cloud models.
-
Run the project and output the target object poses.