Improve and Validate Extrinsic Parameters
This section explains how to improve and validate the accuracy of extrinsic parameters.
Improve the Extrinsic Parameter Accuracy
During hand-eye calibration, you can take the following measures to improve the accuracy of extrinsic parameters (calibration results):
Before calibration:
-
Ensure that the robot base is securely mounted.
-
Ensure high accuracy of camera intrinsic parameters. It is recommended to use the calibration board to check the intrinsic parameters at different heights in different regions.
-
Ensure that the robot absolute accuracy has been checked and meets the project requirements.
-
(Recommended) Warm up the camera for at least 30 minutes before calibration; for high-accuracy applications, warm up the camera for at least 45 minutes. The preheating and warm-up process can be carried out by powering on the camera or capturing pictures continuously.
During calibration:
-
When the “multiple random calibration board poses” method is used for calibration in the ETH setup, ensure that the calibration board is securely mounted.
-
If the robot picks with a very heavy gripper,enable load compensation on the robot side and calibrate extrinsic parameters with the gripper.
-
If the working distance of the camera exceeds 1.5 m, enable Surface Smoothing for the “calib” parameter group used for calibration.
-
Reduce the robot speed and set a longer wait time when collecting calibration data to avoid noticeable robot vibrations.
-
Perform calibration strictly according to the hand-eye calibration procedure.
View the Results of Extrinsic Parameter Calibration
View the Extrinsic Parameter Calibration Report
For calibration scenarios using the “multiple random calibration board poses” method, you can click the View extrinsic parameter calibration button after calculating the extrinsic parameters. The extrinsic parameter calibration report will be automatically displayed after it is generated.
If the calibration results of the Euler angle convention check, camera accuracy check, and robot absolute accuracy check are all “Pass” (or there is no significant error), then the extrinsic parameters are calibrated successfully and can be used.
If any of the checks fails, please follow the recommendations provided in the report and re-calibrate the extrinsic parameters until the check passes.
View Error Point Cloud in Point Cloud Viewer
For calibration using the “TCP touch” method, you can check the error of the point cloud in the point cloud viewer to see if the calibration result is usable.
After calculating the extrinsic parameters, click Point cloud viewer on the right to view the error point cloud. The error point cloud shows the deviation between the calculated value and the actual value of the circles on the calibration board.
In general, the standards for acceptable calibration error in the point cloud are as follows:
-
For common projects, all data points should have errors lower than 3 mm (< 3 mm: 100%).
-
For high-precision projects, all data points should have errors lower than 2 mm (< 2 mm: 100%).
-
For palletizing and depalletizing projects, all data points should have errors lower than 5 mm (< 5 mm: 100%).
The above standards are just for reference. Please follow the specific accuracy requirement of the project.
Validate the Extrinsic Parameter Accuracy
Validate the Extrinsic Parameter Accuracy in the ETH Setup
After calculating the extrinsic parameters, you can use the “Analyze extrinsic parameter error in ETH setup” tool to evaluate whether the calibration results are valid.
The detailed instructions are as follows:
-
In the Calculate extrinsic parameters step, click Extrinsic parameter accuracy in the Supplementary tools area, and then select Analyze extrinsic parameter error in ETH setup in the pop-up Error Analysis window.
-
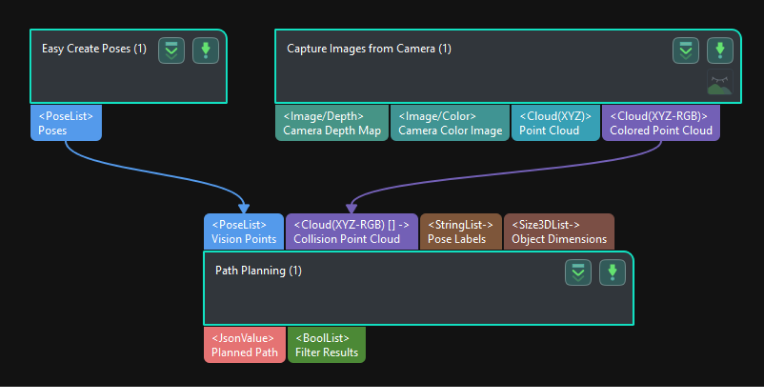
Build a new project for obtaining the calibration board poses. The project to be built is shown below:
-
Synchronize the pose of the real robot and obtain the scene point cloud containing the calibration board point cloud.
-
Select the Path Planning Step in the project, and click the Open the editor button on the Step Parameters panel to open the 3D simulation area.
-
Synchronize the pose of the real robot with that of the simulated robot in the “Path Planning” Step, so that the poses of the simulated robot in the 3D simulation area and the real robot will be the same.
-
Click the Simulate button to visualize the scene point cloud containing the calibration board. (Please ignore the error message after clicking Simulate.)
-
-
Create virtual TCP on the calibration board.
-
Add an end tool to the resources in the path planning tool.
-
Check the visualization of the end tool in the 3D simulation area, and adjust the parameters to make the TCP coincide with a circle center on the calibration board (the pose axis should coincide with the cross in the circle and the XOY plane should be closely aligned with the calibration plane).
-
Enter a name and click OK to finish creating the virtual TCP.
-
-
Check extrinsic parameters at other positions in the workspace.
-
Move the real robot using the teach pendant to other positions in the workspace.
-
Synchronize the pose of the real robot with that of the simulated robot in the “Path Planning” Step, so that the poses of the simulated robot in the 3D simulation area and the real robot will be the same.
-
Click the Simulate button to obtain the new scene point cloud containing the calibration board.
-
Check if the virtual TCP added in the previous step coincides with the circle center on the calibration board.
-
If the simulated TCP generally coincides with the center of the calibration board circle, the calibration result is valid.
Validate the Extrinsic Parameter Accuracy in the EIH Setup
After calculating the extrinsic parameters, you can use the “Analyze extrinsic parameter error in EIH setup” tool to evaluate whether the calibration results are valid.
The detailed instructions are as follows:
-
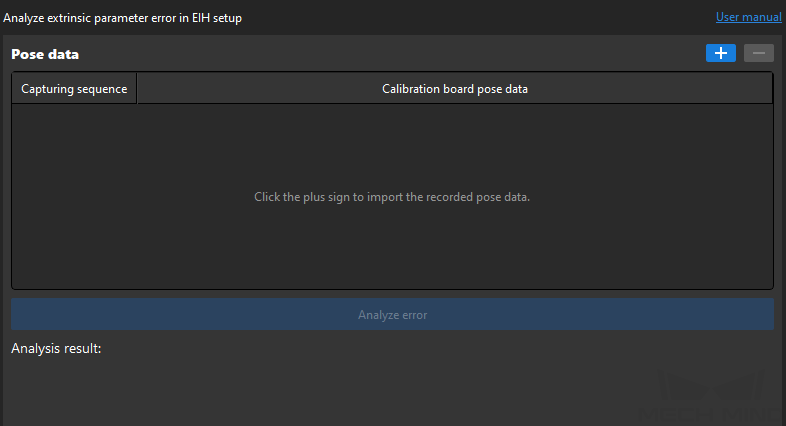
In the Calculate extrinsic parameters step, click Extrinsic parameter accuracy in the Supplementary tools area, and then select Analyze extrinsic parameter error in EIH setup in the pop-up Error Analysis window.
-
Learn the instructions on evaluating the extrinsic parameter error in EIH setup, and then click the Next button.
-
Click + to add multiple sets of calibration board poses.
-
Click the Analyze error button to view the result.
If the error meets the requirements of the picking accuracy, the calibration result is valid.