User Interface
Startup Interface
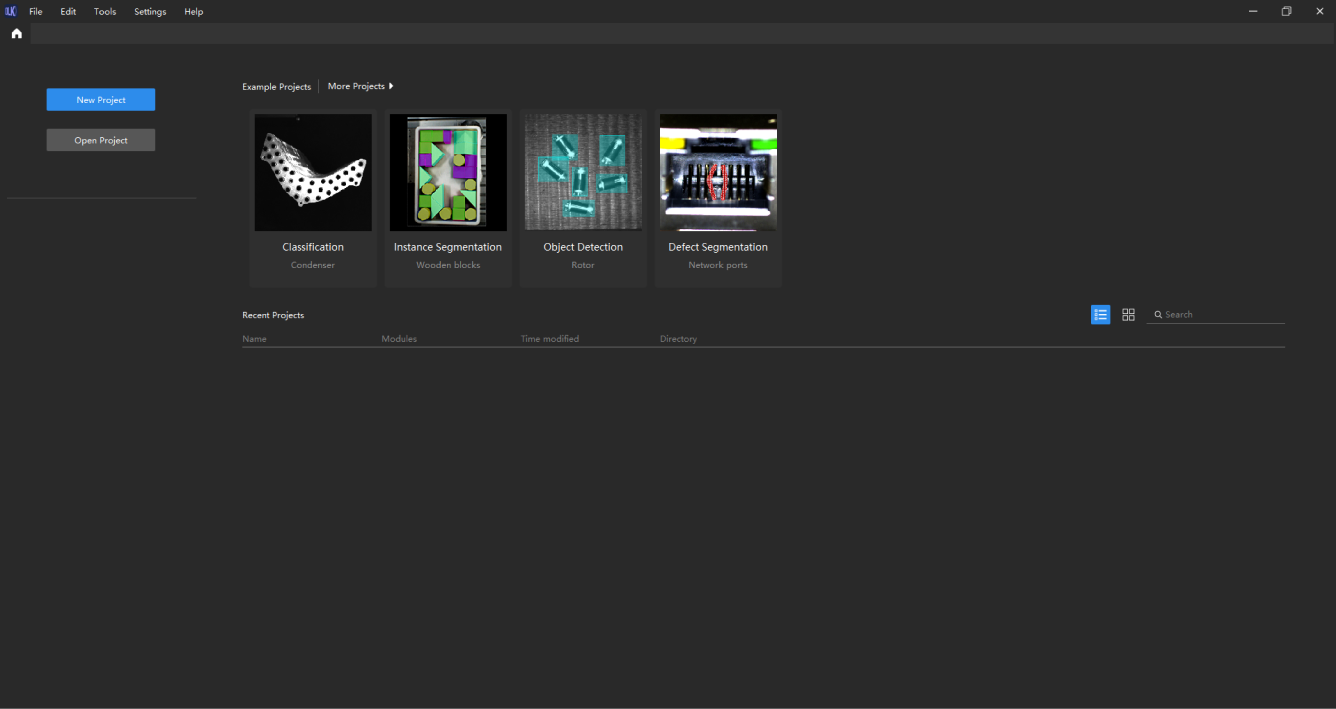
When you start the Mech-DLK software, the following startup interface appears:

New Project |
Create a new empty project. |
Open Project |
Select and open an existing project. |
Example Projects |
View an example project. |
More Projects |
Download more example projects for use. |
|
Go to the startup interface. |
Home Interface
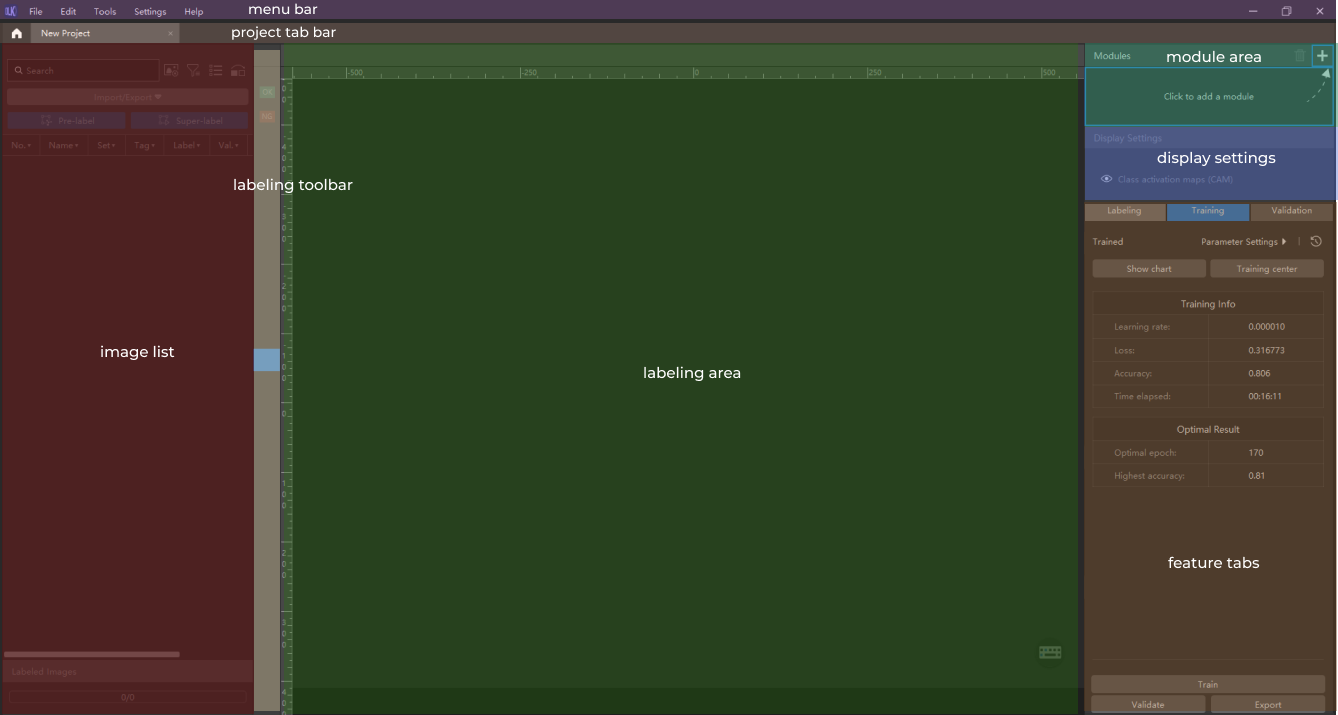
When you create or open a project, the following home interface appears. You can perform operations such as data viewing and labeling, model training and validation.

This interface consists of the following parts:
Includes File, Edit, Tools, Settings, and Help. |
|
Displays all open projects. |
|
Includes image processing tools, the Import/Export button, labeling tools, and the image list. |
|
Includes the tools that are used to label images. |
|
Displays and labels the current image. |
|
Includes all modules and function buttons in the current project. |
|
Modifies the display settings. |
|
Includes the Labeling tab, Training tab, Validation tab, and function buttons. |
Menu Bar
| Menu | Option | Description |
|---|---|---|
File |
New Project |
Create a new project. |
Open Project |
Select and open an existing project folder. |
|
Save Project |
Save changes to the current project. |
|
Save As |
Save the project under a specified directory. |
|
Edit |
Undo |
Undo the Labeling action. |
Redo |
Redo the action that you’ve undone. |
|
Tool |
Operation mode |
You can perform batch-wise testing on the dataset under the Operation Mode.
|
Training Center |
Manage training tasks and training history. |
|
Settings |
Settings |
Change the display language, turn on/off the Developer Mode, and set whether to always load the smart labeling model. |
Help |
User Manual |
View the user manual. |
Quick Guide |
Quick guide to start the software. |
|
What’s New |
View the release notes. |
|
Logs |
Open the folder containing the running logs. |
|
Device Check |
Check and view the CPU and GPU information of the deployment device. |
|
About |
View the software version. |
Project Tab Bar
This bar displays all open projects. You can click the project tabs to switch between projects.
Image List
| Feature | Option | Description |
|---|---|---|
search box |
Search for images in the image list. |
|
image processing tools |
Preprocessing Image |
Adjust the brightness, contrast, and color balance of images. |
Filter Images |
Set the filtering conditions to conveniently select specific images from datasets. |
|
Switch to Preview Mode |
Switch the image display mode to preview view or list view. |
|
Partition Training and Validation Sets |
Drag the slider to adjust the proportion of the training set and validation set. |
|
Import/Export |
Import from Previous Module |
Import data from the previous module (applicable to cascaded modules). |
Import Image |
Import one or more images. |
|
Import Folder |
Import all images from the selected folder, excluding images in subfolders. |
|
Import Dataset |
A dataset contains images and corresponding labels.
|
|
Export Dataset |
Export the datasets from the current project. |
|
labeling tools |
Pre-trained labeling |
Use the Pre-trained Labeling Tool to label all images in the image list. |
VFM labeling |
Use the VFM Labeling Tool to label all images in the image list. |
|
image list |
Displays all images and their attributes in the current project. You can select one or more images, then right-click the images to perform corresponding operations. |
|
Labeling Toolbar
Mech-DLK provides various image labeling tools to label the objects in the images according to your needs. You can view the supported labeling tools and their usage details in each algorithm module.
| Category | Tool | Supported Module |
|---|---|---|
label tool |
OK Label |
Defect Segmentation, Unsupervised Segmentation |
NG Label |
Unsupervised Segmentation |
|
labeling tool |
Polygon Tool |
Instance Segmentation, Defect Segmentation, Object Detection, Text Detection, Fast Positioning |
Ellipse Tool |
Instance Segmentation, Object Detection, Fast Positioning |
|
Rectangle Tool |
Instance Segmentation, Object Detection, Fast Positioning |
|
Free Rectangle Tool |
Text Detection |
|
Brush Tool |
Defect Segmentation |
|
Autofill Lasso Tool |
Defect Segmentation |
|
Smart Labeling Tool |
Instance Segmentation, Defect Segmentation, Object Detection, Fast Positioning |
|
Pre-trained Labeling Tool |
Instance Segmentation, Defect Segmentation, Classification, Object Detection, Text Detection |
|
VFM Labeling Tool |
Instance Segmentation, Object Detection, Text Detection |
|
mask tool |
Mask Polygon Tool |
Instance Segmentation, Unsupervised Segmentation, Defect Segmentation, Object Detection, Fast Positioning |
Mask Brush Tool |
Instance Segmentation, Unsupervised Segmentation, Defect Segmentation, Object Detection, Fast Positioning |
|
Mask Lasso Tool |
Instance Segmentation, Unsupervised Segmentation, Defect Segmentation, Object Detection, Fast Positioning |
|
eraser tool |
Labeling Eraser Tool |
Defect Segmentation |
Mask Eraser Tool |
Instance Segmentation, Unsupervised Segmentation, Defect Segmentation, Object Detection, Fast Positioning |
|
grid tool |
Grid Cutting Tool |
Defect Segmentation |
Grid Selection Tool |
Defect Segmentation |
|
Text Recognition Tool |
Text Recognition |
|
Template Tool |
Instance Segmentation, Object Detection, Text Detection |
|
ROI Tool |
Instance Segmentation, Defect Segmentation, Classification, Object Detection, Fast Positioning, Text Detection, Text Recognition, Unsupervised Segmentation |
|
Select Tool |
Instance Segmentation, Defect Segmentation, Classification, Object Detection, Fast Positioning, Text Detection, Text Recognition, Unsupervised Segmentation |
|
Labeling Area
This area displays the current image, labels on the image, and attributes. You can perform the following operations in this area:
-
Select labeling tools and label the image.
-
Right-click on the image and labels to perform the corresponding operations.
-
Scroll upwards or downwards to zoom in or out the image.
-
Move the cursor to the left or right sides of the image to quickly switch between previous and next images.
-
View the keyboard shortcuts.
-
For some algorithm modules, the image label set by the user is displayed in the upper left corner of the image. After validation, the upper right corner displays the label results, hardware type, and validation duration.
Module Area
This area displays a single module or multiple modules of the project. You can perform the following operations in this area:
-
Click the Add button to add a new module for a new project.
-
Click the Add button to add a cascaded module for the existing module.
-
Click the Delete button to delete a module.
Feature Tabs
This area includes the Labeling Tab, the Training Tab, the Validation Tab, and function buttons.
Labeling Tab
The Labeling Tab displays the label classes and image tags in the current project. You can perform the following operations in the Labeling Tab:
-
In the Classes area,
-
Create or delete the classes.
-
After selecting a class, right-click the class to edit, delete, or merge it.
-
-
In the Image Tag area,
-
Create or delete tags.
-
Set a tag for the current image.
-
Double-click the tag name to rename the tag.
-
Training Tab
In the Training Tab, you can configure training parameters and view training information.
For more information about detailed parameters and training guidance, see Train a model.
Validation Tab
After model training, you can configure validation parameters and view the validation results of models in the Validation Tab.
For more information about detailed parameters and validation guide, see Validate a model.