Calc Results by Python
Description
This Step runs a user-defined script through Python and outputs the calculation results to Mech-MSR.
The characteristics of this Step are as follows:
-
Support multi-threading.
-
Load Python script in real time.
-
Support various data type conversions when transferring data between C++ and Python.
-
Allow for the display of the Python’s log in the log panel of Mech-MSR.
Usage Scenario
When a custom calculation is required, this Step can be used to run the user-defined Python script and the measurement solution can be simplified.
Input and Output
-
Input: determined by the data type input in the Input Ports parameter.
-
Output: determined by the data type input in the Output Ports parameter.
|
You can specify the data type of the input/output ports according to the data type of the previous or subsequent Steps’ input/output ports. |
Installation and Usage
Installation
Python 3.9.13 and two commonly used Python libraries, NumPy and OpenCV, are built into Mech-MSR. The “Calc Results by Python” Step will use the built-in Python environment while the Step running. If there is any missing Python library when you use this Step, you need to install the library in the Mech-MSR’s built-in Python environment. The procedures for installation are as follows:
-
Navigate to the Python installation directory of Mech-MSR. For example, C:\App\Mech-MSR-2.1.1\python.
-
In the current directory, hold down the Shift key, right-click, and then select the Open PowerShell window here option from the context menu.
-
Execute the
python -m pip install xxxcommand (xxxis the name of the Python library) in the Windows PowerShell window to download and install the corresponding Python library.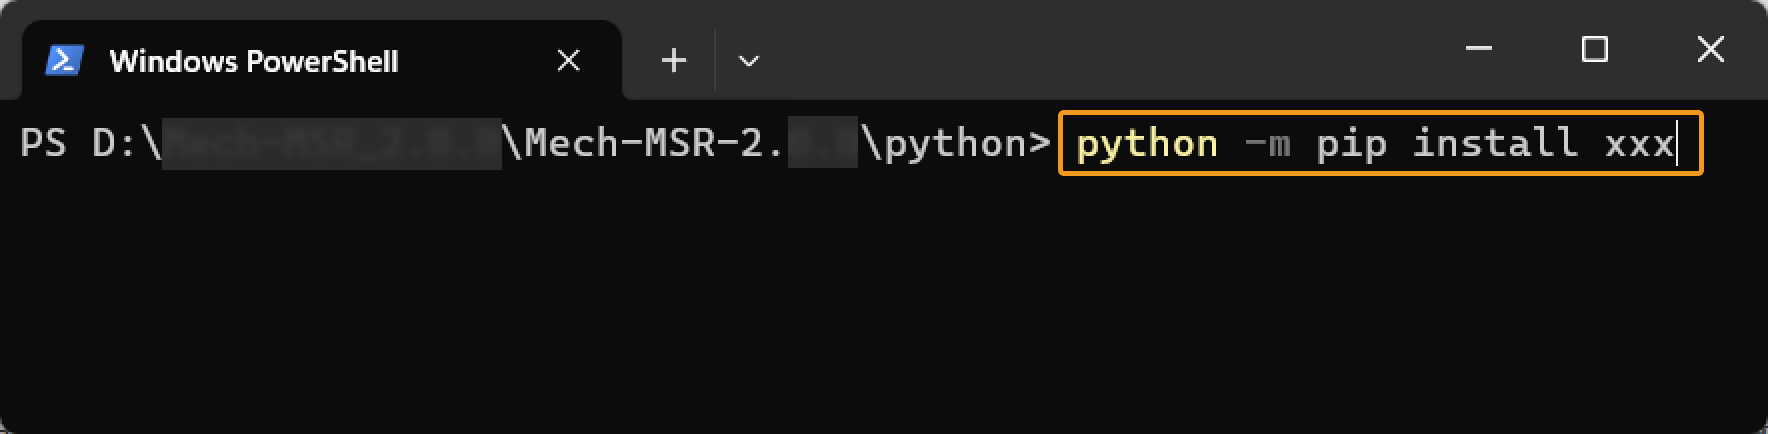
Usage Instructions
After preparing the Python script, please follow the procedure below to use the Step. For detailed description of the parameters, refer to Parameter Description.
-
Set the data type for the input and output ports. Enter the data type for Input Ports and Output Ports according to the data type of the previous or subsequent Steps’ input/output ports.
-
Specify the file path to the Python script. Select the file path to the script to be loaded in the Script File Path parameter.
-
Set the name of the function to be called. Once the Script File Path has been specified, this Step will retrieve the function names in the script automatically, and you can select the name of the function to be called in the drop-down list of Func Name.
-
Run the Step.
|
When writing the Python scripts, you can directly write the functions to process data without writing the statements in the scripts to obtain Mech-MSR data. |
Notes
Please pay attention to the following issues when you write the Python script and run the script in this Step.
Third-Party Library is Recommended
Because running a Python script in Mech-MSR differs from running the script in Python directly, some Python libraries could not be installed successfully or they cannot function properly after being installed, it is recommended to use third-party libraries.
Use the NumPy Library
The NumPy library is used to support some complicated formats of data. If a parameter type is ndarray, but the NumPy has not been imported, an error may occur. Therefore, you should add the import numpy statement at the beginning of the script.
| Only NumPy versions between 1.19.3 (inclusive) and 2.0.0 (exclusive) are supported. It is recommended to use 1.22.4. Using 2.0.0 or an above version may lead to compatibility issues, resulting in abnormal operation of this Step. |
Import Predefined Modules
| When the input or output port type of this Step is Surface, Profile, or Shape3D, predefined module(s) must be imported. |
When using a Python script in Mech-MSR to process data of types Surface, Profile, or Shape3D, you should import the corresponding predefined module into the script. This allows Python to recognize and operate the data structure when running the script. If the required module is not imported, the script will fail to recognize these classes and encounter errors during execution.
You can find these predefined modules in the software installation directory (e.g., C:\Mech-MSR-2.1.1\python\Lib\py_module). These modules can be used to handle the following three types of data:
-
Surface data
-
Description: Represents the scan data of the object surface, usually including the depth map and intensity image.
-
Port type: Surface
-
Module to import into a Python script:
mmind_surfaceInstructions
from mmind_surface import *		# must be imported

def test_surface(surface):
    print(surface) # is a class
    print(type(surface)) # is a class
    print(surface.depth) # is numpy.ndarray (n, m)
    print(surface.intensity) # is numpy.ndarray (n, m)
    print(surface.xResolution)
    print(surface.yResolution)
    print(surface.xOffset)
    print(surface.yOffset)
    print(surface.zOffset)

    return surface


def test_surfaces(surfaces):
    print(type(surfaces)) # is list
    for surface in surfaces:
        print(type(surface)) # is class
        print(surface.depth)
        print(surface.intensity)
        print(surface.xResolution)
        print(surface.yResolution)
        print(surface.xOffset)
        print(surface.yOffset)
        print(surface.zOffset)
    return surfaces
-
-
Profile data
-
Description: Represents profile data. A profile is made up of points containing X and Z values, reflecting changes in height across a cross-section of an object.
-
Port type: Profile
-
Module to import into a Python script:
mmind_profileInstructions
from mmind_profile import *		# must be imported

def test_surface(profile):
    print(profile) # is a class
    print(type(profile)) # is a class
    print(profile.points) # is numpy.ndarray (n,2)
    print(profile.yResolution)
    print(profile.xOffset)
    return profile


def test_surfaces(profiles):
    print(type(profiles)) # is list
    for profile in profiles:
        print(type(profile)) # is a class
        print(profile.points) # is numpy.ndarray (n,2)
        print(profile.yResolution)
        print(profile.xOffset)
    return profiles
-
-
Geometric features
-
Description: Represents geometric features such as points, lines, planes, and circles.
-
Port type: Shape3D
-
Modules to import into a Python script:
mmind_featureandmmind_utilInstructions (taking Shape3D [] as an example)
from mmind_util import *		# must be imported
from mmind_feature import *		# must be imported

def test_shape3dList(point_list, line_list, plane_list, circle_list):
    point = point_list[0]       # class PyPoint3D
    line = line_list[0]         # class PyLine3D
    plane = plane_list[0]       # class PyPlane3D
    circle = circle_list[0]     # class PyCircle3D

    p_x = point.x               # number
    p_y = point.y
    p_z = point.z

    l_p = line.point            # class PyVector3D
    l_d = line.direction        # class PyVector3D
    print(l_d.x, l_d.y, l_d.z)

    p_a = plane.a               # number
    p_b = plane.b
    p_c = plane.c
    p_d = plane.d

    c_p = circle.point          # class PyVector3D
    c_r = circle.radius         # number
    c_n = circle.normal         # class PyVector3D


def create_shape3dList():
    point1 = PyPoint3D(1.0, 2.0, 3.0)
    point2 = PyPoint3D()
    point2.x = 4.0              # must be a number
    point2.y = 5.0
    point2.z = 6.0

    line1 = PyLine3D(PyVector3D(1.0, 1.0, 1.0), PyVector3D(1.0, 1.0, 0.0))
    line2 = PyLine3D()
    line2.point = PyVector3D(1.1, 1.2, 1.3)     # can be PyVector3D or PyPoint3D
    line2.direction.x = 0.0     # must be a number
    line2.direction.y = 1.0
    line2.direction.z = 1.0

    plane1 = PyPlane3D(2.0, 0.0, 0.0, 10.0)
    plane2 = PyPlane3D()
    plane2.a = 0.0056           # must be a number
    plane2.b = 0.001
    plane2.c = 0.0023
    plane2.d = -3.22

    circle1 = PyCircle3D(point1, 10.0, PyVector3D(0.0, 0.0, 1.0))
    circle2 = PyCircle3D()
    circle2.point = point2      # can be PyVector3D or PyPoint3D
    circle2.radius = 100.0      # must be a number
    circle2.normal = PyVector3D(0.0, 1.0, 0.0)  # must be unit vector

    return [point1, point2], [line1, line2], [plane1, plane2], [circle1, circle2]
-
Parameter Description
- Input Ports
-
This parameter is used to specify the data type(s) of the input port(s). The input data types will be passed to the called function as parameters in the corresponding order.
Default value: Null.
- Output Ports
-
Description: This parameter is used to specify the data type(s) of the output port(s). Data returned by the function will be returned to the Step in the corresponding order and will be parsed according to the corresponding data type.
Default value: Null.
The currently supported data types are as follows:
When you add [] after the basic data type, it signifies an increase in the dimensionality of the data. Specify the data type of the input or output port according to the actual situation.
|
| Basic data type | Python data type | Input/Output port field | Example data |
|---|---|---|---|
Pose (Custom type) |
|
|
[10, 20, 30, 0.951, 0.255, 0.168, 0.045] (The first three values represent the X, Y, and Z coordinates, respectively, while the last four represent rotation as a quaternion in the order of [w, x, y, z].) |
|
[[10, 20, 30, 0.951, 0.255, 0.168, 0.045]], [10, 20, 30, 0.951, 0.255, 0.168, 0.045]] |
||
Pose2D (Custom type) |
|
|
[2, 0, 120] (The first two values represent the X and Y coordinates, while the third represents the angle.) |
|
[[0, 0, 0]], [2, 0, 120]] |
||
Number |
|
|
233 |
|
[1.1, 2, 999.9, -22] |
||
String |
|
|
'string_1' |
|
['string_1', 'string_2', 'string_3'] |
||
Index |
|
|
1 |
|
[45, 10, 90] |
||
Bool |
|
|
True |
|
[True, False, True] |
||
Surface (Custom type) |
|
(Surface data, usually including the depth map and intensity image.) |
|
Profile (Custom type) |
|
(Profile data) |
|
Shape3D (Custom type) |
|
PyPoint3D(), PyLine3D(), PyPlane3D(), or PyCircle3D() (PyPoint3D, PyLine3D, PyPlane3D, and PyCircle3D are all custom classes, representing the geometric features of point, line, plane, and circle, respectively.) |
|
|
[PyPoint3D(), PyPoint3D(), …]
|
||
Image |
|
|
Single-channel grayscale image ( |
Cloud(XYZ) (Custom type) |
|
|
[[0.1, 0.2, 0.3], [0.2, 0.3, 0.4], [0.3, 0.4, 0.5], [0.4, 0.5, 0.6], [0.5, 0.6, 0.7]] (In each array, the three values represent the X, Y, and Z coordinates of the point, respectively.) |
Cloud(XYZ-Normal) (Custom type) |
|
|
[[0.1, 0.2, 0.3, 0.4, 0.5, 0.6], [0.2, 0.3, 0.4, 0.5, 0.6, 0.7], [0.3, 0.4, 0.5, 0.6, 0.7, 0.8], [0.4, 0.5, 0.6, 0.7, 0.8, 0.9], [0.5, 0.6, 0.7, 0.8, 0.9, 1.0]] (In each array, the first three values are the X, Y, and Z coordinates of the point, and the last three values are the X, Y, and Z components of the normal, respectively.) |
Cloud(XYZ-RGB) (Custom type) |
|
|
[[0.1, 0.2, 0.3, 52, 64, 13], [0.2, 0.3, 0.4, 45, 21, 72], [0.3, 0.4, 0.5, 17, 69, 13], [0.4, 0.5, 0.6, 12, 8, 37], [0.5, 0.6, 0.7, 25, 58, 46]] (In each array, the first three values are the X, Y, and Z coordinates of the point, and the last three values are the red, green, and blue components of the point, respectively.) |
Size3D (Custom type) |
|
|
[2.5, 5, 0.001] (Represents dimensions along the X, Y, and Z axes, respectively.) |
|
[[2.5, 5, 0.001]], [6, 5, 0.02]] |
- Script File Path
-
This parameter is used to select the file path of the script to be loaded.
- Func Name
-
This parameter is used to set the name of the function to be called.
Python Examples
| Refer to Step Usage Instructions to learn how to call a function in this Step. |
Output Data of One Type with Python Script
The following example defines a function that outputs one type of data.
def get_bool():
    return True
You can view the output result of the Step in the Output Results panel.
Read Data in Output of a Measurement Item
The following example shows how to read the information contained in the output of a measurement item, such as the measured value(s), the judgment result (OK or NG), the corrective compensation value, and the upper and lower limits (Max and Min) set for the measurement item.
import mmind_measure
# Or use wildcard import
# from mmind_measure import *

def test(numberList, stringList, boolList):

    entries = mmind_measure.measurement_entries_at(1) 	# Calls the function with the port number as the argument.
    # If wildcard import is used (e.g., from mmind_measure import *), the function can be called directly:
    # entries = measurement_entries_at(1)
    print(entries)

    for entry in entries:
        print(entry.observeValue) # Measured value(s)                     (float, str, bool)
        print(entry.judgement)    # Judgment result, OK or NG             (str)
        print(entry.offset)		  # Corrective compensation value         (float)
        print(entry.lowerLimit)   # The set Min for the measurement item  (float)
        print(entry.upperLimit)	  # The set Max for the measurement item  (float)
        print(entry.compensation) # Compensated value(s)                  (float)
        print(entry.entryName)	  # Port name                             (str)
Troubleshooting
See Error Code List for common error messages and solutions.