Set Point Cloud Model in Parameter Recipe
Parameter recipes are sets of parameter settings that need to be adjusted according to different situations for the same project. With parameter recipes, you do not need to build multiple projects with the same logic and configure their parameters differently to meet different on-site requirements. Instead, you will only need to switch between parameter recipes in one project to make it applicable to various scenarios and therefore the productivity can be increased. For example, you can use the same Mech-Vision project to recognize different types of target objects using multiple parameter recipes.
Add a Parameter Recipe
The following section uses setting two different point cloud models for the "3D Matching" Step as an example. Please ensure that the two point cloud models have been created beforehand. The steps for setting the parameter recipes are as follows:
-
Click the Project Assistant tab, and click
 to open the Parameter Recipe panel.
 -
Click
 in the Parameter Recipe panel.
 -
Click the Add Recipe button in the pop-up Parameter Recipe Editor window.
-
Double-click the newly added item in the parameter list and enter the recipe name, such as track_link.
-
Continue to click Add Recipe and enter the recipe name, such as shaft.

-
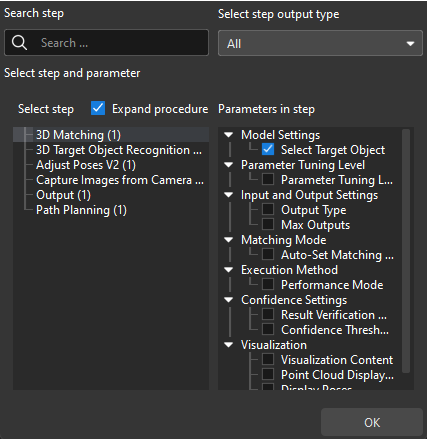
Click Add Parameter, find and click "3D Matching" in the pop-up window, select the "Select Target Object" checkbox and then click OK.

-
Set the parameters of the two recipes respectively.

-
Click Save to save the configurations.
Apply or Switch the Parameter Recipe
Follow these steps to apply or switch the parameter recipe.
-
Click the Project Assistant tab, and click
 to open the Parameter Recipe panel.
 -
In the Parameter Recipe panel, select the parameter recipe corresponding to the point cloud model of target object in the drop-down list.

-
When the project is running, the "3D Matching" Step will load the point cloud model corresponding to the current parameter recipe to recognize target objects.