Point Cloud Editor
Point Cloud Editor is for editing and processing point clouds, the point cloud editor mainly has the following functions:
Edit point cloud: filter out unnecessary point clouds and get a point cloud template suitable for subsequent processing.
Set pick point(s): add one or more pick points to the point cloud template and export a JSON file of pick points.
Merge all visible point clouds: merge multiple point cloud templates.
Downsampling: Downsampling the point cloud to reduce the workload of subsequent calculations while maintaining the point cloud structure information.
Zoom: zoom the point cloud to facilitate subsequent processing.
Interface
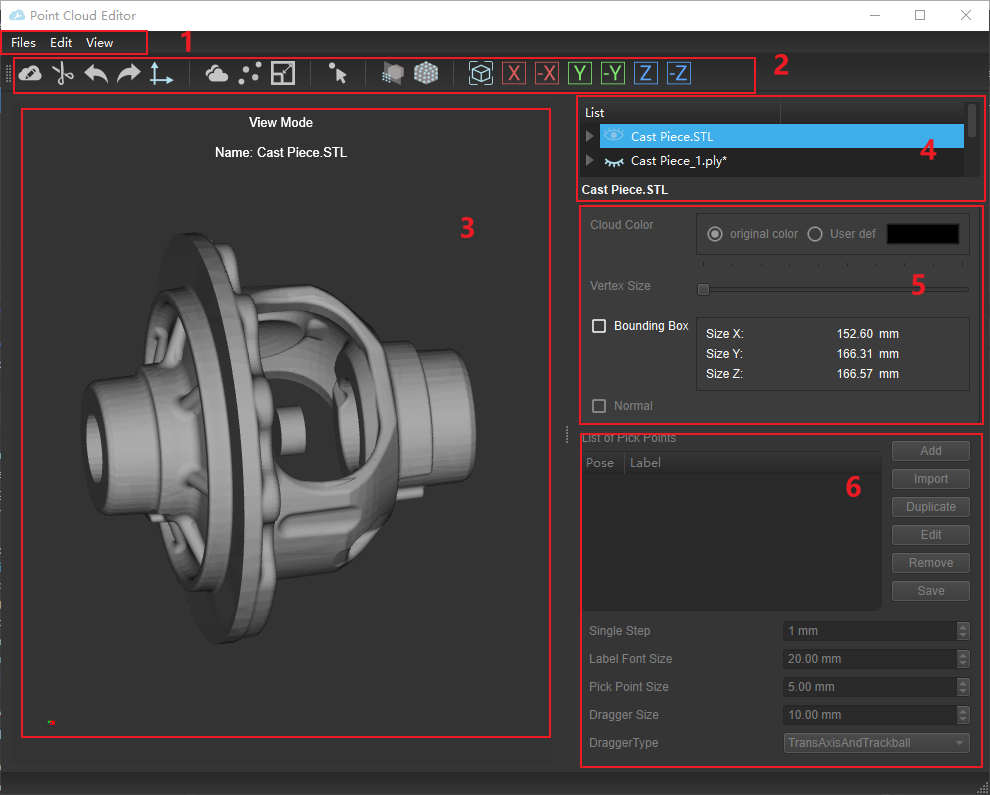
Figure 1. Point Cloud Editor Interface Introduction
The point cloud editor interface includes the following six sections:
Menu Bar |
File: Open Cloud, Save Cloud As. |
Edit: Edit Point Cloud, Set Pick Points, Merge Visible Clouds, Downsample, Scale, Sample Cloud By View, Delete, Undo, Redo, Render Axis. |
|
View: Fit In Window, X View, Negative X View, Y View, Negative Y View, Z View, Negative Z View. |
|
Toolbar |
Shortcut buttons for editing tools. |
3D simulation |
Display point cloud and editing status. |
Point cloud list |
Display the opened point cloud file and its path information; set the visibility. |
Point cloud parameters |
Cloud Color: set the display color of the point cloud in the 3D simulation; for color point clouds, the original object color can be displayed. |
Vertex Size |
|
Bounding Box (check to display) |
|
Normal (check to display) |
|
List of pick points |
List of pick points: display the grab point information of the currently activated point cloud; select an item to activate for editing by selecting. |
Add: add a pick point to the currently active point cloud. |
|
Import: Load pick points and labels from THE file. |
|
Duplicate: copy the information of the selected pick point and generate a new pick point. |
|
Edit: Edit the currently selected pick point. |
|
Delete: delete the currently selected pick point. |
|
Save: save the pick point and label information in the pick point list. |
Instructions
View a Point Cloud
Click (shortcut Ctrl+O) to load an existing point cloud file.
Point cloud files are .stl or .ply files.
Import an .stl file:
Select the .stl file, click Open, and select the correct unit in the Measurement Unit window that pops up. If the selected unit is wrong, a warning window asking for whether to continue loading will pop up. The loaded .stl file will be added to the Point cloud list in the upper right corner, and the point cloud will be displayed in the 3D simulation on the left.
- Sample cloud from STL model by view
After selecting the .stl file in the point cloud list, click
in the toolbar to generate the point cloud of the part of the surface visible from the current perspective. In the point cloud list, the .ply file of the current point cloud will also be added.
- Sample cloud from STL model by out
After selecting the .stl file in the point cloud list, click
in the toolbar, and the Sampling Interval window will pop up. After completing the settings, a complete external surface point cloud will be generated. In the point cloud list, the .ply file of the current point cloud will also be added.
Import a .ply file::
Select the target file and click Open. The loaded .ply file will be added to the point cloud list, and the point cloud will be displayed in the 3D simulation on the left.
Change the perspective of viewing the point cloud:
Drag the point cloud with the left mouse button to view the point cloud objects from different perspectives.
Click
 to fit in the window.
Click
 to view the point cloud from the front, back, top, bottom, left, and right respectively.
Zoom or enlarge to view the point cloud:
Scroll to zoom the point cloud.
Point cloud visibility settings:
When multiple point clouds are open, this function helps to view each point cloud separately.
The eye icon to the left of the point cloud name in the point cloud list specifies the visibility of the point cloud. After clicking to make it a closed eye icon, the point cloud will be hidden.
Merge all visible point clouds:
Downsample:
Select the point cloud to downsample in the point cloud list on the right, and click
 .
.Set the appropriate sampling interval, click Confirm, the down-sampled point cloud will be automatically generated and the file name will be displayed in the point cloud list (at this time, the previously selected point cloud will be automatically hidden). The comparison of the point clouds before and after adjusting the sampling interval is shown in Figure 3.
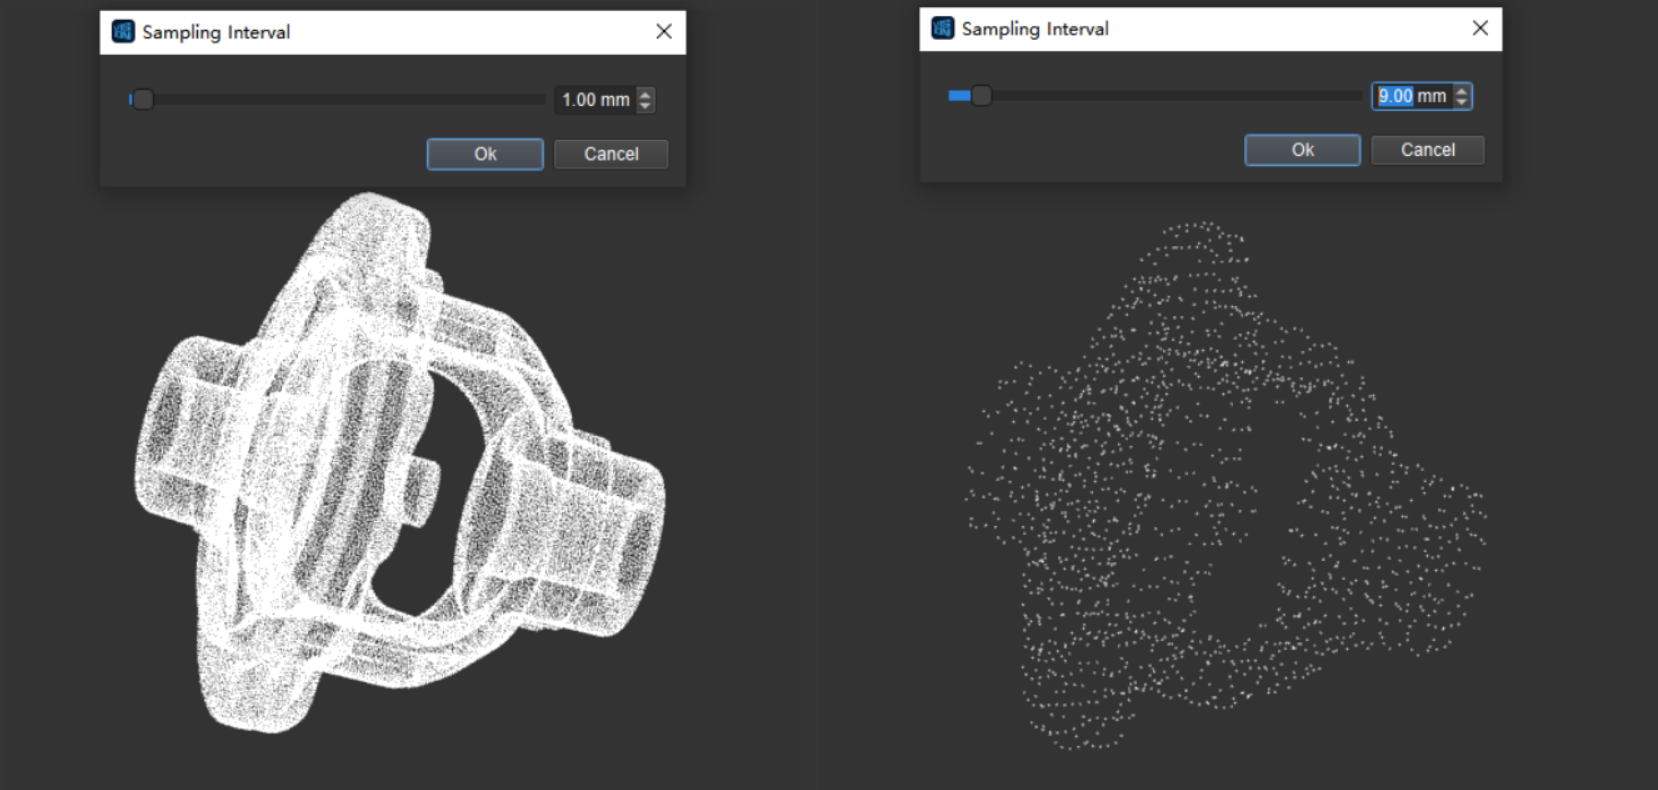
Figure 3. Point Cloud Downsampling
Attention
The point cloud after downsampling will not be saved automatically. Please save it manually.
Scale:
Select the point cloud to scale in the point cloud list on the right, and click
 .
.Set the scale value in the X, Y, and Z directions. By default, the option of equal values for each direction is checked. Click Confirm and the zoomed point cloud template will not generate a new point cloud template, only the zoomed effect will be displayed in the current template. The comparison chart before and after scaling is shown in Figure 4.
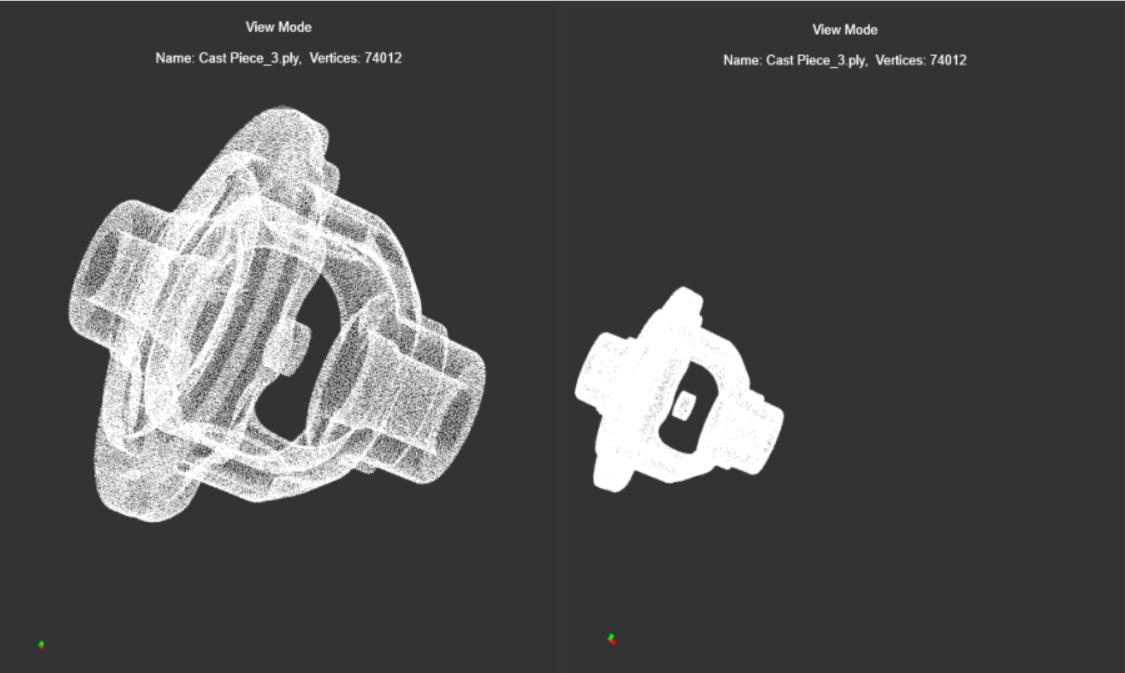
Figure 4. Scale
Attention
The scaled point cloud will not be saved automatically. Please save it manually.
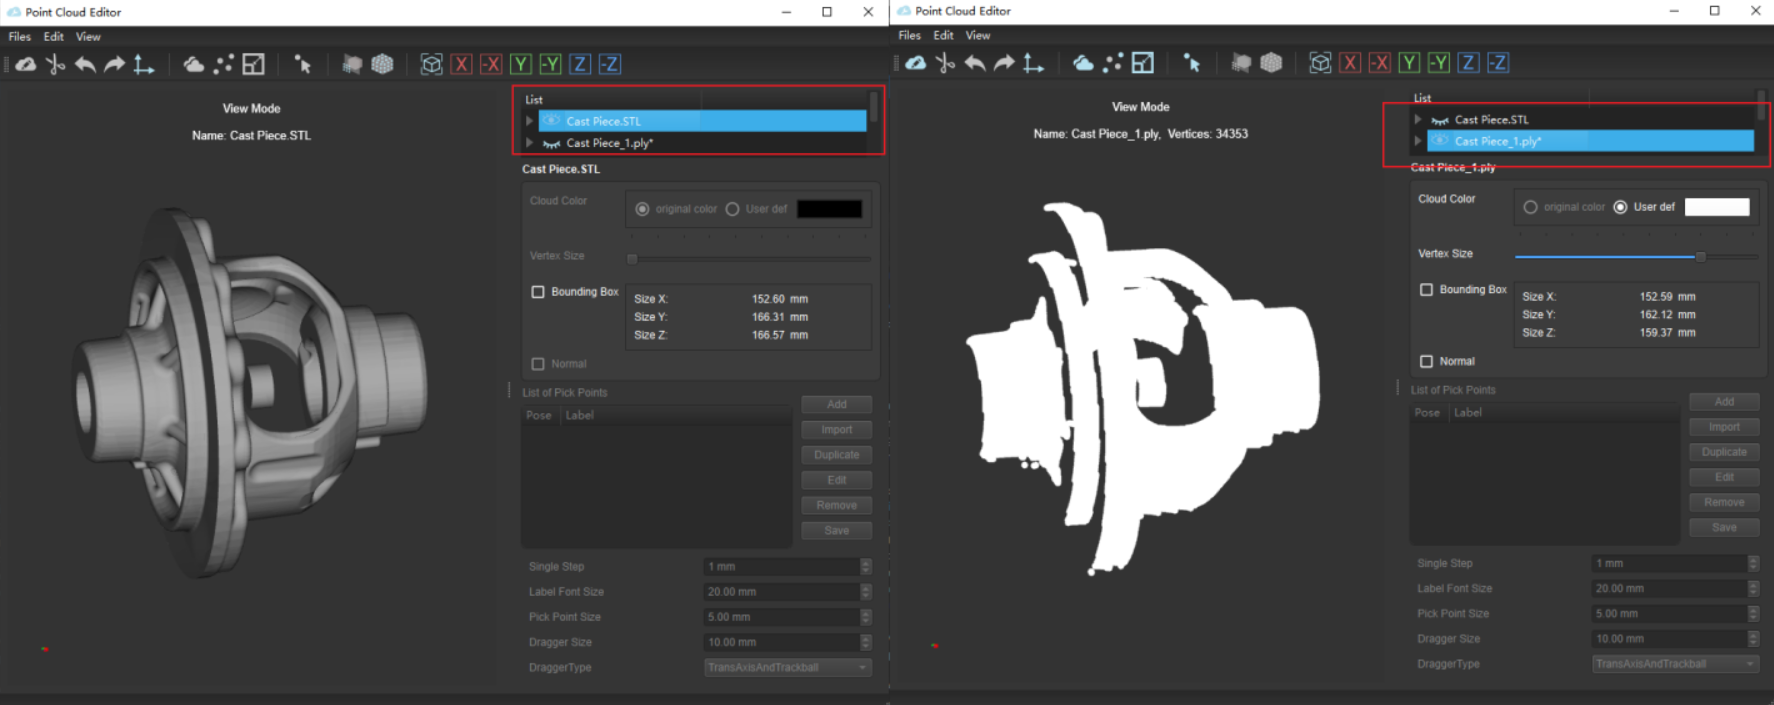
Point Cloud Parameters
Customize point cloud color
Set the display color of the point cloud in the 3D scene. For color point clouds, the original object color can be displayed. The comparison of point clouds before and after customizing color is shown in Figure 5 .
Figure 5. Customize Point Cloud Color
Vertex size
This feature is to change the vertex size of the displayed point cloud. The comparison of point clouds before and after vertex adjustment is shown in Figure 6 .
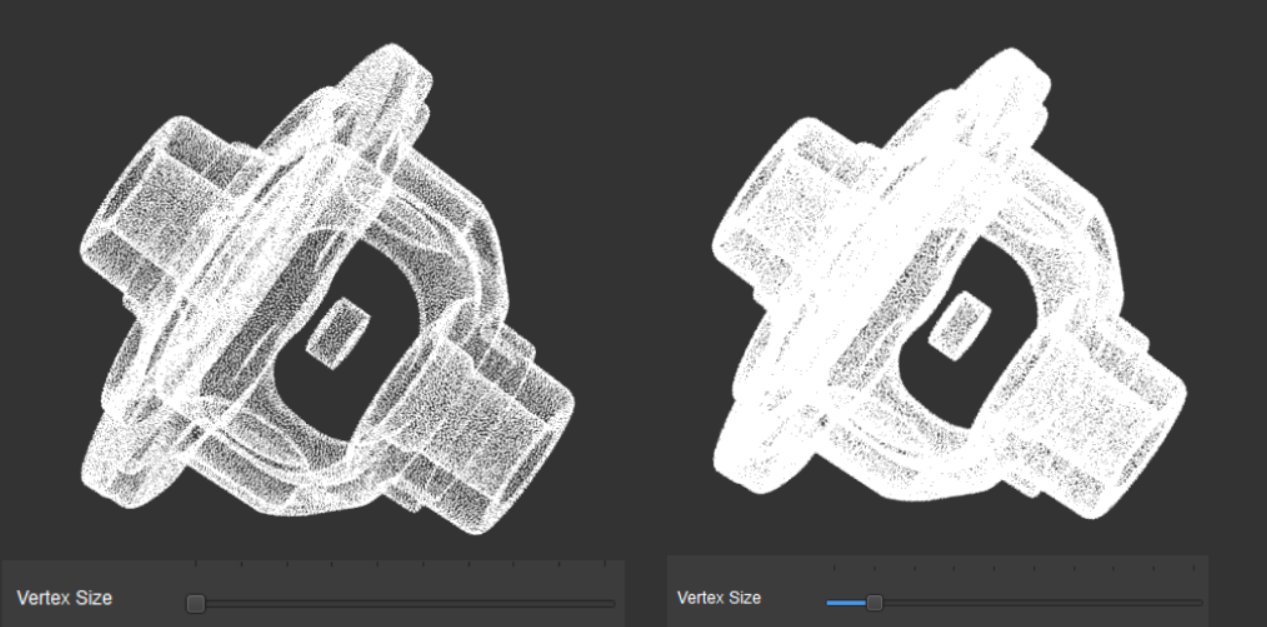
Figure 6. Vertex Size
Display bounding box
The comparison of the display before and after displaying the bounding box is shown in Figure 7 .
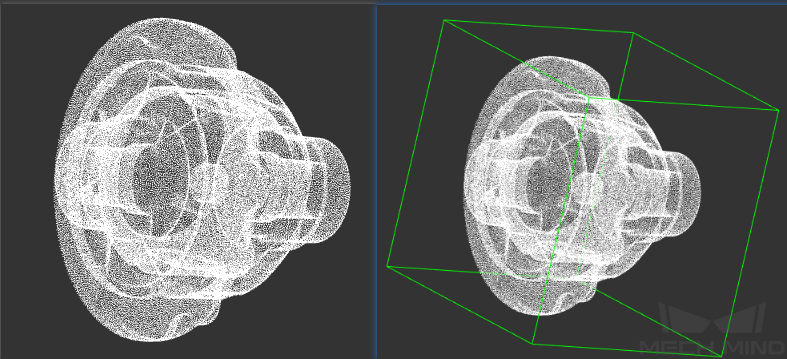
Figure 7. Displaying the Bounding Box
Display the normals
The comparison of the display before and after displaying the normal is shown in Figure 8 .
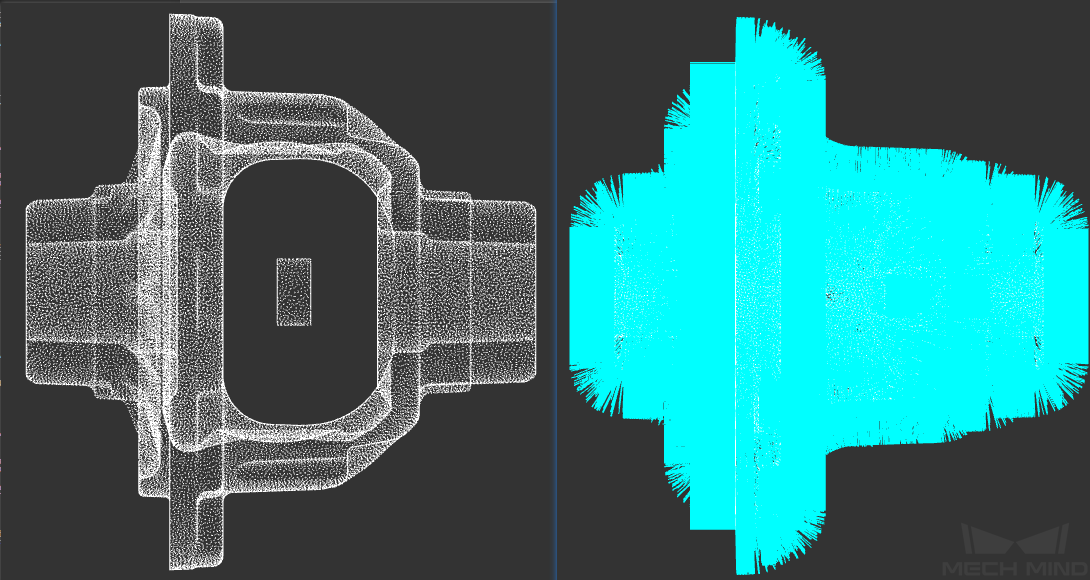
Figure 8. Display the Normals
Make a Point Cloud Template
After a certain point cloud in the point cloud list is selected, the point cloud is active, and all editing operations will only act on the activated point cloud (the point cloud needs to be visible at the same time). If there are multiple point clouds in the list, only the selected point cloud (highlighted) is active.
Attention
Visibility and activation state are two different states of the point cloud. Invisible point clouds can be activated but cannot be edited. Inactive point clouds can be made visible. Only point clouds that are visible and activated at the same time can be edited.
After finding a suitable perspective, click
 in the toolbar (shortcut Alt+M) to enter the point cloud editing mode.
Select the area to delete. If the selected area is not ideal, please reselect it. Hold Ctrl to select multiple different areas at the same time.
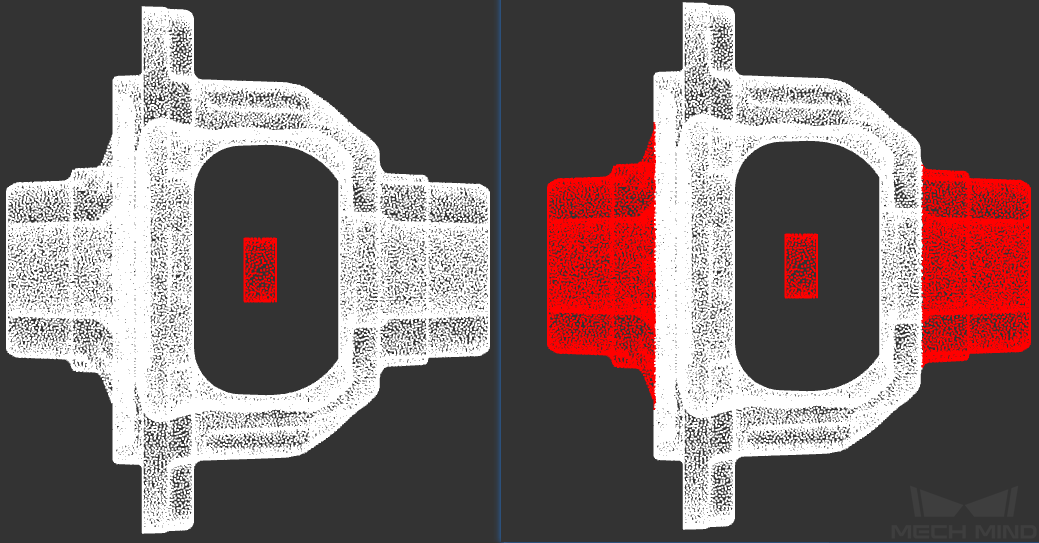
Figure 9. Select Area
Click
 (shortcut key Delete) to delete the selected points, then the editor will enter the point cloud view mode. If further editing is needed, please re-enter the point cloud editing mode. A delete operation can be undone by clicking
  .
.After editing, please save the edited point cloud. Click or (shortcut Ctrl+S) in the point cloud list, select the path, enter the file name and save.
Reload the saved edited point cloud file to see that the editing has been saved correctly, as shown in Figure 10.
Figure 10. Edited Point Cloud
Set Pick Point
The procedure for setting the pick point is as follows:
In the point cloud list on the right, select the point cloud that needs pick point settings, and click
 .
.Click Add or Import on the right to set one or more pick points (when importing, if a pick point has a label, please import the corresponding label file).
Or set the pose of a selected pick point by dragging the dragger (trackball or transaxis or both) of the pick point. The properties of the dragger can be set in the lower right corner, as shown in Figure 11.
Or click Edit on the right to set the pick point.
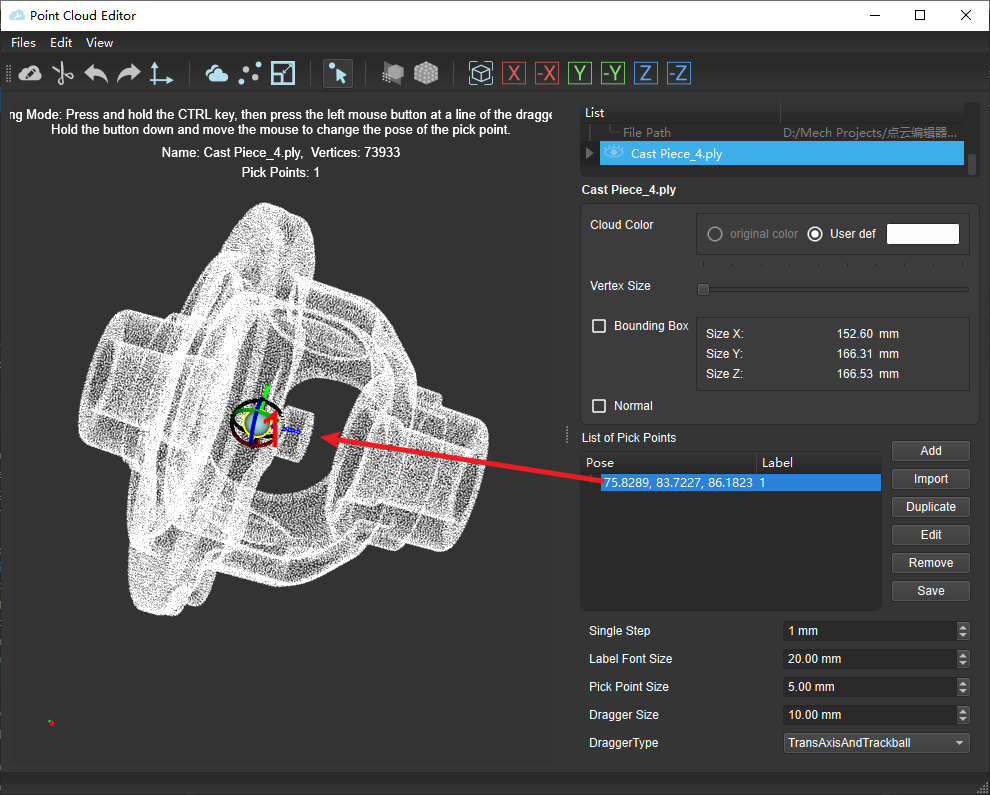
Figure 11. Set Pick Point
Tip
The edit window of a pose in the pick point list can be directly opened by double-clicking on the pose. The single step length, label font size, pick point display size, and dragger type can be edited by actual needs.
When done setting the pick points, click Save, select the file save path, and finally generate the pick point JSON file.