FANUC Example Program
This section introduces the example program provided with Mech-Center and the operations required to perform an actual pick-and-place task.
The example program mm_sample can be found in XXXX/Mech-Center/mech-interface/fanuc.
Check the section corresponding to your own application setup:
Before running the program, please make sure that:
You have loaded the Standard Interface program onto the robot and can establish communcation with Mech-Center.
You have completed the extrinsic parameter calibration with the calibration program or by manually adding calibration points.
Mech-Vision and Mech-Viz projects are created and set to autoload.
The Project list in is synced by clicking on
 , and the order of Mech-Vision projects have been adjusted according to actual needs.
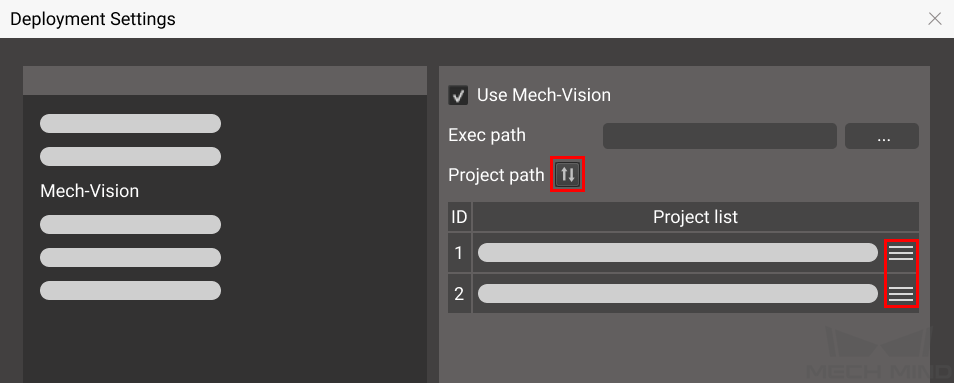
The TCP has been correctly specified.
The robot speed is set to a low value, so that the operator can notice any unexpected behavior before accidents occur.
Obtain Vision Results from Mech-Vision
 1:  !FUNCTION:Eye to Hand simple pick ;
 2:  !MechMind,2022-05-30 ;
 3:   ;
 4:  !SET Tool ;
 5:  UTOOL_NUM=1 ;
 6:  !Move to HOME Position ;
 7:J P[1] 100% FINE    ;
 8:  !Move to Camera capture Position ;
 9:L P[2] 3000mm/sec FINE    ;
10:  !Set IP address and Port ;
11:  CALL MM_INIT_SKT('8','192.168.1.20',50000,1) ;
12:  WAIT    .10(sec) ;
13:  !Set Vision Recipe ;
14:  //CALL MM_SET_MOD(1,1) ;
15:  !Run Vision Project ;
16:  CALL MM_START_VIS(1,1,2) ;
17:  WAIT   1.00(sec) ;
18:  CALL MM_GET_VIS(1,50,51,52) ;
19:  IF (R[52]<>1100) THEN ;
20:  PAUSE ;
21:  ENDIF ;
22:  CALL MM_GET_POS(1,60,70,80) ;
23:L PR[60] 800mm/sec CNT100 Offset,PR[1]    ;
24:L PR[60] 800mm/sec FINE    ;
25:  !Add object grasping logic here ;
26:   ;
27:L PR[60] 800mm/sec CNT100 Offset,PR[1]    ;
28:  !Add transition point ;
29:L P[3] 800mm/sec FINE    ;
30:  !Move to DROP Position ;
31:L P[4] 800mm/sec CNT100 Offset,PR[2]    ;
32:L P[4] 200mm/sec FINE    ;
33:  !Add object releasing logic here ;
34:   ;
35:L P[4] 800mm/sec CNT100 Offset,PR[2]    ;
36:  !Move to HOME Position ;
37:J P[1] 100% FINE    ;
Program Logic
Move the robot to HOME position.
Move the robot to the image capturing pose.
Initialize communication with MM_INIT_SKT. For detailed information, please refer to FANUC Standard Interface Commands.
If parameter recipes are used in the Mech-Vision project, the recipe to be used is set with MM_SET_MOD. For detailed information, please refer to FANUC Standard Interface Commands.
Run the Mech-Vision project with MM_START_VIS.
Wait for 1 second. Under Eye-In-Hand, this WAIT instruction is required to make sure the robot stays still until image acquisition is completed. Under Eye-To-Hand, this WAIT instruction is not needed if there is a motion procedure between MM_START_VIS and MM_GET_VIS
Obtain the vision results from Mech-Vision.
Check if the returned status code indicates any error. If an error code is returned, the program is paused.
Move the robot to the picking pose and perform picking.
Move the robot to a waypoint between the picking pose and placing pose.
Move the robot to the set placing pose and perform placing.
Return the robot to HOME position.
The following parts should be modified according to your actual needs.
Define HOME position
Please set the HOME position in register P[1].
Define the TCP
The TCP in this example is defined as UTOOL_NUM=1. Please change the value 1 according to the actual TCP values.
Teach the Image Capturing Pose
Please record the image capturing pose in register P[2].
Teach the Waypoint(s)
Waypoints are intermediate poses between the picking pose and placing pose. They are used to ensure that the robot doesn’t collide with the surrounding when moving between the picking and placing poses.
The waypoints in this example is saved in P[3]. You can add one or more waypoints.
Teach the Placing Pose
Please record the placing pose in register P[4].
Define Z-Offset from Picking/Placing Pose
Z-offset distances relative to the tool frame from the picking/placing pose are used to ensure collision doesn’t occur when the robot is approching or departing the picking/placing pose.
Adjust the following commands according to your actual needs.
L PR[60] 800mm/sec CNT100 Offset,PR[1]: the Z-offset when approching the picking pose is saved in PR[1].
L PR[60] 800mm/sec CNT100 Offset,PR[1]: the Z-offset when departing the picking pose is saved in register PR[1].
L P[4] 800mm/sec CNT100 Offset,PR[2]: the Z-offset when approching placing pose is saved in register PR[2].
L P[4] 800mm/sec CNT100 Offset,PR[2]: the Z-offset when departing the placing pose is saved in register PR[2].
Add Object Grasping and Releasing Logics
Add logic for controlling the tool action when picking or placing the object.
Obtain Planned Path from Mech-Viz
 1:  !FUNCTION:Eye to Hand simple pick ;
 2:  !and place with Mech-Viz ;
 3:  !MechMind,2022-05-30 ;
 4:   ;
 5:  !SET Tool ;
 6:  UTOOL_NUM=1 ;
 7:  !Move to HOME Position ;
 8:J P[1] 100% FINE    ;
 9:  !Move to Camera capture Position ;
10:L P[2] 3000mm/sec FINE    ;
11:  !Set IP address and Port ;
12:  CALL MM_INIT_SKT('8','192.168.1.20',50000,1) ;
13:  WAIT    .10(sec) ;
14:  !Set Vision Recipe ;
15:  //CALL MM_SET_MOD(1,1) ;
16:  !Run Viz Project ;
17:  CALL MM_START_VIZ(1) ;
18:  WAIT    .10(sec) ;
19:  !set branch exitport ;
20:  //CALL MM_SET_BCH(1,1) ;
21:  !get planned path ;
22:  CALL MM_GET_VIZ(2,50,51,52,53) ;
23:  IF (R[53]<>2100) THEN ;
24:  PAUSE ;
25:  ENDIF ;
26:  CALL MM_GET_POS(1,60,70,80) ;
27:  CALL MM_GET_POS(2,61,71,81) ;
28:  CALL MM_GET_POS(3,62,72,82) ;
29:  !follow the planned path to pick ;
30:L PR[60] R[70]mm/sec FINE    ;
31:L PR[61] R[71]mm/sec FINE    ;
32:  !Add object grasping logic here ;
33:   ;
34:L PR[62] R[72]mm/sec FINE    ;
35:  !Add transition point ;
36:L P[3] 800mm/sec FINE    ;
37:  !Move to DROP Position ;
38:L P[4] 800mm/sec CNT100 Offset,PR[2]    ;
39:L P[4] 200mm/sec FINE    ;
40:  !Add object releasing logic here ;
41:   ;
42:L P[4] 800mm/sec CNT100 Offset,PR[2]    ;
43:  !Move to HOME Position ;
44:J P[1] 100% FINE    ;
Program Logic
Move the robot to HOME position.
Move the robot to the image capturing pose.
Initialize communication with MM_INIT_SKT. For detailed information, please refer to FANUC Standard Interface Commands.
If parameter recipes are used in the Mech-Vision project, the recipe to be used is set with MM_SET_MOD.
Run the Mech-Viz project with MM_START_VIZ.
Obtain the planned path from Mech-Viz.
Check if the returned status code indicates any error. If an error code is returned, the program is paused.
Store obtained target points in the planned path to PR[60], PR[61], and PR[62]. For detailed information, please refer to FANUC Standard Interface Commands.
Move the robot along the planned path and perform picking.
Move the robot to a waypoint between the picking pose and placing pose.
Move the robot to the set placing pose and perform placing.
Return the robot to HOME position.
The following parts should be modified according to your actual needs.
Define HOME position
Please set the HOME position in register P[1].
Define the TCP
The TCP in this example is defined as UTOOL_NUM=1. Please change the value 1 according to the actual TCP values.
Teach the Image Capturing Pose
Please record the image capturing pose in register P[2].
Teach the Waypoint(s)
Waypoints are intermediate poses between the picking pose and placing pose. They are used to ensure that the robot doesn’t collide with the surrounding when moving between the picking and placing poses.
The waypoints in this example is saved in P[3]. You can add one or more waypoints.
Teach the Placing Pose
Please record the placing pose in register P[4].
Add Object Grasping and Releasing Logics
Add logic for controlling the tool action when picking or placing the object.