Basics of Building a Project
Software Running Process
The software will serially control the operations of robot according to the sequence of the modules. For some tasks outputting different results, you can connect different tasks to different output ports of the module for branch processing. A loop of a process can be realized through connecting the output port of a module with the input of a another module in front of it, as shown in the example
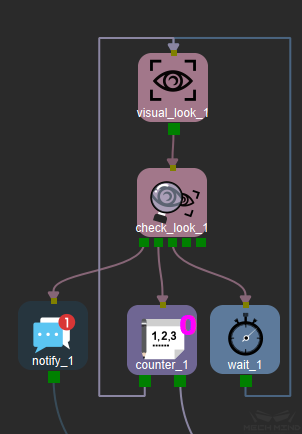
After running the visual_look module, a variety of visual results will appear. If there is a result, you can use it to pick. When there is no result, you can run the visual_look again to take a picture and check the result. If the visual processing is not completed, you can set the waiting time to check the visual results again later. Multiple output ports are used to connect different tasks to complete all process logic for all possibilities.
Multi-Level Mission Processing
If the program involves multiple tasks with different functions, you can use the “mission” module to manage multi-level task.As shown in the figure, the tasks of the same type are included in a “mission” module. Through its name and thumbnail on the bottom right you can understand the function of this “mission” intuitively and it makes modification as well as maintenance of function easier.

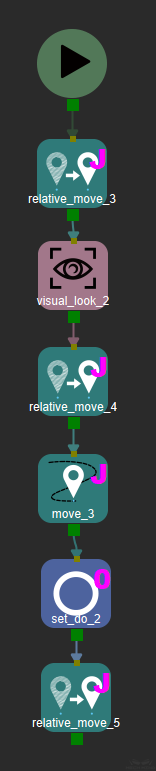
You can double-click the “mission” module to enter the sub-interface of this mission. As shown in the figure, each “mission” is equivalent to a subroutine, the execution logic is the same as in the main interface and using right-click + “Navigate Up” to return to the main interface to continue editing. When the process reaches the “mission” module, it starts to execute the “mission” process. After executing the last module in the “mission”, it jumps out and continues to execute the modules in main interface.
Task Type
When the software controls the movement of the robot, it will plan the trajectory according to movement tasks as well as non-movement tasks in advance and send motion commands to the robot to ensure the continuity of robot motion.
Movement Tasks
As shown in figure, the mobile task is used to control the robot to move according to the planned trajectory, motion type, speed, acceleration and other parameters in the software;
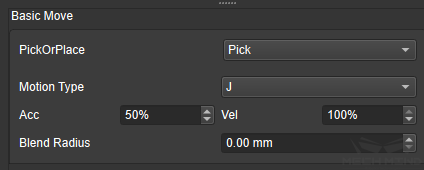
in addition to setting Pick-Hold-Place to pick or place object, you can also set whether or not to check for point cloud collisions, turn off object symmetry, make the software plan the robot’s optimal path and pick-place-pose, as shown in figure

Optional Checking for Point Cloud Collisions
After checked the Point Cloud Configuration as true, point cloud collisions in vision-related movements will be checked by default , those vision-related movements include visual_move and relative_move which depends on visual_move. You can also set check or not by yourself. For example, if the picked object will definitely collide with other objects during the extraction process and this type of collision is within the allowable range, you can set this option to “notCheck” to turn checking point cloud collision off, otherwise the software will choose not to grab this object so that the grabbing efficiency will be affected;
Optional Disable for Object Symmetry
The movement tasks with Obj Pose as
Move Target Type , such as the move
module and the modules of Pallet
that select the option ObjPose in Move
Target type, you can set whether or not to
turn off the symmetry of the object
according to the needs of the scene. For
example, some object has to be picked or
placed in a fixed pose , you can set
“disbaleObjSymm” to true to make the
software planed trajectory unique.
Non-movement Tasks
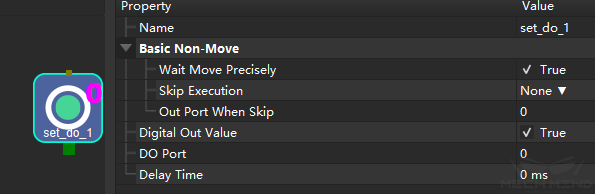
Non-movement tasks include tasks such as calling for visual services, setting and receiving status of external interface, waiting, checking visual results, and other non-controlling-movement tasks of robot; according to the application, it can be set to wait for robots to move in place before execution or to execute them in advance to optimize the beat, as shown in figure
Summary
Both movement and non-movement tasks can be set to wait or not. If the robot needs to run continuously and reduce pauses, you can set not to wait.
Application cases:
Powering the sucker up in advance during the robot’s movement can speed up the beat of picking;
Checking the external signals in advance during the robot’s movement, such as the signal that object is in place, can shorten the time of the movement and waiting for the signal, and optimize the overall operation cycle.