Add Pick Point by Adding a Pose
A pick point is the position on the object that can be grasped by the robot. The pick point is in the object reference frame, and the point’s position and orientation are relative to the object. The robot needs a picking pose (the TCP of the robot when picking) provided by Mech-Vision to actually perform the picking. The picking pose is transformed from the pick point on the target object. Therefore, pick points need to be added to point cloud models, so that Mech-Vision can generate pick points for target objects through matching, and further output picking poses for the robot.
Hint
The first pick point you add will be automatically set as the geometric center.
The geometric center in Mech-Vision’s algorithm is introduced to recognize nearly symmetrical (but not strictly speaking symmetrical) objects, and it does not indicate the “point at the center of a symmetrical object” in the general sense.
Every point cloud model should have one and only one geometric center, while they can have multiple pick points.
Please refer to Symmetry Settings in 3D Fine Matching for application instructions on the geometric center.
Select the point cloud model for adding pick point in the Model files list, and then click on
 on the toolbar to add a pose as the pick point.
Hint
By default, pick points added using
are placed at the geometric center of the point cloud model’s bounding box.Select this pick point in the Model files list to adjust it. There are two ways you can adjust a pick point:
By dragging the manipulator on the pick point:
while holding the Ctrl key, click and drag a manipulator to move the pick point along the axis.
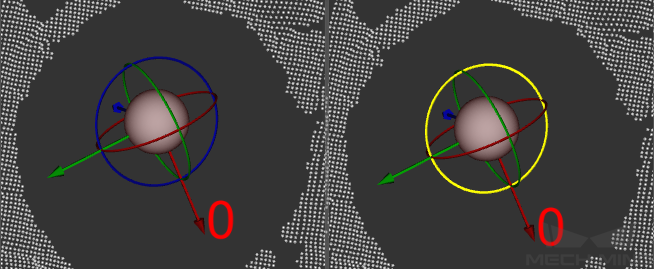
A manipulator is successfully selected if it turns yellow after being clicked. In the figure below, the left image is before selection and the right after.
By editing the pose data:
Pose editing can be done below the CAD files list. Please see Pose Editing Widget for instructions.
After you finish the configuration, click (Shortcut Ctrl + S), the point cloud model and pick point file will be saved to
Project Folder/resource/3d_matchingby default.Note
xxx.ply is the point cloud model file.
geo_center.json is the geometric center file of the point cloud model.
pick_points.json is the pick point file.
pick_points_labels.json is the label file of the pick point.