Plan History
You can check the detailed planning information and error description in the Plan History panel, which facilitates to debug the project.
This section covers the following topics:
Overview
Functions
When running a project in Mech-Viz, if a collision occurs, the point in the path is not achievable, or other error occurs, you can check the detailed cause in Plan History.
The overall plan history is laid out in a tree structure, which contains every node in the whole process of path planning. Comparing to the log, plan history contains more details of every node (especially when there is an error) in the process.
Some errors are serial errors, which means that if the error occurs at one of the nodes, the final plan result will fail. For example, a certain joint position is set wrong, and the robot cannot move to the planned point.
Some errors are parallel errors, which means that the final plan result will still succeed if the planning at one of the parallel nodes is successful. For example, when Mech-Viz attempts to pick with the pick points sent by Mech-Vision, if either one of the pick points works, the workobject can be picked successfully.
Hint
You can focus on the nodes where errors occur when running the project.
Interface Introduction
Click on the Plan History tab in the lower right corner of the interface to open the panel.

Hint
If you cannot see the tab, please go to View and check the box before Plan History.
The interface mainly includes 3 area: ① for displaying planning content, result (Success or PlanFail), and all failure reasons; ② includes options as display duration time of the collision, expired time, load plan history, clear, and help; right click in the plan history panel and the context menu ③ provides options as Search, Collapse All, and Delete Selected Plan History.

The functions of the options and buttons in the panel are as follows:
The options on the top:

Contents: displays the detailed time and description of the planning process; expand to show the planning contents at every level.
Results: shows whether the planning is successful or not. You may expand the failed planning content for detailed information.
Details: shows the Task used in the path and other details.
All failure reasons of children: shows the cause of failure when the planning fails.
The options and buttons at the bottom:

Collision Display Duration: the collision will be displayed in the simulation area for the time duration you set.
Expired: after the expired time, the previous plan history will be overwritten by the current plan history.
Load Plan History: loads the saved plan history.
Clear: clears the current plan history.
Help: click to read the introduction of the plan history.
The options in the context menu after right clicking:
Search: after selecting Search, two filter buttons will appear at the bottom of the panel. You can search for the planning item you need according to the plan result type and the collided link index.

Collapse All: collapses all sub-nodes in the panel and only displays the parent nodes.
Delete Selected Plan History: deletes the selected plan history item.
Visualize Collision
Display Collision While Planning
If you would like to visualize the collision, go to View and check the box before Display Collision While Planning.
Collision with the scene object
Click on the task in which the collision occurs, and the object in the scene will be highlighted.
Click on the object that collides with the robot, and the object will be highlighted.
Collision with the point cloud
Click on the task in which the collision occurs, and the object in the scene will be highlighted.
Click on the collision volume, and the point cloud which collides with the robot will be highlighted.
When the point cloud collides with the robot, if the collision is not recorded, only the other collided object will be highlighted.
Collision with the workobject
When the workobject collides with the robot, it will be highlighted.
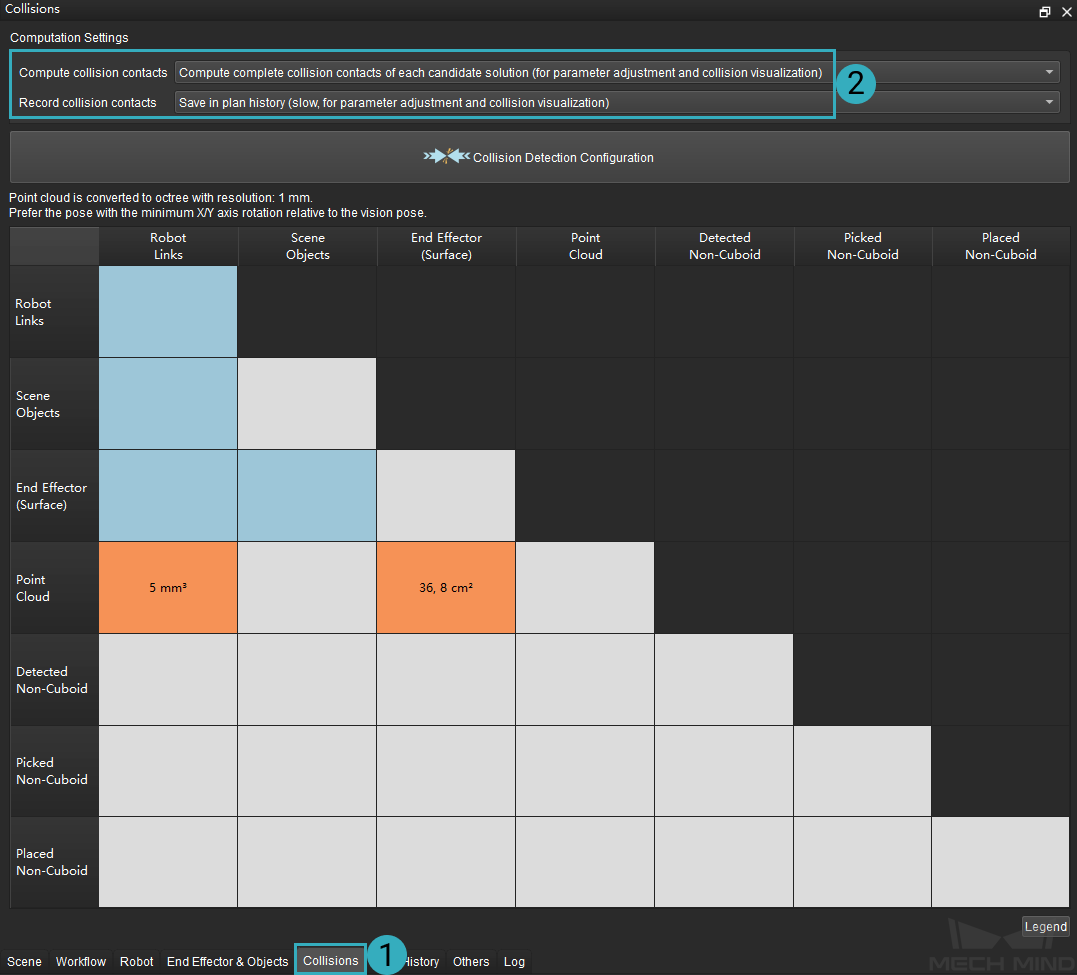
Compute collision contacts and record collision contacts
Compute collision contacts and Record collision contacts are used for visualization for collision. Please refer to Computation Settings for detailed information.
Details
Success
As shown in the figure below, there are failed sub-nodes (②) under the parent node (①). However, the planning at the last sub-node succeeded, and therefore the planning at its parent node succeeded as well.

Self Collision

Cause: As shown in the details, the wrist and forearm of the robot collided with each other. You can expand the parent node information and find that the collision occurred in the task Move_2.
Fix: Adjust the joint positions and pose of the tool to avoid self collision.
Collide with Scene Object
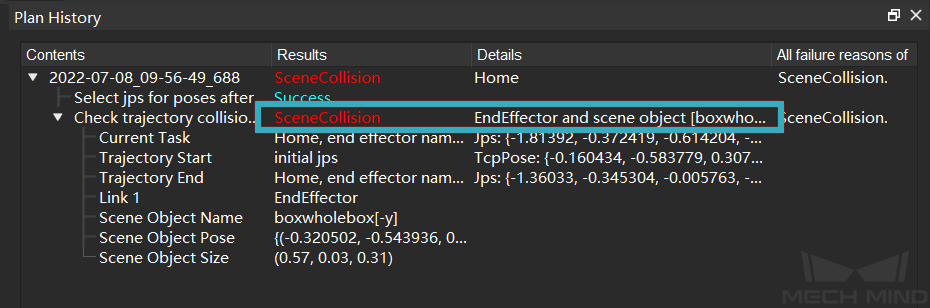
Cause: As shown in the details, the end effector collided with the scene objects. You can expand the parent node information to check the pose of the scene object.
Fix: Adjust the pose of the robot or the tool to avoid colliding with the scene object; or you can adjust the pose of the collision model.
Target Unreachable

Cause: The target in Move_1 is out of the reachable range of the robot.
Fix: Adjust the pose.
Cross the Collision Points Threshold

Cause: The number of the collision points are 37 when the picking pose as shown in the figure above is attempted. As it outnumbered the collision points threshold which is set to 37, a collision was detected.
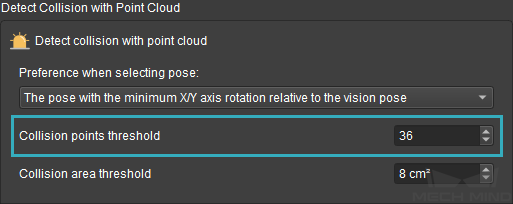
Fix: Check whether the real robot do collide with other objects first. Then go to the Collision panel and select Compute complete collision contacts of each candidate solution and Save in plan history. You can also adjust the collision points threshold, pick point, the pose of TCP and end effector model, etc. to avoid the collision.
Cross the Collision Area Threshold

Cause: The collision area is 8.00000006 cm² when the picking pose as shown in the figure above is attempted. As it outnumbered the collision area threshold which is set to 8 cm², a collision was detected.
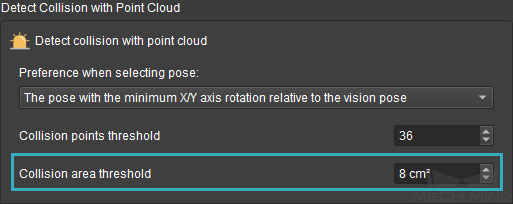
Fix: Check whether the real robot do collide with other objects first. Then go to the Collision panel and select Compute complete collision contacts of each candidate solution and Save in plan history. You can also adjust the collision points threshold, pick point, the pose of TCP and end effector model, etc. to avoid the collision.