Robot
The first thing you might do when creating a project in Mech-Viz is importing a robot model. The Robot panel is mainly used for robot configuration and simulation.
This section covers the following topics:
Click on the Robot tab in the lower right corner to open the robot panel.
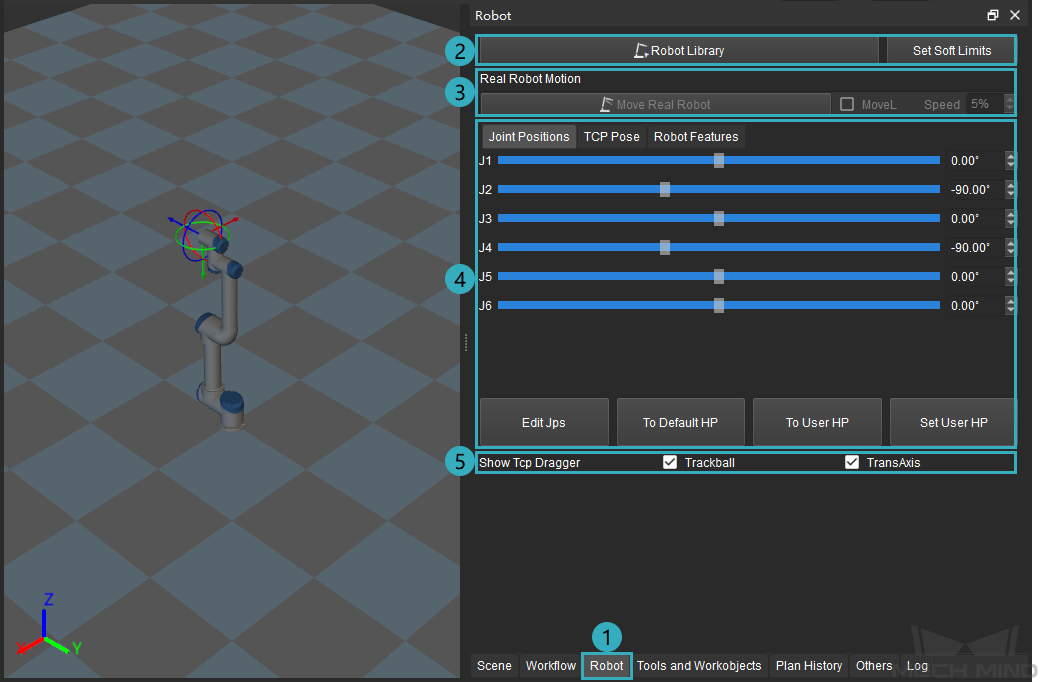
You can select a robot model and set soft limits in ②, configure real robot motion in ③, configure joint positions and TCP and check robot features in ④, and configure whether to display the TCP dragger in ⑤.
Configure the Robot
Click on Robot Library and select the robot model you need, then it will appear in the 3D simulation area.

If you cannot find the robot you need in the Robot Library, please refer to Robot Model Package or click on Online robot gallery in the lower left corner to check whether the robot model is available.
If there is an available robot model package of the type you need, you can download it by clicking on the type of the robot you need. Then you can import the robot model package to Mech-Viz by either of the following methods.
Select the MROB file and drag it to the interface of Mech-Viz.
Go to , select the downloaded MROB file and click on Open.
A message saying Robot import finished indicates that the robot model package has been imported uccessfully.
If there is not an available robot model, you will need to create a robot model yourself and then import it to Mech-Viz.
The descriptions of the options in the Robot Library are as follows.
Search Box: enter the brand and model of the robot to search the robot model you need. Click on
 to clear the content in the search box. You can also set the desired Brand, Axes, Payload, and Reach to filter the robot.
Search Result: the robot model will appear on the right if there is any matching result. Hover the cursor over the robot and a Select button will appear, click on the button and then the selected robot model will appear in the 3D simulation area.
Current Robot: displays the robot model which is used in the 3D simulation area at present.
Hint
Please note that the keywords in the search box are not case sensitive. It is recommended to enter the brand name or model name independently to search the robot. Please use a underscore to connect the words when entering the brand name and model name together (e.g. abb_crb15000), for a space may lead to no result.
Soft limits are the movement limits of each axis set in the software to avoid the risks of collision. Click on Set Soft Limits and a window to configure the limits will appear, as shown below.
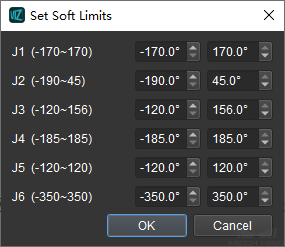
After the soft limits are set, the joint positions in relevant Tasks (e.g. move) should be selected from the range set here.
Attention
The soft limits set here will only take effect when Mech-Viz is used, and will not affect the soft limits set on the teach pendant.
Real Robot Motion
If a real robot has been connected, click on Move Real Robot will move the real robot to make its JPs the same as that of the simulated robot. You can select MoveL to make the robot move linearly and set the speed for the move.

Attention
Please click on the Sync Robot on the toolbar to sychronize the connected real robot.
You can configure the Joint Positions and TCP to adjust the pose of any robot.
Joint Positions
Click on the Joint Positions tab to view the JPs of each axis of the simulated robot. You can drag the slider or enter a value in the box on the right to adjust the JPs, and the robot in the 3D simulation area will move according to the adjustment in real time.

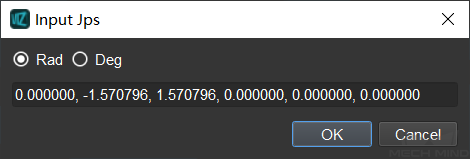
Edit JPs: enter the value of JPs in radians or degrees in the pop up window.
Hint
1°=π/180, 1 rad=(180/π)°
To Default HP: click to bring the robot back to the home position specified in the robot configuration file (i.e. the default home position in Mech-Viz).
To User HP: click to bring the robot back to the home position defined by the user.
Set User HP: drag the slider or enter a value of JPs in the Real Robot Motion panel to adjust the robot to a pose that you would like to set as the home position, and then click on Set User HP to set it as the home position.
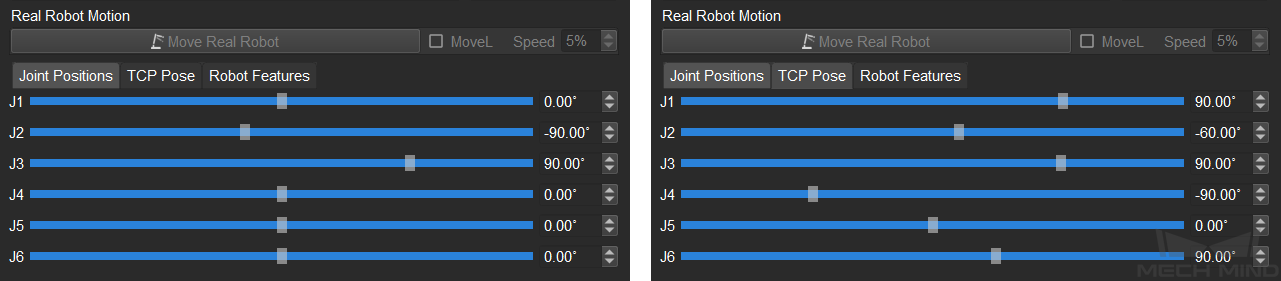
The figure below shows the JPs before and after being adjusted.
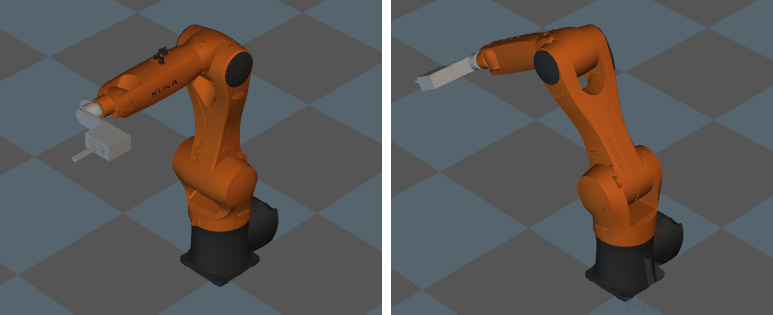
The figure below shows the corresponding robot pose before and after the adjustment.
TCP
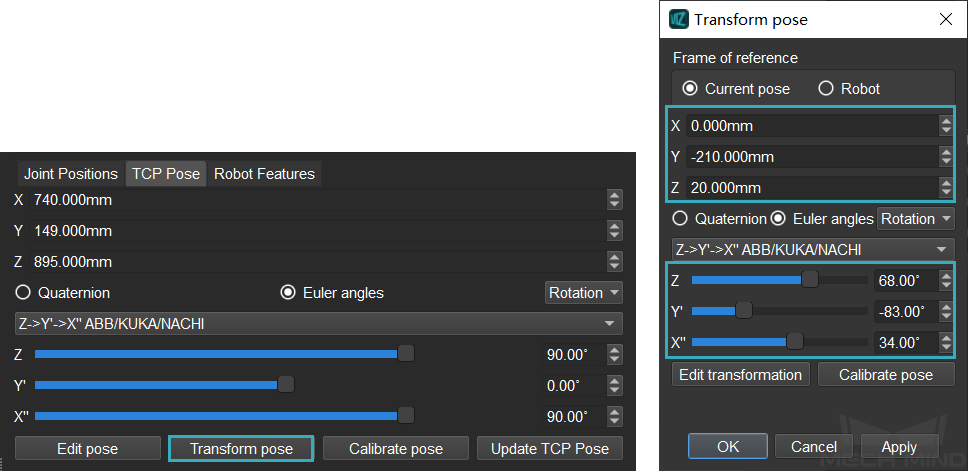
Click on the TCP tab to view the current TCP of the simulated robot. You can adjust the TCP by changing values in quaternions or Euler angles in the panel, or click on Edit pose and enter the pose directly.
The figure below shows the TCP before and after being adjusted.

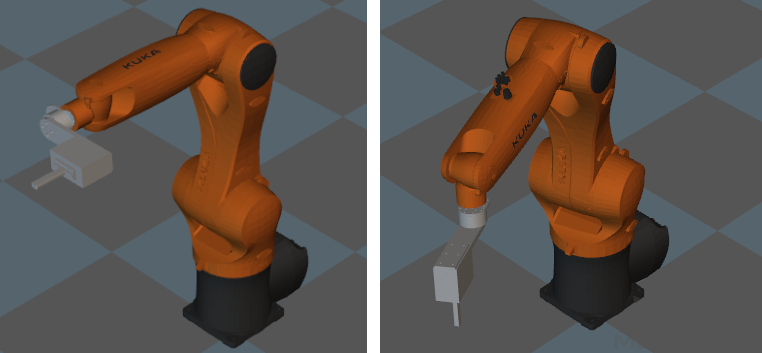
The figure below shows the corresponding TCP before and after the adjustment.
Transform pose: transform current pose to a new pose. Select a frame of reference first, and then edit the transformation with the options in the window. The robot will move according to the settings in real time. Click on Apply and then OK to save the settings. If you do not want to apply the transformation, click on Cancel to exit, and the robot will move back to the original pose.
The figure below shows the TCP before and after being adjusted.
The figure below shows the corresponding TCP before and after the adjustment.
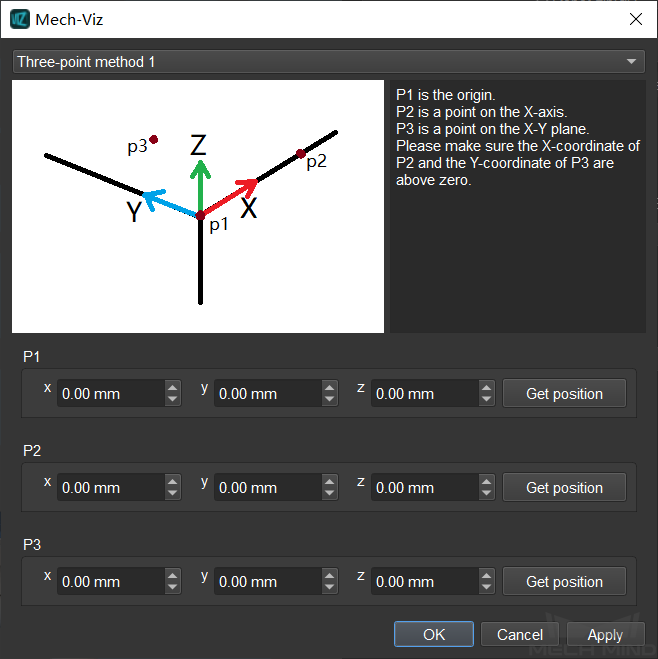
Calibrate pose: set the coordinate of P1, P2, and P3 according to the instruction, and then calibrate the TCP with three-point method.
Update TCP: click to obtain the TCP from a real robot when the robot is connected.
Robot Features
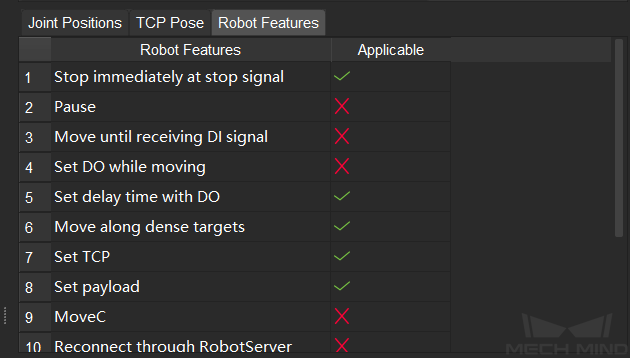
Click on Robot Features tab to view whether the robot features are applicable in Mech-Viz.
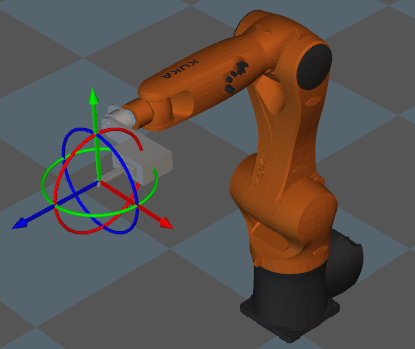
Show TCP Dragger
This option is used to hide or display the TCP dragger at the end of the robot. Uncheck the box before Trackball and TransAxis to hide the dragger.
Hint
Press and hold the Ctrl key and you can drag the dragger to adjust the TCP more intuitively.