Configure the Workflow
Workflow is the core of a Mech-Viz project. It is where you configure what the robot does at what point.
In the Workflow tab, you’ll add Tasks to the workflow, connect the Tasks , and adjust the parameters of Tasks to achieve the desired actions.
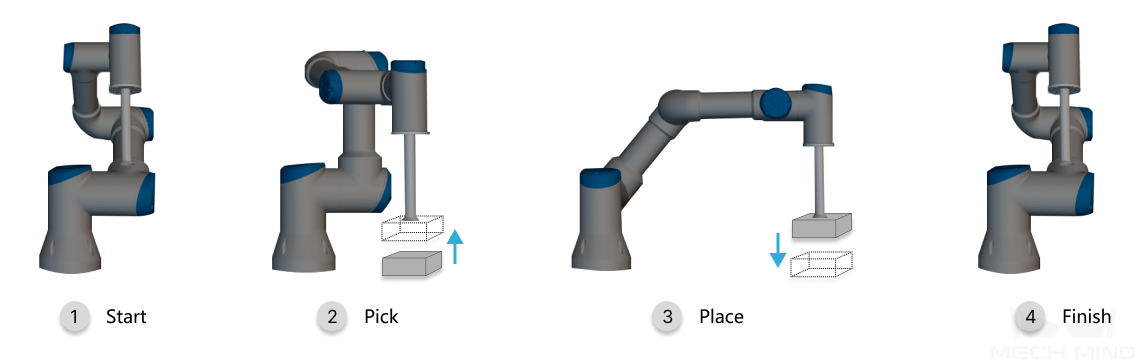
In the example project, you will create the following simple pick-and-place workflow.
Build the Workflow
Set Home Position
The home position is where the robot starts to move and where it will return at the end. The home position should be relatively removed from other objects, and the robot shouldn’t block the camera when it’s at the home position.
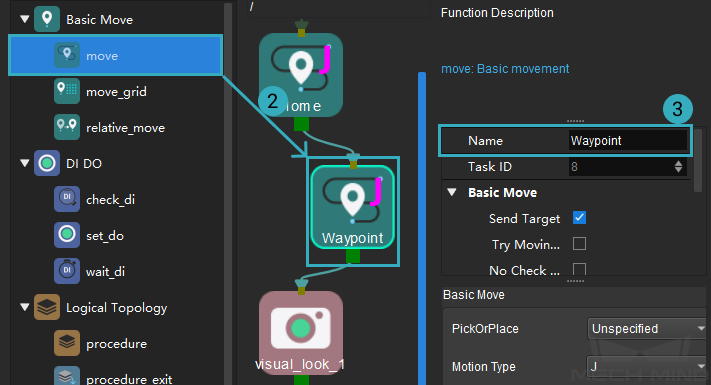
The move Task can be used to define a target pose on the robot’s path and set how the robot moves to this pose.
Note
With the real robot connected, you can sync the pose of the real robot to the simulated robot in Mech-Viz.
In Mech-Viz, click on Sync Robot in the toolbar. The simulated robot will move in sync with the real robot.
Move the real robot to the desired home position. Check the simulated robot to make sure the pose of the real robot has been synced.
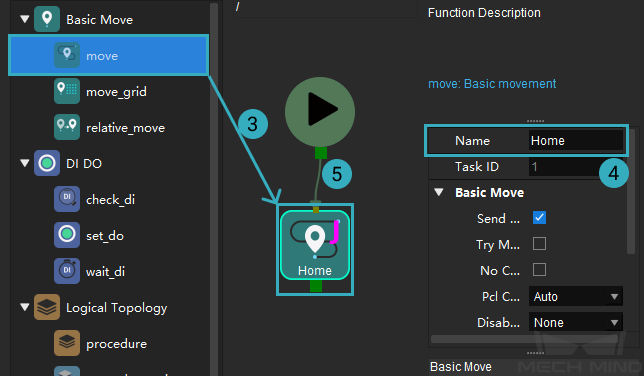
From the Basic Move category in the Task library, drag the move Task to the programming area. The current pose of the simulated robot will be automatically set as the target.
Note
If not connected to a real robot, you can still adjust the target pose of the move Task in the parameter panel. The simulated robot will display the adjusted pose simultaneously.
In the upper part of the parameter panel, rename the Task to Home in the Name field.
Connect the start icon to Home.
Hint
A connection is added by holding and draging an exit port onto an entry port.
Set Picking Target
Mech-Viz receives the workobject pose from Mech-Vision, and you’d want the robot to move according to this pose. This can be accomplished with the visual_look and visual_move Tasks.
visual_look Task obtains the workobject pose from the corresponding Mech-Vision project.
visual_move Task moves the robot according to the received workobject pose.
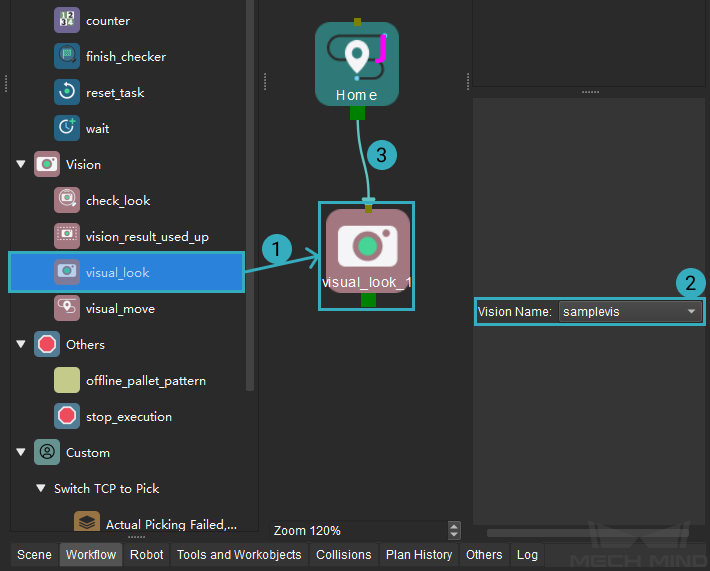
From the Vision category in the Task library, drag the visual_look Task to the programming area. This Task is automatically named visual_look_1.
In the lower part of the parameter panel, select samplevis (the example Mech-Vision project) from the drop-down menu of Vision Name.
This will enable the Task to obtain workobject poses from the Mech-Vision project named samplevis.
Connect Home to visual_look_1.
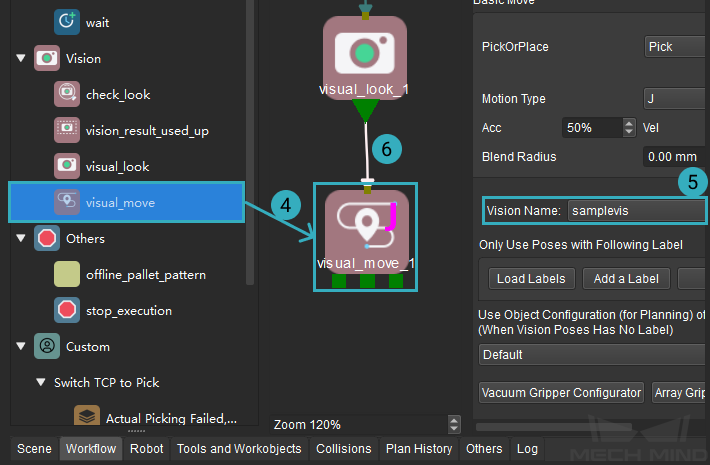
From the Vision category in the Task library, drag the visual_move Task to the programming area. This Task is automatically named visual_move_1.
In the lower part of the parameter panel, select samplevis from the drop-down menu of Vision Name.
Connect the exit port of visual_look_1 to the entry port of visual_move_1.
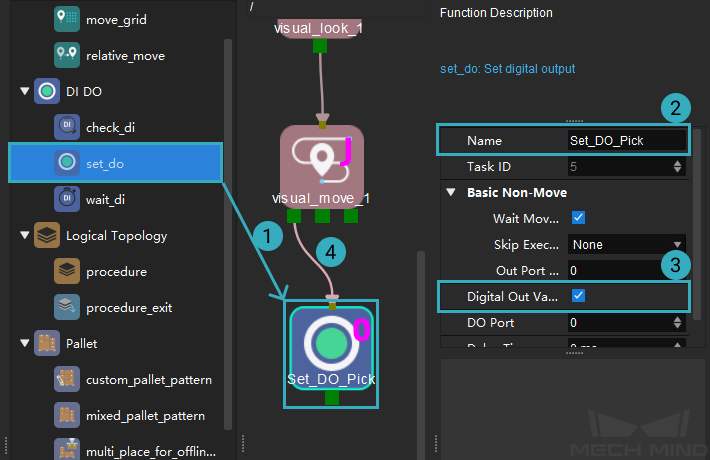
Set DO for Picking
Once the robot reaches the picking target, the robot has to operate its tool to pick up the workobject. This is achieved with the set_do Task, which instructs the robot to operate its tool.
From the DI DO category in the Task library, drag the set_do Task to the programming area.
In the parameter panel, rename the Task to Set_DO_Pick in the Name field.
Check the checkbox of Digital Out Value, which tells the robot to start generating vacuum.
Connect the left-most exit port of visual_move_1 to Set_DO_Pick.
Set Placing Target
After picking up the workobject, the robot should move to a predetermined position to drop off the workobject. Once again, the move Task can be used to define the placing target.
Move the real robot to the desired placing target. Check the simulated robot to make sure the pose of the real robot has been synced.
From the Basic Move category in the Task library, drag the move Task to the programming area. This Task is automatically named move_1.
Connect Set_DO_Pick to move_1.
Set DO for Placing
Once the robot reaches the placing target, the robot has to once again operate its tool to drop off the workobject, which is achieved with the set_do Task.
From the DI DO category in the Task library, drag the set_do Task to the programming area.
In the parameter panel, rename the Task to Set_DO_Place in the Name field.
Uncheck the checkbox of Digital Out Value, which tells the robot to release.
Connect move_1 to Set_DO_Place.

Return to Home
After the robot drops off the workobject, the next step is to return to its home position. As you already set the home position in Home, now you just need to copy and paste this Task.
Right-click on Home and select Copy, or left-click on Home and then use the shortcut Ctrl + C.
Navigate down to the end of the workflow. Right-click on the empty area and select Paste, or use the shortcut Ctrl + V.
This pasted Task is automatically named move_2. Rename it to Return_Home in the Name field in the parameter panel.
Connect Set_DO_Place to Return_Home.
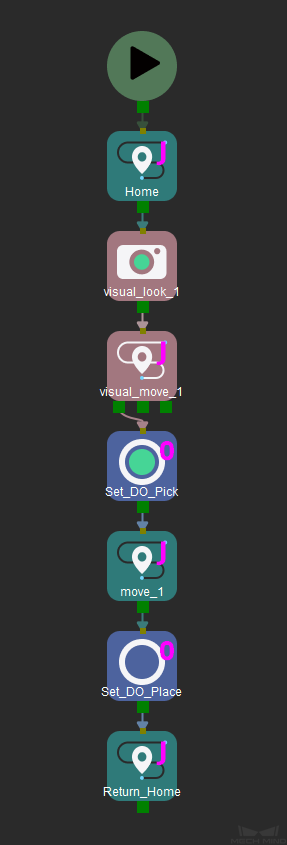
The entire workflow now looks like this:
Hint
Right-click in the programming area and select Format to automatically align the Tasks and adjust their spacing.
Click on Simulate in the toolbar, the simulated robot will move according to the workflow.
You can see that although we built the workflow according to the correct pick-and-place logic, there are several problems:
The robot motion from the home position to the picking target is too large.
Moving right after setting DO signals doesn’t provide enough time for the robot to pick/place.
It would be safer if the robot moves vertically down and up right before and after it performs picking and placing.
Now let’s improve the workflow to resolve the problems.
Improve the Workflow
Add Waypoint
Add a waypoint between the home position and the picking target to break down the motion into two parts.
Move the real robot to the desired waypoint. Check the simulated robot to make sure the pose of the real robot has been synced.
Note
The robot should not block the view of the camera when its at this waypoint. You can capture an image to check it the robot is in the way.
From the Basic Move category in the Task library, drag the move Task to the programming area.
In the upper part of the parameter panel, rename the Task to Waypoint in the Name field.
Connect Home to Waypoint and Waypoint to visual_look_1.
Add Relative Targets for Picking
The more practical picking motion should be: the tool moves vertically down to the picking target, and then moves vertically up after it picks up the workobject.
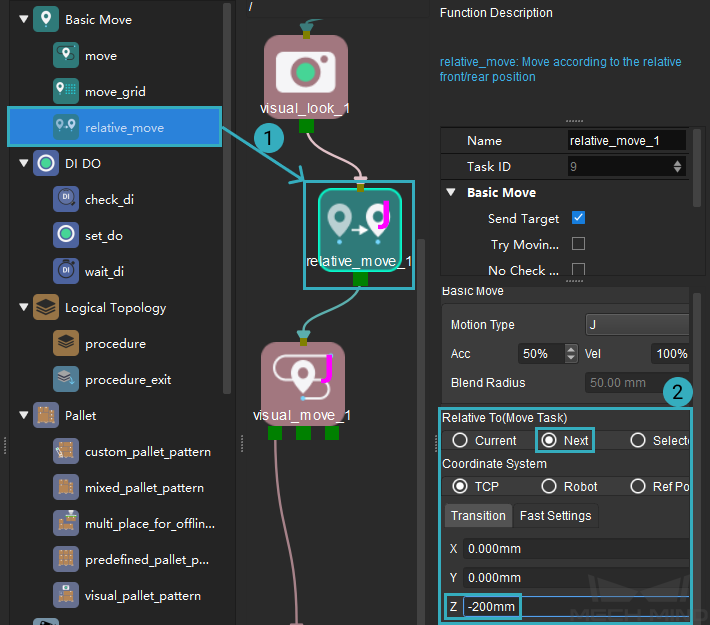
The relative_move Task can be used to add targets relative to other targets.
Approaching the Picking Target
Move the robot to 200 mm above the picking target first, and then move it to the picking target from there.
From the Basic Move category in the Task library, drag the relative_move Task to the programming area. The Task is automatically named relative_move_1.
In the parameter panel, set the following fields:
Relative To(move-type Task): select Next, which means that the target defined here is relative to the next target in the Workflow (i.e., the target of visual_move_1).
Transition tab: set the value of Z to -200.
Connect visual_look_1 to relative_move_1 and relative_move_1 to visual_look_1.
Departing the Picking Target
Move the robot to 200 mm above the picking target after it picks up the workobject.
From the Basic Move category in the Task library, drag the relative_move Task to the programming area. The Task is automatically named relative_move_2.
In the parameter panel, set the following fields:
Relative To(move-type Task): select Current, which means that the target defined here is relative to the previous target in the Workflow (i.e., the target of visual_move_1).
Transition tab: set the value of Z to -200.
Connect Set_DO_Pick to relative_move_2 and relative_move_2 to move_1.

Add Relative Targets for Placing
Similarly, the more practical placing motion should be: the tool moves vertically down to the placing target, and then moves vertically up after it drops off the workobject.
Approaching the Placing Target
Move the robot to 200 mm above the placing target first, and then move it to the placing target from there.
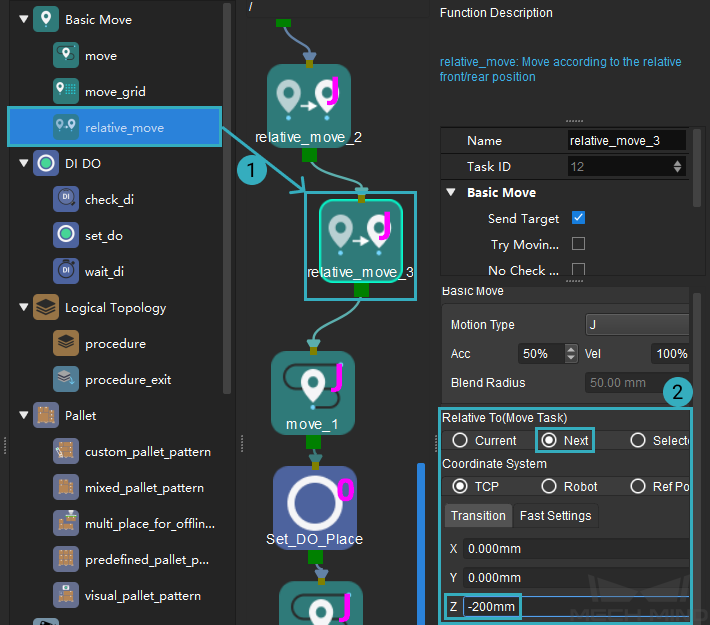
From the Basic Move category in the Task library, drag the relative_move Task to the programming area. The Task is automatically named relative_move_3.
In the parameter panel, set the following fields:
Relative To(move-type Task): select Next, which means that the target defined here is relative to the next target in the Workflow (i.e., the target of move_1).
Transition tab: set the value of Z to -200.
Connect relative_move_2 to relative_move_3 and relative_move_3 to move_1.
Departing the Placing Target
Move the robot to 200 mm above the placing target after it drops off the workobject.
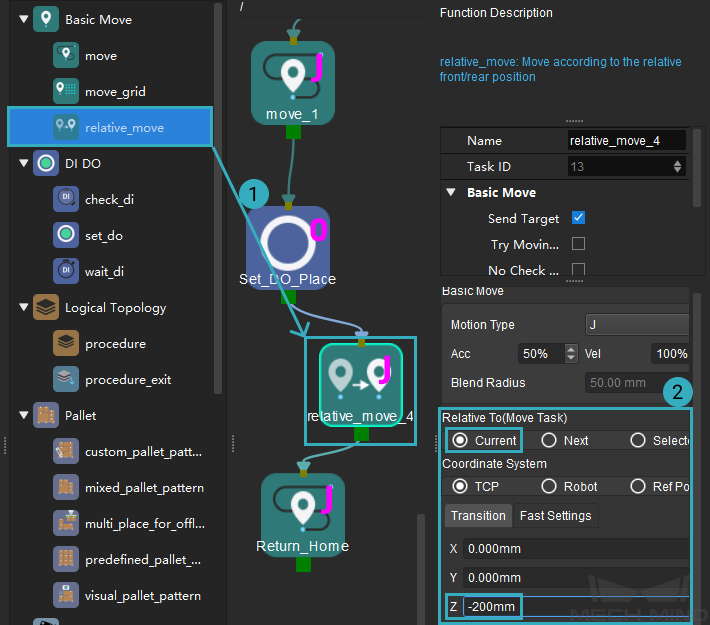
From the Basic Move category in the Task library, drag the relative_move Task to the programming area. The Task is automatically named relative_move_4.
In the parameter panel, set the following fields:
Relative To(move-type Task): select Current, which means that the target defined here is relative to the previous target in the Workflow (i.e., the target of move_1).
Transition tab: set the value of Z to -200.
Connect Set_DO_Place to relative_move_4 and relative_move_4 to Return_Home.
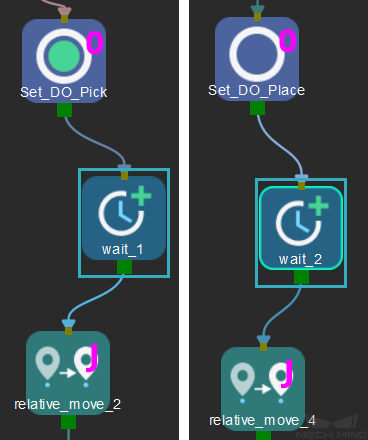
Wait after Setting DO Signals
Make the robot wait a little while after the DO signal is set to ensure that the picking and releasing actions are fully completed. This can be accomplished with the wait Task.
From the Tools category in the Task library, drag the wait Task to the programming area. The Task is automatically named wait_1.
Connect Set_DO_Pick to wait_1 and wait_1 to relative_move_2.
From the Tools category in the Task library, drag the wait Task to the programming area. The Task is automatically named wait_2.
Connect Set_DO_Place to wait_2 and wait_2 to relative_move_4.
The complete workflow should look like this:
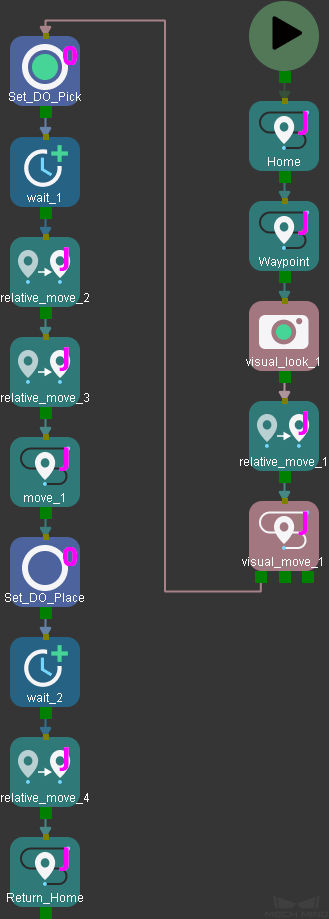
Click on Simulate in the toolbar, the simulated robot will move according to the workflow.
You can see that the robot path is more smooth and safe now.