IPC Setup
The IPC supplied by Mech-Mind provides the standard operation environment for Mech-Mind software and therefore can maximize the function and performance of the software. The standard IPC provided by Mech-Mind is already fully set up. Therefore, it is recommended to use the standard IPC provided by Mech-Mind.
Besides, you are free to use your own computer or laptop (“non-standard IPC” for short) as the IPC for installing and running Mech-Mind software. Mech-Mind does not guarantee that the function and performance of a non-standard IPC are the same as those of a standard IPC.
To ensure normal operation of Mech-Mind software on a non-standard IPC, please make sure that the hardware configuration of the non-standard IPC is not lower than that of the standard IPC of the matching configuration, and that it meets the following requirements:
Check Graphics Card Driver
To carry out deep learning training and inference, Mech-DLK and Mech-Vision rely on NVIDIA’s high hash rate and require that the GPU driver meets the version requirement.
Mech-Vision 1.7.0 and Mech-DLK 2.3 require NVIDIA 472.50 or newer versions to operate.
Mech-Vision 1.6.1 and 1.6.2 require NVIDIA 471.68 or newer versions to operate.
Check Driver’s Version
Follow the steps below to check the driver’s version.
Type NVIDIA control panel in the search box of the taskbar and open NVIDIA control panel from the search results.
Check the graphics card type and driver version on the homepage.
If the driver version is lower than 472.50, please update graphics card driver.
If the driver version is higher than 472.50, no update is required.
Update Graphics Card Driver
Follow the steps below to update the graphics card driver:
Choose the IPC’s graphics series in the Product Series drop-down menu, and choose the graphics type in the Product drop-down menu. Make sure the other options are correct and then click Search.
Click Download on the page.
Click Download again on the new page to start downloading the driver.
When the download is completed, double-click the EXE file to install the driver.
Hint
When the new driver is successfully installed, Please restart Mech-Vision to ensure normal operation.
Check CPU
Mech-Vision and Mech-Viz require that the CPU supports AVX2 instruction set.
Set up Software License
Mech-Mind provides two types of license: trial license and full license.
If you need to obtain a trial license, please refer to Trial License.
If you need to obtain a full license, please refer to Full License.
Hint
If you are using a full license for the first time, please plug the license dongle you received into the USB port on the IPC first, and then install Mech-Mind software of version 1.6.0 or above.
Set IPC Region and Language
The region and language of the IPC should match. Otherwise, garbled texts will appear in the log of Mech-Vision, Mech-Viz, or Mech-Center.
Set IPC Region
Please follow the steps below to set the IPC region:
Go to . In Country or region, choose the country or region where you are located.
Set IPC Language
The IPC language should be set according to the IPC region. Follow the steps below to complete the setting:
Go to . Choose the language in Windows display language. If your language is not listed in Windows display language, proceed to the next step.
In Preferred languages, click Add a preferred language to open the window Choose a language to install.
Type a language or country/region name in the search box, select the language that you wish to install, and click Next to open the window Install language features.
Check the option Set as my Windows display language, and then click Install to install the language and set it as the display language for your IPC.
Hint
If the option Set as my Windows display language was not checked while you installed the language, please set the display language according to step 1.
Turn off Windows Defender Firewall
Mech-Mind software communicate with external devices connected to the IPC (such as Mech-Eye Industrial 3D Camera. robot controller, and PLC) through Ethernet ports, whereas Windows Defender Firewall might block such communication. Therefore, it is necessary to turn off Windows Defender Firewall’s protection for these Ethernet ports.
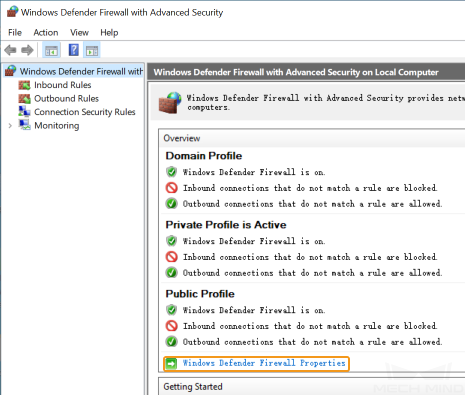
Go to .
In the pop-up window, click Windows Defender Firewall Properties.
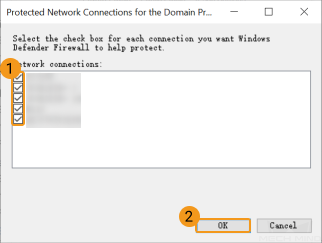
Under the Domain Profile tab, click Customize… next to Protected network connections.
In the pop-up window, uncheck all the Ethernet ports connected to devices that communicate with Mech-Mind software. Then, click OK.
Repeat steps 3 and 4 for the Private Profile and Public Profile tabs.
Prevent Windows from Updating
In order to complete updates, Windows might force the IPC to shut down/restart, which obstructs normal production. Therefore, it is highly recommended to prevent Windows from updating to avoid unexpected downtime.
Note
If you choose to keep Windows Update enabled, please make sure that the shutdown/restart occurs during planned downtime. For example, you can set active hours for Windows Update.
Windows Update Medic Service fixes problems in Windows Update and ensures that your computer continues to receive updates. That is, even if you have disabled Windows Update, Windows Update Medic Service will eventually re-enable it. Therefore, it is necessary to disable Windows Update Medic Service as well.
Disable Windows Update
Follow the steps below to disable Windows Update:
Search for Services in the search box in the taskbar, and open Services from the search results.
Scroll down to find Windows Update. Double-click it to open Windows Update Properties.
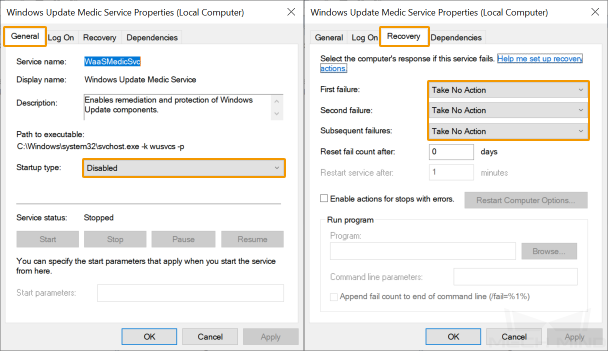
Click Stop to stop the service first. In the drop-down menu of Startup type, select Disabled, and then click Apply.
Click the Recovery tab, and change the response for all failures to Take No Action. Then, click OK.

Disable Windows Update Medic Service
Follow the steps below to disable Windows Update Medic Service:
Search for Registry Editor in the search box in the taskbar, and open Registry Editor from the search results.
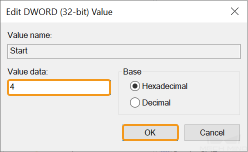
#. In the left pane, navigate to HKEY_LOCAL_MACHINE\SYSTEM\CurrentControlSet\Services\WaaSMedicSvc. Then in the right pane, right-click Start and select Modify.
In the pop-up window, change Value data to 4, and then click OK.
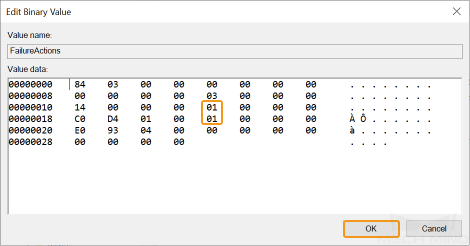
Right-click FailureActions and select Modify.
In the pop-up window, change the values in the fifth column from the left for 00000010 and 00000018 to 01. Then, click OK.
Check if the changes are effective:
Search for Services in the search box in the taskbar, and open Services from the search results.
Find Windows Update Medic Service and double-click to open it. Now the Startup type in the General tab should be Disabled, and all responses for failures in the Recovery tab should be Take No Action.
Check Python Version
Hint
Starting from version 1.6.0, the Python 3.6.5 environment is integrated into Mech-Center. This section only applies to users of version 1.5.3 or below.
Mech-Center requires Python 3.6.5 to function. This version of Python is automatically installed by running Mech-Center’s installation package. When installing Python, make sure to check the Add Python 3.6 to PATH option. You can check the Python version in the Control Panel: .
If you have multiple versions of Python installed, Mech-Center may not be able to call the correct version and thus may not function normally. If not needed, extra versions of Python should be uninstalled.
Attention
Use the corresponding Python executable installer of each version to uninstall to ensures that all related files are removed.