JAKA Example Program
This section introduces two simple example programs that are used to obtain the vision result and move the robot.
Introduction
Please make sure that you have loaded the example programs.
The following example programs are as follows:
Use Mech-Vision in Detection and Obtain the Vision Result
In the Programming control window, drag the instructions in sequence as shown below, or open the loaded mm_vis_sample program.
Program Description
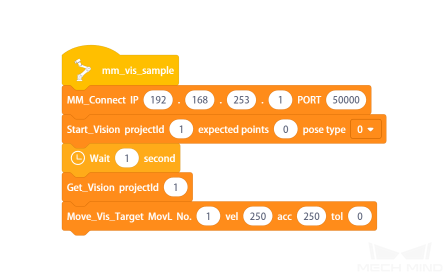
The program name is mm_vis_sample.
Connect the robot with the IPC. You should set the IP address and port number of the IPC. Please refer to MM_Connect for details.
Start Mech-Vision project. You should set the project ID, number of poses you expect to receive, and the type of the pose that robot sends to Mech-Vision. Please refer to Start_Vision for details.
Wait for 1 second to prevent the robot from shaking and therefore the image-capturing process will not be affected.
Receive the vision result from the Mech-Vision project. You should set the project ID. Please refer to Get_Vision for details.
Move the robot to the vision point received from Mech-Vision. You can set a waypoint to which the robot should move, the velocity, acceleration during moving, and the tolerance of the waypoint. Please refer to Move_Vis_Target for details.
Use Mech-Viz to Plan the Path
In the Programming control window, drag the instructions in sequence as shown below, or open the loaded mm_viz_sample program.
Program Description
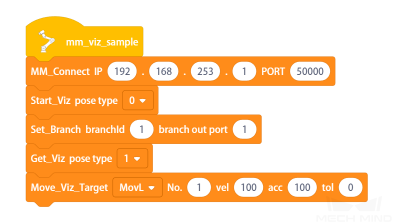
The program name is mm_viz_sample.
Connect the robot with the IPC. You should set the IP address and port number of the IPC. Please refer to MM_Connect for details.
Start the Mech-Viz project. You should set the type of pose that the robot sends to Mech-Viz. Please refer to Start_Viz for details.
Select the branch along which the Mech-Viz project should proceed. You should set the Step ID of the Branch by Msg Step and the exit port number. Please refer to Set_Branch for details.
Receive the data from Mech-Viz. You should set the type of the returned waypoint pose. Please refer to Get_Viz for details.
Move the robot to the waypoint in the path planned by Mech-Viz. You can set a waypoint to which the robot should move, the velocity, acceleration during moving, and the end point error of the waypoint. Please refer to Move_Viz_Target for details.
Obtain the Planned Path from Mech-Vision “Path Planning” Step
In the Programming control window, drag the instructions in sequence as shown below, or open the loaded mm_vispth_sample program.
Program Description
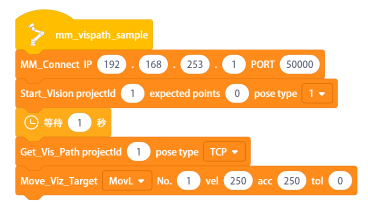
The program name is mm_vispath_sample.
Connect the robot with the IPC. You should set the IP address and port number of the IPC. Please refer to MM_Connect for details.
Start Mech-Vision project. You should set the project ID, number of poses you expect to receive, and the type of the pose that robot sends to Mech-Vision. Please refer to Start_Vision for details.
Wait for 1 second to prevent the robot from shaking and therefore the image-capturing process will not be affected.
Receive the path planned by the “Path Planning” Step from the Mech-Vision project. You should set the project ID and the type of the returned waypoint pose. Please refer to Get_Vis_Path for details.
Move the robot to the waypoint received from Mech-Vision. You can set a waypoint to which the robot should move, the velocity, acceleration during moving, and the end point error of the waypoint. Please refer to Move_Vis_Target for details.