Obtain the Pose of the Plane Where the Object Is Placed
In the logistics scenario, the Dynamic Place parameter group is added to prevent the parcels and conveyor belt from being damaged. With Dynamic Place, the height of the robot end tool can be determined according to the height of the target object, and therefore the following two situations can be avoided:
If the robot drops the object at a very high height, the object may roll on the fast-running conveyor belt.
If the robot places the object at a very low height, the object may collide with the conveyor belt, and both the object and the conveyor belt may be damaged.
Usually, the object to be picked is placed on a plane, and the pose of the plane should be obtained to calculate the height of the object. Therefore, before using Dynamic Place, you should obtain the pose of the plane on which the object to be picked is placed.
Obtain the Pose of the Plane Where the Object to Be Picked Is Placed
To obtain the pose of the plane where the object to be picked is placed, you should build an individual project and adjust the parameters.
Create the Project
Create a new Mech-Vision project or open an existing project.
Select to create a new project.
Select to open an existing logistics project.
Add and connect Steps as shown below:
Capture Images from Camera → From Depth Map to Point Cloud → Calc Normals of Point Cloud and Filter It → Calc Poses and Dimensions from Planar Point Clouds → Save Results to File
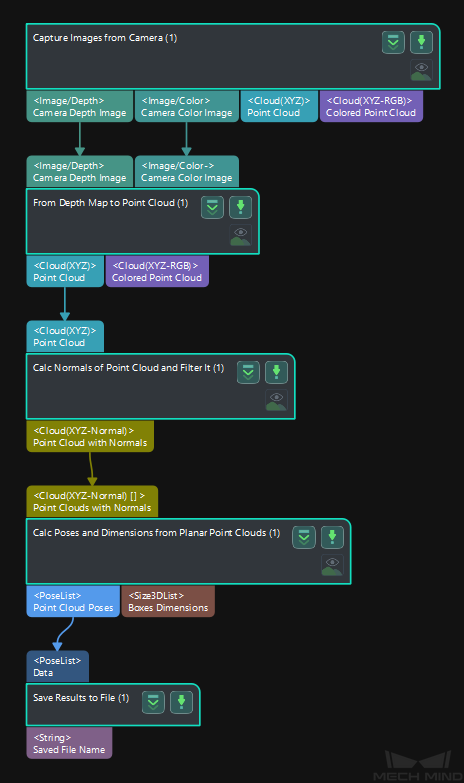
Capture Images from Camera: Click Select camera, and select a camera to connect.
Hint
Please ensure there is no object on the plane and the 2D image and depth map of the plane obtained from the camera are normal.
From Depth Map to Point Cloud: Click Set 2D ROI to set a region of interest.
Hint
When you set a region of interest, please select the area in the middle of the camera’s field of view.
Calc Poses and Dimensions from Planar Point Clouds: Enable Visualize Outputs in the Execution Flags, and check the generated point cloud poses.
Save Results to File: Enter a File Name Prefix in the File Name Settings.
Generate the Pose of the Plane Where the Object to Be Picked Is Placed
After building the project, you can run the project to obtain the pose of the plane where the object to be picked is placed.
Click Run to run the project.
Check the visualized outputs from the Calc Poses and Dimensions from Planar Point Clouds Step.
If the pose is not at the center of the point cloud, you will need to re-capture an image and obtain the planar point cloud again.
If the pose is at the center of the point cloud, please proceed to the next step.
The pose file will be automatically stored in the project folder, and the folder will be opened automatically after the pose file is generated.
Read the Pose of the Plane Where the Object to Be Picked Is Placed
Use the Read Poses from File Step to read the generated pose.
Hint
If you need to use the pose of the plane in the logistics project containing the Predict Pick Points V2 Step, please delete the above Steps except Capture Images from Camera in this individual project.