Kawasaki Calibration Program
This topic introduces the process of automatic hand-eye calibration when a Kawasaki robot communicates with Mech-Mind Vision System through Standard Interface.
The process consists of the following steps:
Before proceeding, please make sure that:
You have set up Standard Interface communication with the robot.
You are familiar with the contents in Hand-Eye Calibration Guide.
Select the Calibration Program
Switch the robot to teach mode, press on the Program area, and select Directory.

Note
To switch the robot to teach mode, turn the Teach/Repeat switch on the controller to TEACH, and the teach lock switch on the teach pendant to ON.
Select calibrate from the list, and press ENTER to confirm.

If the calibration program is selected successfully, the screen shown below will appear.

Teach the Calibration Start Point
Manually move the robot to the start point for the calibration.
Press on the STEP area, enter 13 with the number key and then press ENTER to confirm.

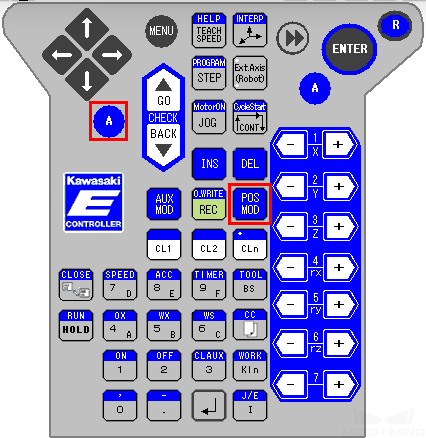
Press down the A key and POS MOD key at the same time.
Press on Yes to modify the position in STEP 13, and the pose at the start point will be stored in the variable vis_calib_start. The point can be used directly as the start point in the future.

Run the Calibration Program
Switch the robot to repeat mode, and press on the white button below Aux., and change the drop-down options to STEP CONT and REPEAT ONCE.

Press on RPT. SPD to adjust the repeat speed to 10%.

Note
To switch the robot to repeat mode, turn the Teach/Repeat switch on the controller to REPEAT, and the teach lock switch on the teach pendant to OFF.
Press on the STEP area, enter 1 with the number key, and then press ENTER to confirm.

Press on MOTOR while holding down the A key to power the motor.
Press on CYCLE while holding down the A key to run the program.
If RUN does not turn green, press the RUN/HOLD key while holding down the A key.

Proceed to the next section when the following message is displayed in the Console tab of Mech-Vision Log panel:
Entering the calibration process, please start the calibration in Mech-Vision
Complete Calibration in Mech-Vision
In Mech-Vision, click Camera Calibration (Standard) on the toolbar, or select from the menu bar.
Follow the instructions in Mech-Vision to complete the configuration.
If the camera is mounted in the eye-to-hand mode, please refer to Complete Automatic Calibration in the Eye to Hand Scenario.
If the camera is mounted in the eye-in-hand mode, please refer to Complete Automatic Calibration in the Eye in Hand Scenario.
Note
If the robot does not reach the next calibration point within 60 seconds, Mech-Vision will report a timeout error and stop the calibration process. In such cases, please select calibration in the program directory and run this program again, and restart the calibration process in Mech-Vision.