Hardware Connection
The hardware of the Mech-Mind Vision System that need to be connected include:
Camera:
Connect the camera and IPC with the Ethernet cable.
Power the camera with the DIN rail power supply.
IPC:
Connect the IPC and the camera with the Ethernet cable.
Power the IPC with the power adapter.
Connect the IPC and the monitor (use your own) with the HDMI cable.
Robot Controller:
Connect the robot controller and the IPC with the Ethernet cable.
Power the robot controller with the power adapter.

Attention
Please connect the power cables last.
The camera, IPC, and robot controller are connected through Ethernet cables. When there are not enough Ethernet ports on the IPC, use a Gigabit Ethernet network switch for connection.
Since the Ethernet cables look basically the same, it is recommended to label these cables for differentiation.
Connect the Camera
Attention
For Eye in Hand, please pay attention to the cable arrangement of the camera. If the last joint of the robot moves in a wide range and overstretches the robot dresspack or camera cables, you can limit the motion range of the last joint in the software, provided that it does not affect the normal operation of the robot.
Camera connection consists of two parts:
Connect the camera and IPC with the Ethernet cable.
Power the camera with the DIN rail power supply.

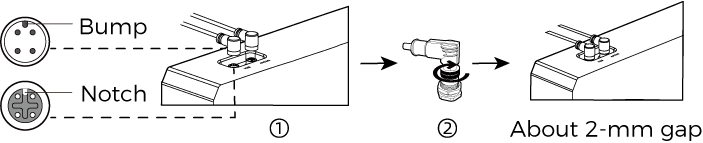
Connect the DC Power Cable
Insert the DC power cable connector into the DC 24V port, as shown below.
Make sure the bump on the connector is aligned with the notch of the port.
Tighten the nut after inserting the cable.
Hint
The recommended tightening torque is 16 N·m.
Connect the Ethernet Cable
Insert the M12 connector of the Ethernet cable into the ETH port, as shown above.
Make sure the bump on the M12 connector is aligned with the notch of the ETH port.
Tighten the nut after inserting the cable.
Hint
The recommended tightening torque is 16 N·m.
Connect the DIN Rail Power Supply
When wiring the DIN rail power supply, wires of the power cable must be inserted to the corresponding input/output connectors, as shown below.
The AC power cable has three wires: PE, N, and L. Insert them into the corresponding 220 V input connector (
, N, L) respectively.
Connect the DC power cable:
Connect the +V wire to the +V connectors of the 24 V output connectors.
Connect the -V wire to the -V connectors of the 24 V output connectors.
Connect the PE wire to the 220 V input connector

Warning
The PE wires must be properly grounded!
Please install the DIN rail power supply inside a control cabinet. Make sure that the DIN rail or control cabinet is reliably grounded.
If using multiple DIN rail power supplies, ensure enough distance in between.
Connect the IPC
Connect the IPC:
Connect the IPC and the monitor (use your own) with the HDMI cable.
Connect the IPC and the camera with the Ethernet cable.
Power the IPC with the power adapter.
Insert the license dongle.
Connect the HDMI Cable
Insert one end of the HDMI cable into the HDMI port on the back of the monitor, the other end into the HDMI port of the IPC, as shown below.

Connect Other Devices
Insert the power cable into the power port of the IPC, and insert the license dongle into the USB port, as shown below.

Hint
You can insert the Ethernet cable into the IPC Ethernet port when you set the IP address of the IPC.
It is recommended to label the cables so that you can easily distinguish the devices to which the cables are connected.
Connect the Robot IPC Controller
Prepare an RJ45-to-RJ45 Ethernet cable and insert one end of the cable into the Ethernet port of the robot controller. Then, connect the controller to the power supply. Please refer to the robot’s manual for more details.
