YASKAWA Example Program
The example program provided in this section can be used to perform a simple pick-and-place task.
The program contains two parts: the first part obtains a vision result from Mech-Vision; the second part obtains a planned path from Mech-Viz.
Check the section corresponding to your own application setup:
Before running the program, please make sure that:
You have loaded the Standard Interface program onto the robot and can establish communcation with Mech-Center.
You have completed the extrinsic parameter calibration with the calibration program or by manually adding calibration points.
Mech-Vision and Mech-Viz projects are created and set to autoload.
The Project list in is synced by clicking on
 , and the order of Mech-Vision projects have been adjusted according to actual needs.
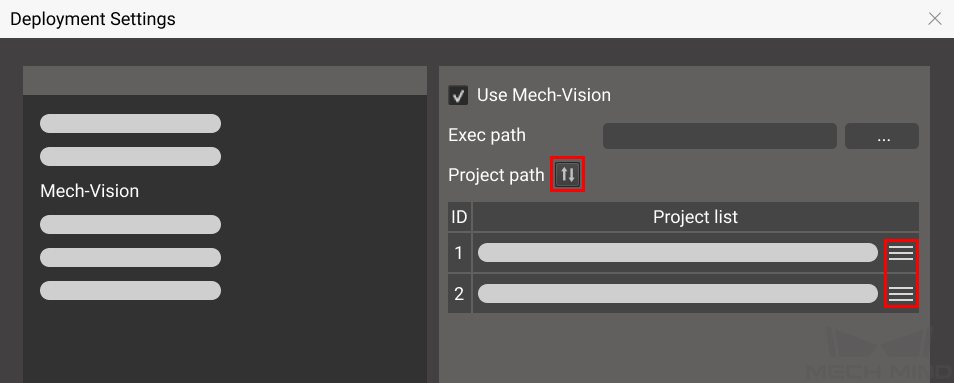
The TCP has been correctly specified.
The robot speed is set to a low value, so that the operator can notice any unexpected behavior before accidents occur.
Obtain Vision Result from Mech-Vision
NOP
'*****************************
'FUNCTION:simple pick and place
'with Mech-Vision
'mechmind, 2022-5-27
'*****************************
'clear I50 to I69
CLEAR I050 20
'Initialize p variables
CNVRT PX070 PX070 RF
CNVRT PX071 PX071 RF TL#(1)
SUB P070 P070
SUB P071 P071
'set  200mm to Z
SETE P070 (3) 200000
'move to the home position
MOVJ C00000 VJ=80.00
'move to the camera position
MOVJ C00001 VJ=80.00 PL=0
'set ip address of IPC
CALL JOB:MM_INIT_SOCKET ARGF"192.168.170.22;50000;1"
TIMER T=0.20
CALL JOB:MM_OPEN_SOCKET
'set vision recipe
CALL JOB:MM_SET_MODEL ARGF"1;1"
TIMER T=0.20
'Run vision project
CALL JOB:MM_START_VIS ARGF"1;2;2"
TIMER T=1.00
'get result from Vis
CALL JOB:MM_GET_VISDATA ARGF"1;50;51;52"
TIMER T=0.20
PAUSE IF I052<>1100
'set the first pos to P071;
'set lables to I61;
'set speed to I62;
CALL JOB:MM_GET_POSE ARGF"1;71;61;62"
PAUSE IF I061<>1
SFTON P070
MOVJ P071 VJ=50.00
SFTOF
MOVL P071 V=80.0 PL=0
'enable girpper
DOUT OT#(1) ON
SFTON P070
MOVJ P071 VJ=50.00
SFTOF
MOVJ C00002 VJ=80.00
'drop point
MOVJ C00003 VJ=80.00 PL=0
'release gripper
DOUT OT#(1) OFF
CALL JOB:MM_CLOSE_SOCKET
END
Program Logic
Move the robot to home position.
Move the robot to the image-capturing point.
Initialize communication with MM_INIT_SOCKET.
Start TCP/IP connection with MM_OPEN_SOCKET.
If parameter recipes are used in the Mech-Vision project, the recipe to be used is set with MM_SET_MODEL.
Run the Mech-Vision project with MM_START_VIS.
Wait for 1 second. Under eye-in-hand, this TIMER instruction is required to make sure the robot stays still until image acquisition is completed. Under eye-to-hand, this TIMER instruction can be replaced with MOVJ or MOVL.
Obtain the vision result from Mech-Vision with MM_GET_VISDATA and MM_GET_POSE.
Check if the returned status code indicates any error. If an error code is returned, the program is paused.
Store the obtained vision result to P071 with MM_GET_POSE.
Move the robot to a waypoint above the picking waypoint.
Move the robot to the picking waypoint and perform picking.
Move the robot to the same waypoint.
Move the robot to another waypoint between the picking waypoint and the placing waypoint.
Move the robot to the set placing waypoint and perform placing.
Return the robot to home position.
End TCP/IP connection with MM_CLOSE_SOCKET.
The following parts should be modified according to your actual needs.
Define Home Position
Teach home position to C00000.
Define the TCP
Change TL#(1) to the tool number to which the actual TCP is saved.
Note
Do not use TOOL 0 as it is used for calibration in MM_AUTO_CALIB.
Teach the Image-Capturing Point
Record the image-capturing point in C00001.
Define Z-Offset from Picking Waypoint
Z-offset indicates the distance relative to the tool frame from the picking waypoint. It is used to ensure that collision doesn’t occur when the robot is approaching or departing the picking waypoint.
Adjust the following commands according to your actual needs.
SETE P070 (3) 200000: the Z-offset when approaching the picking waypoint is set to 200 mm. Robot will move to 200 mm above P071, which is the picking waypoint.
Teach the Waypoint(s)
Waypoints are intermediate poses between the picking waypoint and placing pose. They are used to ensure that the robot doesn’t collide with the surrounding when moving between the picking and placing waypoints.
Record the waypoints to C00002. You can add more waypoints if needed.
Teach the Placing Waypoint
Record the placing pose in C00003.
Add Object Grasping and Releasing Logics
Modify DOUT OT#(1) ON to the actual logic for controlling the tool action when picking the object.
Modify DOUT OT#(1) OFF to the actual logic for controlling the tool action when placing the object.
Obtain Planned Path from Mech-Viz
'*****************************
'FUNCTION:simple pick and place
'with Mech-Viz
'mechmind, 2022-5-27
'*****************************
'clear I50 to I69
CLEAR I050 20
'Initialize p variables
CNVRT PX070 PX070 RF
CNVRT PX071 PX071 RF TL#(1)
SUB P070 P070
SUB P071 P071
'set  200mm to Z
SETE P070 (3) 200000
'move to the home position
MOVJ C00004 VJ=80.00
'move to the camera position
MOVJ C00005 VJ=80.00 PL=0
'set ip address of IPC
CALL JOB:MM_INIT_SOCKET ARGF"192.168.170.22;50000;1"
TIMER T=0.20
CALL JOB:MM_OPEN_SOCKET
'set vision recipe
CALL JOB:MM_SET_MODEL ARGF"1;1"
TIMER T=0.20
'Run Viz project
CALL JOB:MM_START_VIZ ARGF"1"
TIMER T=0.20
CALL JOB:MM_SET_BRANCH ARGF"1;1"
'get result from Viz
TIMER T=1.00
CALL JOB:MM_GET_VIZDATA ARGF"2;50;51;52;53"
TIMER T=0.20
PAUSE IF I053<>2100
'set the first pos to P071;
'set lables to I61;
'set speed to I62;
CALL JOB:MM_GET_POSE ARGF"1;71;61;62"
PAUSE IF I061<>1
SFTON P070
MOVJ P071 VJ=50.00
SFTOF
MOVL P071 V=80.0 PL=0
'enable girpper
DOUT OT#(1) ON
SFTON P070
MOVJ P071 VJ=50.00
SFTOF
MOVJ C00006 VJ=80.00
'drop point
MOVJ C00007 VJ=80.00 PL=0
'release gripper
DOUT OT#(1) OFF
CALL JOB:MM_CLOSE_SOCKET
END
Program Logic
Move the robot to home position.
Move the robot to the image-capturing point.
Initialize communication with MM_INIT_SOCKET.
Start TCP/IP connection with MM_OPEN_SOCKET.
If parameter recipes are used in the Mech-Vision project, the recipe to be used is set with MM_SET_MODEL.
Run the Mech-Viz project with MM_START_VIZ.
Select the branch along which the Mech-Viz project should proceed.
Obtain the planned path from Mech-Viz with MM_GET_VIZDATA.
Check if the returned status code indicates any error. If an error code is returned, the program is paused.
Store the obtained target in the planned path to P071 with MM_GET_POSE.
Move the robot to a waypoint above the picking waypoint.
Move the robot to the picking waypoint and perform picking.
Move the robot to the same waypoint.
Move the robot to another waypoint between the picking waypoint and the placing waypoint.
Move the robot to the set placing waypoint and perform placing.
Return the robot to home position.
End TCP/IP connection with MM_CLOSE_SOCKET.
The following parts should be modified according to your actual needs.
Define Home Position
Teach home position to C00004.
Define the TCP
Change TL#(1) to the tool number to which the actual TCP is saved.
Note
Do not use TOOL 0 as it is used for calibration in MM_AUTO_CALIB.
Teach the Image-Capturing Point
Record the image-capturing point in C00005.
Define Z-Offset from Picking Waypoint
Z-offset refers to the distance relative to the tool frame from the picking waypoint. It is used to ensure that collision does not occur when the robot is approaching or departing the picking waypoint.
Adjust the following commands according to your actual needs.
SETE P070 (3) 200000: the Z-offset when approaching the picking waypoint is set to 200 mm. Robot will move to 200 mm above P071, which is the picking waypoint.
Teach the Waypoint(s)
Waypoints are intermediate points between the picking waypoint and placing waypoint. They are used to ensure that the robot does not collide with the surrounding when moving between the picking and placing waypoints.
Record the waypoint to C00006. You can add more waypoints if needed.
Teach the Placing Waypoint
Record the placing pose in C00007.
Add Object Grasping and Releasing Logics
Modify DOUT OT#(1) ON to the actual logic for controlling the tool action when picking the object.
Modify DOUT OT#(1) OFF to the actual logic for controlling the tool action when placing the object.